Quick instructions (the short version)
- Coffee: 1 heaping tablespoon of coarse-ground coffee per cup of water (about 240 ml / 8 oz). Up to 2 tablespoons per cup if you like it strong.
- Grind: coarse, like sea salt or coarse breadcrumbs. Anything finer turns muddy and bitter.
- Brew time: 4 to 8 minutes once it starts perking. Start checking at 4. Stop sooner if it looks dark enough through the glass bubble.
- Heat: drop it to low the moment percolation begins. A rolling boil is not what you want.
- Most important step: remove the entire filter stem (not just the basket) the second brewing is done. This is where most percolator coffee goes wrong.
Electric or stovetop, the ratios and grind are the same. The full method is below.
Let’s start with something that might make coffee snobs cringe. Nearly any coffee expert will tell you that a percolator is about the worst possible way to make coffee. Because the water is heated to a boil in order to perk, it’s really too hot for the coffee. It gets over extracted, and you end up with the bitterness and acidity that made coffee a “grownups only” drink back in the day.
But here’s the thing the experts don’t want to admit – sometimes they’re wrong.
I used to be one of those people who turned their nose up at percolated coffee. Pour-over this, French press that, anything but that ancient contraption bubbling away on the stove. Then I spent a weekend at a friend’s cabin where the only coffee maker was his grandmother’s old stovetop percolator. I was prepared for the worst. Instead, I had some of the most satisfying coffee I’d had in months. Rich, full-bodied, and it just worked. Made me realize the problem isn’t the percolator – it’s how people use it.
That said, there are still people who prefer perked coffee to any other kind. Taste is, after all, a matter of taste. And let’s be honest – those enormous coffee urns are still the best way to make lots and lots of coffee for a crowd. Try making coffee for 40 people with your precious pour-over setup and see how that goes.
Why Percolators Get a Bad Rap (And Why It’s Not Always Fair)
The reputation problem comes from decades of people doing it wrong. Too fine a grind, too much heat, too long on the burner – and yeah, you’re going to get bitter, over-extracted swill. But that’s not the percolator’s fault any more than a burnt steak is the grill’s fault.
The science behind it is actually pretty straightforward. In a percolator, boiling water gets forced up through a hollow stem, sprays over the coffee grounds, then filters back down through the grounds and into the pot below. The cycle repeats until you turn off the heat. Done right, this creates a strong, full-bodied coffee. Done wrong, and you’re basically boiling your coffee grounds into submission.
Most people’s percolator horror stories come from leaving the thing on the stove too long, using coffee ground fine enough for espresso, or both. It’s like judging all grilled food based on hockey pucks someone left on the barbecue and forgot about.
The Parts You Need to Know
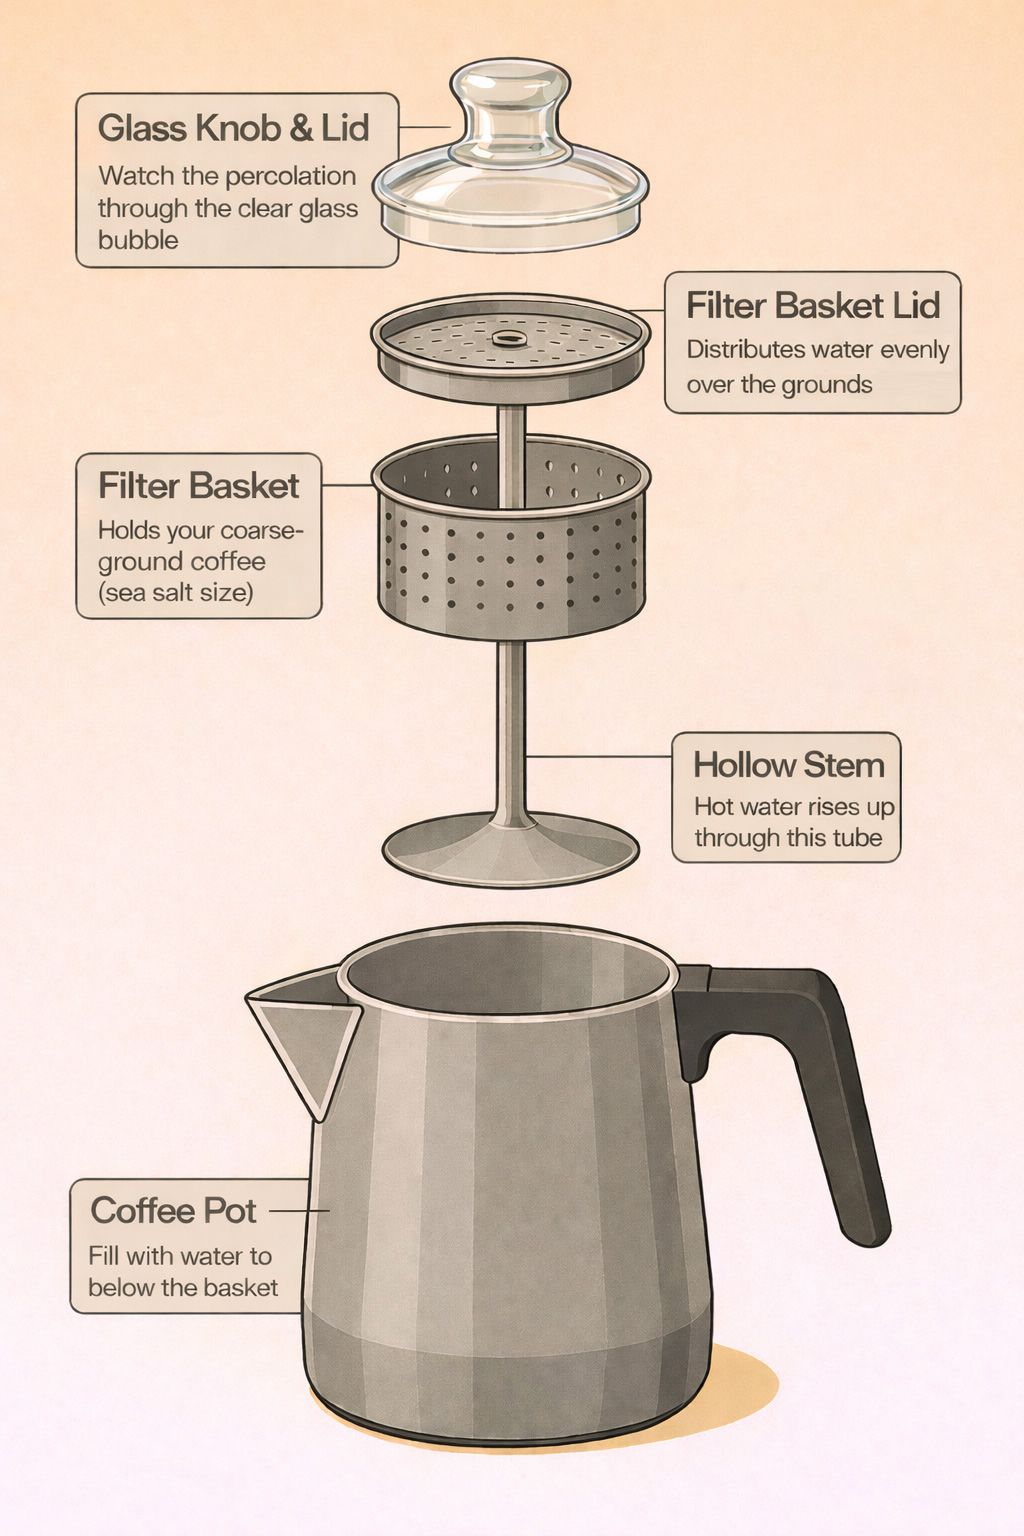
A coffee percolator has five main parts, and understanding each one helps you avoid the mistakes that give percolators their bad name.
There’s the percolator coffee pot itself, into which you put your water. There’s the stem, a hollow metal tube that fits into the bottom of the pot – in non-electric models, it has a flat round bottom that sits on the base. There’s the filter basket, which slides onto the tube and holds the ground coffee. There’s the filter basket cover, a round perforated lid that fits on top and makes sure the water showers the entire basket evenly. And finally, there’s the coffee pot lid, which often has a glass bubble in it.
That glass bubble just might be the most fun part of the entire contraption. It lets you watch the coffee splurting up from the tube and splashing inside before it spills back down onto the lid. Weirdly mesmerizing, like a little coffee fountain show happening right there on your stovetop.
Electric vs. Stovetop: Which Should You Choose?
Coffee percolators come in two distinct types – electric and stovetop. Each has its place, and honestly, both can make decent coffee despite their horrible reputation if you follow a few guidelines.
Electric percolators, including those coffee urns that can make up to forty cups at a time, are the set-it-and-forget-it option. They’re consistent, they shut off automatically, and they’re perfect for offices, church basements, and anywhere else you need to caffeinate a crowd without babysitting the process. The downside? You give up control over timing and temperature.
Stovetop percolators give you complete control, which is both a blessing and a curse. You can adjust the heat exactly how you want it, but you also have to pay attention or risk over-extraction. They’re great for camping since they don’t need electricity, and there’s something genuinely satisfying about the hands-on process. One of our readers pointed out they work differently at altitude too – at 5,300 feet, water boils at about 201 degrees, and percolators run roughly 10 degrees cooler than that, which actually makes the coffee come out better than at sea level. I thought that was fascinating.
What actually changes between the two (steps below stay the same otherwise)
- Heat: electric uses its own thermostat. Stovetop, you start at medium and drop to low the moment it perks.
- When it’s done: electric chimes or shifts indicator color. Stovetop, you watch the glass bubble and the clock.
- Pulling the basket: both still need the entire filter stem removed the second brewing finishes. Most electric models do not do this for you automatically.
- Capacity: stovetop models usually 4 to 12 cups. Electric urns scale up to 40 or 100 cups for events and offices.
For a deeper comparison and buying advice, see Electric vs Stovetop Percolators: Which Should You Buy?
How to Make Perfect Percolator Coffee
Here’s how to make percolator coffee that won’t make you question your life choices:
- Keep all parts of the percolator clean. This isn’t optional. Wash the entire thing with dishwashing liquid and hot water every single time you use it. Coffee oils go rancid faster than you’d think, and old residue will ruin even good coffee. Use a pipe cleaner for the inside of the stem. I learned this the hard way after wondering why my coffee tasted like the bottom of a week-old pot.
- Use freshly ground coffee – and make sure it’s coarse. This is where most people mess up. That pre-ground coffee from the grocery store? It’s ground for drip coffee makers and it’s too fine for percolators. You want a coarse grind, more like sea salt or coarse breadcrumbs. If you don’t have a grinder, look for coffee labeled as coarse grind, or ask your local coffee shop to grind it coarse for you. On a camping trip with no electricity? Carry your ground coffee in a vacuum container with a lid to keep the air out.
- Get your water level right. Disassemble the percolator and put the stem in place. Fill with water to below the line where the filter basket sits. Too much water and you’ll get weak coffee. Too little and it won’t perk properly.
- Don’t be stingy with the coffee. Put the filter basket on and add one heaping tablespoon of coffee for each cup of water. Some people go up to two tablespoons if they like it strong, but start with one and adjust from there. Put the basket lid in place.
- Start the heat. If you’re using an electric percolator, plug it in and turn it on – it’s on its own now. If you’re using a stovetop, put it over medium heat. Not high, not low – right in the middle.
- Watch for the magic moment. As soon as the first splurt of coffee hits that glass bubble, turn the heat down to low. This is crucial. You want just enough heat to keep percolation going, but not so much that you’re boiling your coffee. You’ll hear it change from rapid bubbling to a gentler, slower rhythm.
- Time it right. For most people, 4-8 minutes of perking is the sweet spot. Start checking at 4 minutes – the coffee coming up through the bubble should look like actual coffee, not weak tea. Don’t overthink it.
- Stop the process immediately. As soon as the pot stops perking or you decide it’s strong enough, pull it off the heat.
- Remove the filter stem – this is the step everyone skips. Carefully take off the lid and pull out the entire filter stem assembly, not just the basket. If you leave it in, steam from the coffee keeps condensing, dripping through the spent grounds, and making your coffee progressively more bitter. This is how perfectly good percolated coffee turns into undrinkable swill in about ten minutes.
- Let it rest, then enjoy. Give it about 30 seconds so any grounds that escaped can settle, then pour yourself a cup. You might be surprised by how good it actually is.
When Percolators Actually Shine
Despite what the coffee cognoscenti will tell you, there are situations where percolators are not just acceptable but actually the best choice.
Camping and outdoor adventures. Try bringing your French press on a camping trip and see how long it lasts. Percolators are practically indestructible, work on any heat source, and make coffee strong enough to get you moving after sleeping on the ground.
Large groups and events. Need coffee for 20, 30, or 50 people? A large electric percolator urn beats making pot after pot with any other method. They keep coffee warm for hours without that burnt taste you get from drip makers with hot plates.
The ritual of it. Sometimes the process matters as much as the product. There’s something deeply satisfying about the sound of a percolator bubbling away, the anticipation as you watch that glass bubble, the ritual of removing the basket at just the right moment. It connects you to decades of coffee drinkers who found comfort in exactly the same process.
Troubleshooting Common Percolator Problems
My coffee tastes bitter and terrible. Nine times out of ten, you’re using too fine a grind, perking too long, or both. Try a coarser grind and shorter brewing time. And make sure you’re removing that filter basket immediately when done.
My coffee is weak and watery. Not enough grounds, or the grind is too coarse and water’s flowing through too quickly. Try adding more coffee first, then adjust grind size if needed.
My percolator won’t start perking. Check that the stem is seated properly and the water level is right. It can take 5-10 minutes to get going, especially with electric models. Be patient.
The coffee is muddy and full of grounds. Your grind is definitely too fine. You want pieces about the size of coarse sea salt, not coffee dust.
Best Coffee Beans and Grinds for Percolators
Not all coffee works equally well in a percolator. Medium to dark roasts are your best bet because they’re less acidic and more forgiving of the longer extraction time. Brazilian, Sumatran, and other low-altitude coffees tend to be naturally lower in acid, which plays nicely with percolation.
French roast and Italian roast are particularly good choices. The roasting process has already broken down some of the compounds that turn bitter with extended brewing, and the bold flavors hold up well against the strong extraction.
For grind size – think coarse, then go a little coarser. If you’re grinding your own, aim for something that looks like coarse breadcrumbs or sea salt. Too fine and you get muddy, over-extracted coffee. Too coarse and the water flows through without pulling enough flavor.
The Bottom Line
I’m not going to pretend that percolated coffee is better than a well-executed pour-over or a properly pulled espresso shot. But it’s also not the coffee catastrophe that the experts make it out to be. Made properly – right grind, proper timing, remove the basket – percolator coffee is rich, full-bodied, and satisfying in ways my pour-over never quite manages.
The real problem isn’t the percolator. It’s people who don’t know how to use one. Master the technique, use good coffee ground to the right size, pay attention to timing, and you might find yourself reaching for the percolator more often than you’d ever admit in polite coffee company.
After all, our grandparents drank percolated coffee for decades. They weren’t wrong about everything.
Frequently Asked Questions About Percolator Coffee
Not if you do it right. The bad reputation comes from over-extraction – too fine a grind, perking too long, or forgetting to remove the filter basket after brewing. Follow proper technique and you might be genuinely surprised by how good it can be.
4-8 minutes depending on how strong you like it. Start checking at 4 minutes and taste-test. The coffee coming up through the glass bubble should look like actual coffee, not weak tea. Stop before it gets too dark or you’ll end up with bitter brew.
Coarse grind, like sea salt or coarse breadcrumbs. Fine grinds will give you muddy, bitter coffee that’s impossible to enjoy. If you’re buying pre-ground, look specifically for “coarse grind” or ask your coffee shop to grind it coarse for percolators.
Usually over-extraction from perking too long, grind that’s too fine, or water that’s too hot. Try shorter brew time, coarser grind, and lower heat once percolation starts. And make sure you’re removing the entire filter stem immediately when brewing is done – not just the basket.
Most store-bought ground coffee is too fine for percolators. It’s ground for drip coffee makers and will give you muddy, over-extracted results. Look for coffee specifically labeled as coarse grind, or better yet, grind your own beans.
Start with 1 heaping tablespoon per cup of water. If you like it stronger, go up to 2 tablespoons per cup – but don’t just brew longer to get more strength. That’s how you get bitterness. More grounds, not more time.
Yes, immediately. This is the step most people skip, and it makes all the difference. Remove the entire filter stem assembly, not just the basket. If you leave it in, steam keeps condensing and dripping through the spent grounds, turning your coffee bitter within minutes.
Electric is more convenient and consistent, plus it shuts off automatically. Stovetop gives you more control over heat and timing, and works great for camping. Both can make good coffee with proper technique. It really comes down to how hands-on you want to be.
Check that the stem is properly seated in the bottom of the pot and the water level is correct – it should be below where the filter basket sits. Be patient too. It can take 5-10 minutes for the water to heat up enough, especially with electric models.
Use fewer grounds rather than reducing brew time too much. If you cut brewing time too short, you’ll get weak, sour coffee instead. You can also dilute strong percolated coffee with hot water after brewing – think of it like making an Americano.
Wash all parts with hot soapy water after every use. Use a pipe cleaner or long thin brush for inside the stem – coffee oils build up in there and will make your next pot taste rancid. Once a month, run a cycle with white vinegar and water for a deep clean.
Let the water heat until it just starts to perk, then immediately drop the heat to low. You want hot enough to percolate but not a rolling boil. The percolation should be gentle and steady, not violent bubbling.
Use more coffee grounds rather than longer brew time. A darker roast also gives more intense flavor without extra bitterness. Some people swear by adding a tiny pinch of salt to cut bitter notes, though that’s definitely a personal preference thing.
Interestingly, many people with coffee-related heartburn actually find percolated coffee easier on their stomachs than drip. The longer brewing process and higher heat can break down some of the acids that cause problems. Dark roasted beans help even more with this.
Drop them in the comments below. With over 500 comments from fellow percolator users, our community has probably faced your exact issue before – and there’s always someone willing to share their hard-earned wisdom.
Discussion 582
In regards to making 42 cups of coffee, I do know that you don’t use the same measurements as you would to make 6 or 7 cups of coffe. The more water you use the ratio of coffee grounds changes. I don’t know the ratio is but I do know when I have worked at church bazaars the women there use less coffee as you use more water.
FWIW, Lehman’s, a company that sells all non-electric goods, has percolators and parts in their catalogue and online. As mentioned in previous comments, etsy, ebay, thrift stores, garage sales…all also good places to find a percolator.
I recently rediscovered perked coffee. I’ve been away from camping for a while and was gathering equipment and puchased a stailees steel percolator to use on the camp stove.
I tried a couple of practice runs at home since it’s been about three decades since I’ve used one. After buring the first pot I actually read the directions that came with it and as others have said here as soon as it starts to perk turn the heat down almost a low as it goes.
I go by color in the glass bubble and also smell. It will start to smell bitter if it perks too long. About five minutes does it.
I’m buying another percolator for everyday home use and one for work too. It’s so much better tasting than drip and harkens back to the “good old days.”
I just bought not one but TWO percolators from Etsy.com (they still have plenty of percs left) One stove top and one electric. I had a 4 cup Mr. Coffee maker which was a piece of crap and the carafe broke after less than a year (my fault for putting it in the dishwasher). I did some research and heard about the joys of percolated coffee. Plus, I like retro kitchen gadgets and decided to take a risk. I bought a West Bend 1950’s electric and a David Douglass glass percolaor, also 1950s. Has anyone used either of these brands? In the meantime, I can’t wait to try them out, especially with dark roast coffee!
We almost cried when the old 9cup ceramic tapped the a cast-iron side and popped a little hole right out! Shopping for a replacement, but that one was in the family and was delicious. :(
Making perc coffee is like taking out the little stick-shift sportscar from the shed for a drive! Maybe not the everyday plan, but certainly a welcome treat anytime.
Ivana; Does the coffee basket have a top, and if it does, are you remembering to use it? (Some percolators have baskets with tops and some don’t). Or–is it possible you’re overfilling it with grounds or putting too much water in? If a basket top is not the issue and you’re measuring water and coffee correctly, than maybe using 2 filters and too coarse of a grind may be keeping the water from filtering through and it’s overflowing over the top of the basket along with the grounds.
Does the manual to your coffee maker recommend that you use filters? If none of these seem to be a problem, I’d take the thing back to the store. It could be defective, or maybe it’s just a design flaw causing the problem, and a different brand percolator would work better.
I have a Cuisinart electric percolator and I’m having trouble with coffee grounds in my coffee. I’ve tried to use different coarse types of coffee, thinking the thicker would be better, but still a problem. I’ve also tried the recommended trick of removing the filter basket and the stem after it’s brewed. Even doubled up on my paper filters. Nothing is helping! How embarrassing when my guests after drinking to the last drop only to find the bottom of their cup full of grounds! Any suggestions?
You children of the current liberal/feel-good society are begining to learn what we conservatives have tried to teach, old methods are not always bad and most new ones are, due to no history of being better..Duh? or Duh! Look, when it comes to taste, and other things; Do not be afraid to test. But, then not be surprised if older methods prevail. Youth/new ideas, is often not the best result, and sometimes stupid/short-sighted. But, I just an old guy so, what I know! Duh? or Duh! Work it out!
my problem with my stove top perk is I have a hard time getting it consistent same days it tasts amazing others… well I switch to Chi Latte lol
but I think the problem is with my electric class top range, because when camping I put it on a butane burner and it turns out amazing every time
I just made my first pot of percolated coffee in anticipation of an upcoming camping trip. WoW! I am enjoying this first cup soooo… much. At least if nothing else works out on this trip I know the coffee will be good. I’m well pleased with my first attempt. Thanks for the tips, I had no idea how to make perk’d coffee when I got here.
Evaristus; Here’s a link to an ebay page that has a few different parts for Farberware(They also have lots of parts for Corningware pots too for anybody else looking)http://shop.ebay.com/?_from=R40&_trksid=p3907.m570.l1313&_nkw=percolator+parts&_sacat=See-All-Categories. If they don’t have what your looking for now, I’d check back frequently. I got a lid for a pot that I’d been looking for for a penny (plus 9.00 postage!). Also, if you have an old-fashioned hardware store in your neighborhood, sometimes they carry parts for percolators.
I just took my two teenage daughters on a camping/roadtrip vacation to Yellowstone NP. I had some camping gear from the old days but wanted to add some cooking pots so I bought a Coleman 8 piece enamel cooking set, which, of course, included a percolating coffee pot. (with a solid lid. no peeks of the perks.)I boiled it over a couple of times, mis-measured, poured it into my cup with the filter basket still in the pot, etc. AND I still found the taste better than the drip I have been doing all these years.
After reading some directions, (Thanks for all the tips!)I am enjoying a wonderful cup of coffee! This is the next best thing to Yellowstone. I can’t wait to go camping again.
Meanwhile I plan to keep practicing my perk at home.
I started drinking coffee about a year ago (tea drinker all my life) at church from a big percolator and loved it! Always before it seemed bitter. So, our power goes out a lot, and we don’t have a generator, but have a gas stove, so yesterday I dug out our old camping percolator & looked at this page for instructions. I made 4 cups and put it in the thermos afterward. WOW! It’s HOT! Imagine that! And tastes great!! Thanks, I love this page!!
I’m an old percolator man with two Farberware stainless steel coffee pots, a model 142B and model 134. Does anyone know where I can get parts for these old friends. Most web sites list my wanted parts as “no longer available”. They last forever and give a great cup of java.
drip is still the best. just get a good one
Mel, let me know how you like it. By the way, a few broken pieces of cinnamon stick tossed in with the coffee grounds, and/or a little grated nutmeg, makes a really good spiced coffee, and your kitchen will smell awesome.
wow, good to know about adding the cold water. i bet it has something to do with freezing the cooking process at its best state, instead of continuing to cook itself. they do this with veggies and call it ‘blanching’. i could be wrong, but this totally makes sense and i’m going to give it a try. this little logical steps are always the most illusive :)
Vanilawright:
If your pot is like one that I have, it’s a stove-top drip coffee maker. I have an old aluminum 2-cup size from the 40’s (which barely makes one modern-day mug). All you do is fill the middle part that has the strainer with coffee grouns up to whichever line that corresponds to the amount of coffee that you want to make, then set it on the bottom pot. You then put the upper water pot on top and fill that with hot water (I bring it jut to a boil) to the line, that corresponds to the amount of coffee grounds you put in. After the water drips through, you remove the two upper parts and replace with the lid. I guess it’s aluminum so that you can keep it on a warmer or reheat it on the stove. Althouth it’s a drip maker, it makes surprisingly good coffee–much better than like those electric drip coffee makers, and if you don’t have time to keep an eye on a stove-top percolator it’s a quick and easy way to get a decent cup of coffee. I especially like it when I have a friend over and one of us wants coffee and one wants tea. I just put a kettle of water on for both and make them at the same time.
Re: Recipe for “cowboy coffee”. I love perked coffee, but only break out the percolator if company comes by, just because I’m too lazy to clean it on a regular basis, so for every day, I use my stove-top pyrex teapot or a saucepan and follow a recipe I found on my lamp (which is made out of very old coffee cans stacked up and topped with a 50’s “Melmack” coffee cup and saucer). The old Hills Bros.’s can that has the picture of the guy with the white beard, drinking a cup of coffee, and wearing a turban and a dress on it says to mix 1 level tablespoon of coffee per cup of cold water in cooking vessel.
Stir and cook over med. heat just to the boiling point and then immediately remove from heat and add a small amount of cold water (don’t know what that’s for but the coffee comes out fantastic so it must serve some purpose…)stir again, and then let sit for 5 minutes to let the grounds settle. I find that the grounds stay on the bottom of the pot for the most part, and if you pour slowly, you won’t get them in your cup–at least until you get toward the bottom of the pot. You can use a tea strainer if a few stray ones bother you.
This really does make an excellent cup of coffee, and takes no more than 6 or 7 minutes for 6 cups.
When using decaf coffee do I need to decrease the amount of coffee or is it the same as regular?
JavaJunkie and Mel; Mel, the real question is can one place a whole in a hole or , maybe its the reverse. 2~10 cups via a 14 cup pot. Do the math then test. JavaJunkie, now that we have you squared away back to the land of real/good coffee allow me to suggest people use 2% powdered milk in place of artificial cream or even liguid cream/milk. The 2% I use adds flavor, low fat and not cool down my coffee plus not sour. I keep mine in my cow creamer w/spoon next to Sweet & Low (saccharin) bowl, which eliminates the unnecessary sugar.
Hello All…We have coffee with NO GRINDS…WOO HOO!!!! I just got rid of the paper filter…and it worked. We love the taste of the perk soo much that we also went back to plain half & half with raw sugar…We were using soo much of the flavored cream to kill the horrid taste of the drip…AAhhhh it’s great to have a wonderful cup o” joe in the a.m. again!!! Thanks everyone for your help!
Does size matter? Can you make a small batch in a 14-cup percolator? I’m on board if the same pot can work for 2 people or 10.
Well I am not sure if this will help someone with weak coffee in a percolater short of using beans from a wild cat that has well you know…but anywho…My faberware pot was brewing some weak a&% coffee and I came to this site to find an answer and I sorta did…Some of the comments pointed me in the direction and I investigated the stem of my pot…And I found that my spring had sprung and a weak spring does not push down on the stem properly (by the basket or whatever the proper term is ) which in turn does not allow the proper flow of hot water thru the tube down onto the basket. So I bought some springs from the local hardware put the spring on the stem and brewed me a cup of joe. And viola…holy smokes that is the answer…I have a pot full of deep dark rich coffe…So if you are having weak coffee trouble in your pot check out the spring.
Vanilawright, I’ve seen what you describe but not sure how it works. Why not simply half-fill bottom part w/water, attach the other parts leaving off the lid so as to view what happens then, apply heat. Let us know what you discover.
Is anyone familiar with an aluminum (non-perked) stovetop maker? When we emptied my grandmother’s house I wanted it but was too young to notice how she made the coffee. (I only remember her standing over the stove!) It has 4 parts: upper and lower water vessels, the middle ground (ar ar) part, and a lid. Anyone know how to use it? We’re going camping next weekend and I want to try it out.
Thanks David…I don’t see any plugged holes in the basket, but they are small…maybe I should try a pot without the paper disk filter. I’ll let you know if this makes a difference…Thanks again!
JavaJunkie68 & others..Allow me to suggest that grounds on the basket lid/over-flowing sounds like a case of your basket plugged/water not draining fast enough causing water and grounds to over-flow. Check the draining of basket. Holes may not be clear due to manufacturing defect but can easily be corrected via an ice pick, etc.. Holes of my old GE perc basket are .5mm, a little smaller than the wire of a small paper clip. Also, only time I might find grounds in my cup is when I drain the last cup, due to wet grounds sink..
thanks michael we have done this as well…still grinds! i have been using a super fine stainer cause no matter what we have grinds…BLECK
hello…yes it does have a top to it & today when i took the lid off to remove the filter basket before i poured the top was covered in grinds…hummmm not sure whats going on!
Hey JavaJunkie68. I now remove the filter and grounds before I pour. One time I didn’t, and I ended up with grounds in my coffee. Does your filter have a top to it?
oops ment pour
hey vicki, we actually need a new grinder so when we got this new pot i bought beans & ground @ the store on the perc setting…it seems that the grinds are all over the lid of the coffee basket & i am even using a filter. i did 10 cups water to 11 tablespoons water today & still grinds all over…also do u remove the basket before you poor? i did the other day & there were grinds all over..ugh i was soo excited to get this perk & so far just have weak grindy coffee :(
Javajunkie… in order not to get grinds you must wait a few minutes before pouring the coffee. This allows the basket to empty of retained liquid. This will minimize the amount of grounds which spill over the edge of the basket when pouring.
Javajunkie68: are you using the right grind for percolators? It takes a much coarser ground of coffee than the drips. I have found that most pre-ground coffees are finely ground for drip coffeemakers. So I buy bagged whole beans and use the grinder in the store after selecting perc. I’m thinking about buying a coffee grinder so I can grind just enough for a pot of coffee at a time.
I just “BOILED” a pot of Chock full o Nuts coffee in my 5 cup percolator. I dont care what anybody says about boiling and perking etc. This is the best, most mellow, delicious way to brew coffee in the universe!!!!!!!
Handy Coffee Measure: I have stove-top percolators from 5 cups to 30 cups, Mostly used for camping. Using regular ground coffee, and a full load of water, just pour the ground coffee into the basket. The even level of coffee should reach the first knuckle on your index finger. This works no matter what size of pot.
My personal preference is to perk the coffee for seven minutes.
Hello All,
We just purchased a Presto elec perc after our 5th drip in 10 yrs died…We had them all cheap, expensive, grinding & not grinding and finally decided to go back to good old perc. My problem is i get grinds not matter what in our coffee. I tried both the disks & the wrap style. I am only using a tablespoon for 5 oz of coffee so i am not sure what is going on. And any suggestions for a good strong cup? thanks!
After checking out the Technivorm Moccamaster CDT on Amazon.com my gadget addiction is rearing it’s ugly head. So syd, is the brew basket plastic or metal? Does it have a timer? Couldn’t really tell from the description.
You are distracting with the plastics, I agree consumers need to be more aware of plastics.
Espresso people are in their own world.
I’ve tried coffee on seven of the nine continents and everyone agrees I’m a drip.
I don’t mention my machine, because too many will put me in the coffee snob box, and because Dutch is a silly language.
I stand by all my remarks re: oxidation and coffee and encourage all to consider the implications.
The Keurig is expensive to buy, as are the boxes of coffee. But it’s very convenient for a quick cup, and fun with company when you have the variety. My Dad often uses it just for a quick cup of hot water for tea, but you can get hot water without buying an $80-125 machine and taking up all the counter space. I don’t know if it’s the variety or the novelty people enjoy more, myself included. They offer tea and hot chocolate as well, but the hot chocolates come out very thin and require you to run a clean water cycle through afterward.
Got a 3-cup farberware superfast automatic as a garage sale leftover (free). I was skeptical, but my wife thought it more sensible than buying one of those Keurig machines. We bought a tub of Folgers to try it out. Smooth, but somewhat simple coffee resulted– not much body? I like dark roasts, black. Perhaps I should leave it to sit longer after it finishes perking, or make my tablespoons even MORE heaping?
Anyway, great thread. I love that you can find anything on the Internet… I googled “How to make coffee in a percolator?” to get here. We have a new baby, too, so have been googling a lot of questions. And last night: “does sesame oil go bad?”
Any percolator lovers care to comment on Keurig coffee? I’m a fan, particularly with a great coffee (Green Mountain Coffee’s “Dark Magic” is fantatic).
RE: sydferret
Sandra m. has it right on (#301). What is steam but water that has exceeded the boiling point? The other half of the brewing equation is not only how hot coffee extracts but for HOW LONG. It’s the ratio of temperature to time that makes the difference when all other factors are equal (fresh ground beans, etc.). You can’t just single out one factor and assume that “makes” or “breaks” flavor. It’s the balance that counts. Espresso brews well because the extraction time is brief even though the temp/pressure is higher than other methods. There’s more than one valid way to make coffee, and to each his/her own regardless.
In yet another comment you write “It’s the 21st century, nobody should be boiling coffee.”
My response is, ‘Yeah, it’s the 21st Century and a lot of us are waking up to the fact that plastic doesn’t taste good and it’s not good for you (and it’s COLD). If you want to research something, go look up the prostate/breast cancer/diabetes risk associated with BPA and Phthalates in plastic. Hot water and plastic are a bad, bad combination (not to mention more parts to clog up and break). It should occur to you at some point that there are worse possibilities than “boiling” even if we assume that all electric percs boil. The same people who want organic coffee free of pesticides are probably going to appreciate using an all-stainless brewing method. It’s not ONLY a question of taste. Beyond that, however, it is not a guarantee that all electric percs boil. I decided not to merely “research” but to buy an electric perc and test it for myself and I found that it hit the IDEAL extraction temperature and NOT boiling (see comment #298). So now you have two good reasons to revisit your “research” (aka parroted coffee brewing wisdom 50,000x removed from any actual personal experience with a MODERN perc).
Bottom line here is that there’s a page on this site for press pots and a page for drip brewers and the like. Like Vicki Lea says (#298), you really ought to participate in a section of this site you appreciate. You’re entitled to your own opinion — and so are the people here who want to talk about a brewing method they appreciate.
Live and let live.
Thanks for making me smile. :-) “He was kinda funny lookin’.”
Sandra, You should be concerned about what type of plastics are used, absolutely.
“You don’t get that TruCoat, you get oxidation.”
– Jerry Lundegaard
http://findarticles.com/p/articles/mi_m0876/is_n50/ai_7650849/
I think this is what sydferret was talking about. So what if you put a filter in the perked coffee? Also, what effect does the plastic in modern drip pots have on us?
Sounds like Eric hasn’t had his morning cup of joe yet… (Comment #1, way back in 2008!)
Just found an old percolator at an estate sale. Trying it now!!
Why not just tell us? We know ya’ wanna. ;)
I suggest you research what boiling does to coffee.