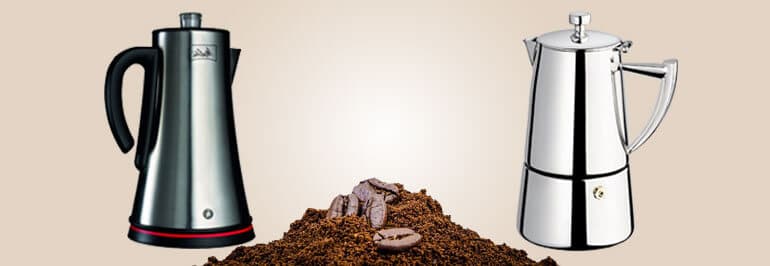
Quick instructions (the short version)
- Coffee: 1 heaping tablespoon of coarse-ground coffee per cup of water (about 240 ml / 8 oz). Up to 2 tablespoons per cup if you like it strong.
- Grind: coarse, like sea salt or coarse breadcrumbs. Anything finer turns muddy and bitter.
- Brew time: 4 to 8 minutes once it starts perking. Start checking at 4. Stop sooner if it looks dark enough through the glass bubble.
- Heat: drop it to low the moment percolation begins. A rolling boil is not what you want.
- Most important step: remove the entire filter stem (not just the basket) the second brewing is done. This is where most percolator coffee goes wrong.
Electric or stovetop, the ratios and grind are the same. The full method is below.
Let’s start with something that might make coffee snobs cringe. Nearly any coffee expert will tell you that a percolator is about the worst possible way to make coffee. Because the water is heated to a boil in order to perk, it’s really too hot for the coffee. It gets over extracted, and you end up with the bitterness and acidity that made coffee a “grownups only” drink back in the day.
But here’s the thing the experts don’t want to admit – sometimes they’re wrong.
I used to be one of those people who turned their nose up at percolated coffee. Pour-over this, French press that, anything but that ancient contraption bubbling away on the stove. Then I spent a weekend at a friend’s cabin where the only coffee maker was his grandmother’s old stovetop percolator. I was prepared for the worst. Instead, I had some of the most satisfying coffee I’d had in months. Rich, full-bodied, and it just worked. Made me realize the problem isn’t the percolator – it’s how people use it.
That said, there are still people who prefer perked coffee to any other kind. Taste is, after all, a matter of taste. And let’s be honest – those enormous coffee urns are still the best way to make lots and lots of coffee for a crowd. Try making coffee for 40 people with your precious pour-over setup and see how that goes.
Why Percolators Get a Bad Rap (And Why It’s Not Always Fair)
The reputation problem comes from decades of people doing it wrong. Too fine a grind, too much heat, too long on the burner – and yeah, you’re going to get bitter, over-extracted swill. But that’s not the percolator’s fault any more than a burnt steak is the grill’s fault.
The science behind it is actually pretty straightforward. In a percolator, boiling water gets forced up through a hollow stem, sprays over the coffee grounds, then filters back down through the grounds and into the pot below. The cycle repeats until you turn off the heat. Done right, this creates a strong, full-bodied coffee. Done wrong, and you’re basically boiling your coffee grounds into submission.
Most people’s percolator horror stories come from leaving the thing on the stove too long, using coffee ground fine enough for espresso, or both. It’s like judging all grilled food based on hockey pucks someone left on the barbecue and forgot about.
The Parts You Need to Know
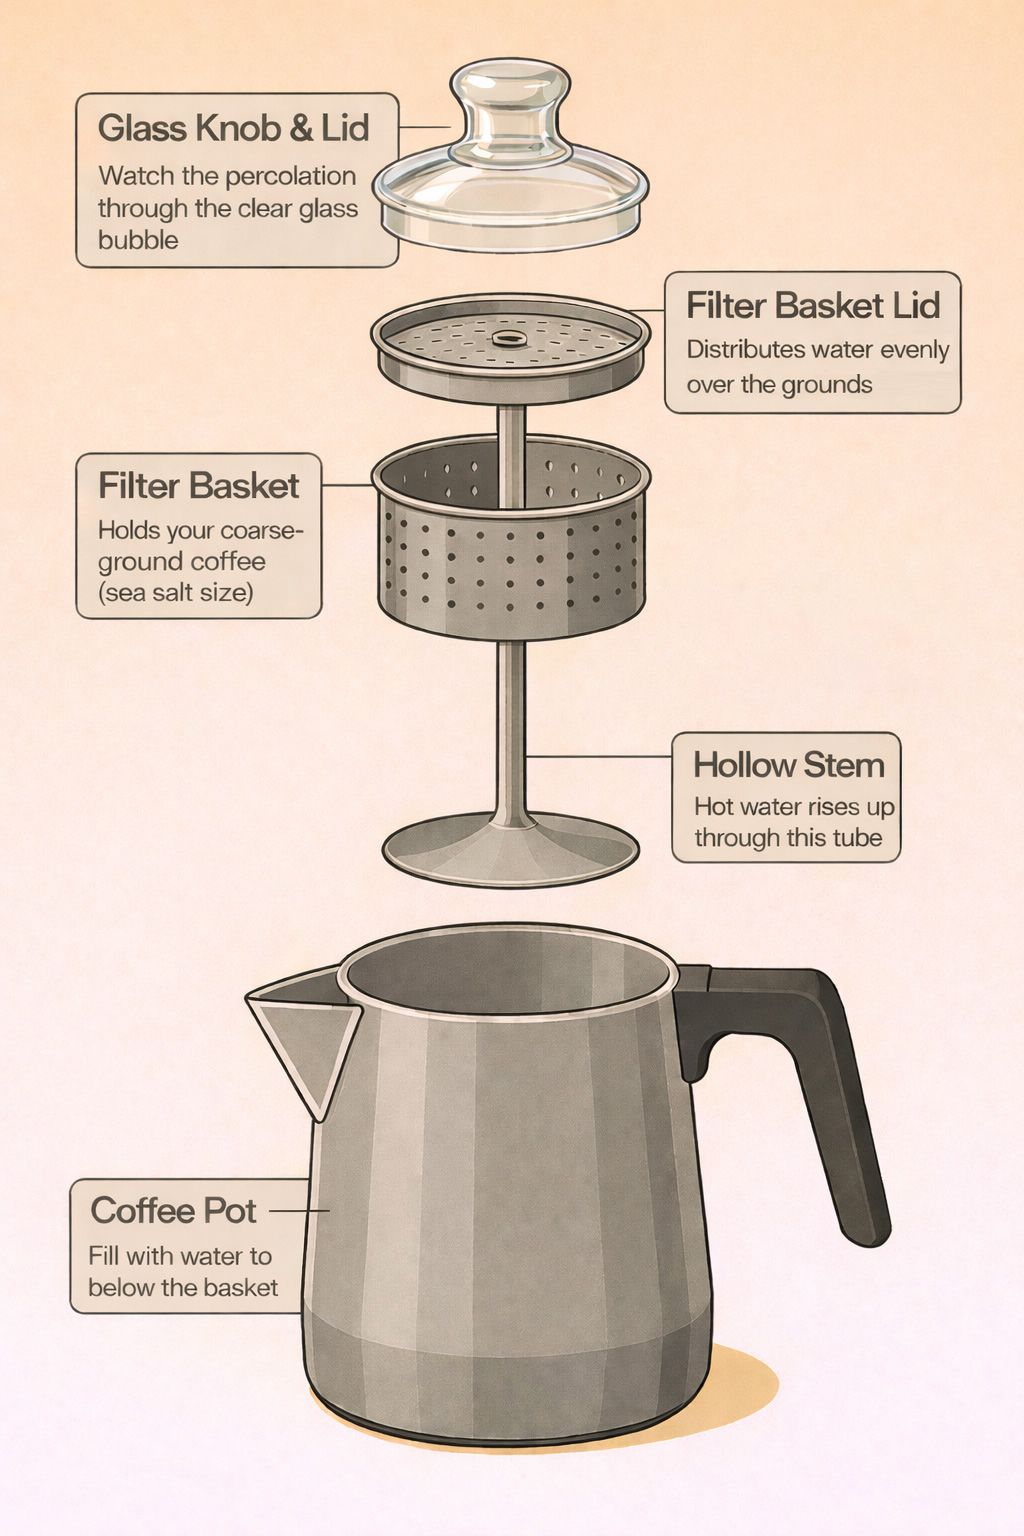
A coffee percolator has five main parts, and understanding each one helps you avoid the mistakes that give percolators their bad name.
There’s the percolator coffee pot itself, into which you put your water. There’s the stem, a hollow metal tube that fits into the bottom of the pot – in non-electric models, it has a flat round bottom that sits on the base. There’s the filter basket, which slides onto the tube and holds the ground coffee. There’s the filter basket cover, a round perforated lid that fits on top and makes sure the water showers the entire basket evenly. And finally, there’s the coffee pot lid, which often has a glass bubble in it.
That glass bubble just might be the most fun part of the entire contraption. It lets you watch the coffee splurting up from the tube and splashing inside before it spills back down onto the lid. Weirdly mesmerizing, like a little coffee fountain show happening right there on your stovetop.
Electric vs. Stovetop: Which Should You Choose?
Coffee percolators come in two distinct types – electric and stovetop. Each has its place, and honestly, both can make decent coffee despite their horrible reputation if you follow a few guidelines.
Electric percolators, including those coffee urns that can make up to forty cups at a time, are the set-it-and-forget-it option. They’re consistent, they shut off automatically, and they’re perfect for offices, church basements, and anywhere else you need to caffeinate a crowd without babysitting the process. The downside? You give up control over timing and temperature.
Stovetop percolators give you complete control, which is both a blessing and a curse. You can adjust the heat exactly how you want it, but you also have to pay attention or risk over-extraction. They’re great for camping since they don’t need electricity, and there’s something genuinely satisfying about the hands-on process. One of our readers pointed out they work differently at altitude too – at 5,300 feet, water boils at about 201 degrees, and percolators run roughly 10 degrees cooler than that, which actually makes the coffee come out better than at sea level. I thought that was fascinating.
What actually changes between the two (steps below stay the same otherwise)
- Heat: electric uses its own thermostat. Stovetop, you start at medium and drop to low the moment it perks.
- When it’s done: electric chimes or shifts indicator color. Stovetop, you watch the glass bubble and the clock.
- Pulling the basket: both still need the entire filter stem removed the second brewing finishes. Most electric models do not do this for you automatically.
- Capacity: stovetop models usually 4 to 12 cups. Electric urns scale up to 40 or 100 cups for events and offices.
For a deeper comparison and buying advice, see Electric vs Stovetop Percolators: Which Should You Buy?
How to Make Perfect Percolator Coffee
Here’s how to make percolator coffee that won’t make you question your life choices:
- Keep all parts of the percolator clean. This isn’t optional. Wash the entire thing with dishwashing liquid and hot water every single time you use it. Coffee oils go rancid faster than you’d think, and old residue will ruin even good coffee. Use a pipe cleaner for the inside of the stem. I learned this the hard way after wondering why my coffee tasted like the bottom of a week-old pot.
- Use freshly ground coffee – and make sure it’s coarse. This is where most people mess up. That pre-ground coffee from the grocery store? It’s ground for drip coffee makers and it’s too fine for percolators. You want a coarse grind, more like sea salt or coarse breadcrumbs. If you don’t have a grinder, look for coffee labeled as coarse grind, or ask your local coffee shop to grind it coarse for you. On a camping trip with no electricity? Carry your ground coffee in a vacuum container with a lid to keep the air out.
- Get your water level right. Disassemble the percolator and put the stem in place. Fill with water to below the line where the filter basket sits. Too much water and you’ll get weak coffee. Too little and it won’t perk properly.
- Don’t be stingy with the coffee. Put the filter basket on and add one heaping tablespoon of coffee for each cup of water. Some people go up to two tablespoons if they like it strong, but start with one and adjust from there. Put the basket lid in place.
- Start the heat. If you’re using an electric percolator, plug it in and turn it on – it’s on its own now. If you’re using a stovetop, put it over medium heat. Not high, not low – right in the middle.
- Watch for the magic moment. As soon as the first splurt of coffee hits that glass bubble, turn the heat down to low. This is crucial. You want just enough heat to keep percolation going, but not so much that you’re boiling your coffee. You’ll hear it change from rapid bubbling to a gentler, slower rhythm.
- Time it right. For most people, 4-8 minutes of perking is the sweet spot. Start checking at 4 minutes – the coffee coming up through the bubble should look like actual coffee, not weak tea. Don’t overthink it.
- Stop the process immediately. As soon as the pot stops perking or you decide it’s strong enough, pull it off the heat.
- Remove the filter stem – this is the step everyone skips. Carefully take off the lid and pull out the entire filter stem assembly, not just the basket. If you leave it in, steam from the coffee keeps condensing, dripping through the spent grounds, and making your coffee progressively more bitter. This is how perfectly good percolated coffee turns into undrinkable swill in about ten minutes.
- Let it rest, then enjoy. Give it about 30 seconds so any grounds that escaped can settle, then pour yourself a cup. You might be surprised by how good it actually is.
When Percolators Actually Shine
Despite what the coffee cognoscenti will tell you, there are situations where percolators are not just acceptable but actually the best choice.
Camping and outdoor adventures. Try bringing your French press on a camping trip and see how long it lasts. Percolators are practically indestructible, work on any heat source, and make coffee strong enough to get you moving after sleeping on the ground.
Large groups and events. Need coffee for 20, 30, or 50 people? A large electric percolator urn beats making pot after pot with any other method. They keep coffee warm for hours without that burnt taste you get from drip makers with hot plates.
The ritual of it. Sometimes the process matters as much as the product. There’s something deeply satisfying about the sound of a percolator bubbling away, the anticipation as you watch that glass bubble, the ritual of removing the basket at just the right moment. It connects you to decades of coffee drinkers who found comfort in exactly the same process.
Troubleshooting Common Percolator Problems
My coffee tastes bitter and terrible. Nine times out of ten, you’re using too fine a grind, perking too long, or both. Try a coarser grind and shorter brewing time. And make sure you’re removing that filter basket immediately when done.
My coffee is weak and watery. Not enough grounds, or the grind is too coarse and water’s flowing through too quickly. Try adding more coffee first, then adjust grind size if needed.
My percolator won’t start perking. Check that the stem is seated properly and the water level is right. It can take 5-10 minutes to get going, especially with electric models. Be patient.
The coffee is muddy and full of grounds. Your grind is definitely too fine. You want pieces about the size of coarse sea salt, not coffee dust.
Best Coffee Beans and Grinds for Percolators
Not all coffee works equally well in a percolator. Medium to dark roasts are your best bet because they’re less acidic and more forgiving of the longer extraction time. Brazilian, Sumatran, and other low-altitude coffees tend to be naturally lower in acid, which plays nicely with percolation.
French roast and Italian roast are particularly good choices. The roasting process has already broken down some of the compounds that turn bitter with extended brewing, and the bold flavors hold up well against the strong extraction.
For grind size – think coarse, then go a little coarser. If you’re grinding your own, aim for something that looks like coarse breadcrumbs or sea salt. Too fine and you get muddy, over-extracted coffee. Too coarse and the water flows through without pulling enough flavor.
The Bottom Line
I’m not going to pretend that percolated coffee is better than a well-executed pour-over or a properly pulled espresso shot. But it’s also not the coffee catastrophe that the experts make it out to be. Made properly – right grind, proper timing, remove the basket – percolator coffee is rich, full-bodied, and satisfying in ways my pour-over never quite manages.
The real problem isn’t the percolator. It’s people who don’t know how to use one. Master the technique, use good coffee ground to the right size, pay attention to timing, and you might find yourself reaching for the percolator more often than you’d ever admit in polite coffee company.
After all, our grandparents drank percolated coffee for decades. They weren’t wrong about everything.
Frequently Asked Questions About Percolator Coffee
Not if you do it right. The bad reputation comes from over-extraction – too fine a grind, perking too long, or forgetting to remove the filter basket after brewing. Follow proper technique and you might be genuinely surprised by how good it can be.
4-8 minutes depending on how strong you like it. Start checking at 4 minutes and taste-test. The coffee coming up through the glass bubble should look like actual coffee, not weak tea. Stop before it gets too dark or you’ll end up with bitter brew.
Coarse grind, like sea salt or coarse breadcrumbs. Fine grinds will give you muddy, bitter coffee that’s impossible to enjoy. If you’re buying pre-ground, look specifically for “coarse grind” or ask your coffee shop to grind it coarse for percolators.
Usually over-extraction from perking too long, grind that’s too fine, or water that’s too hot. Try shorter brew time, coarser grind, and lower heat once percolation starts. And make sure you’re removing the entire filter stem immediately when brewing is done – not just the basket.
Most store-bought ground coffee is too fine for percolators. It’s ground for drip coffee makers and will give you muddy, over-extracted results. Look for coffee specifically labeled as coarse grind, or better yet, grind your own beans.
Start with 1 heaping tablespoon per cup of water. If you like it stronger, go up to 2 tablespoons per cup – but don’t just brew longer to get more strength. That’s how you get bitterness. More grounds, not more time.
Yes, immediately. This is the step most people skip, and it makes all the difference. Remove the entire filter stem assembly, not just the basket. If you leave it in, steam keeps condensing and dripping through the spent grounds, turning your coffee bitter within minutes.
Electric is more convenient and consistent, plus it shuts off automatically. Stovetop gives you more control over heat and timing, and works great for camping. Both can make good coffee with proper technique. It really comes down to how hands-on you want to be.
Check that the stem is properly seated in the bottom of the pot and the water level is correct – it should be below where the filter basket sits. Be patient too. It can take 5-10 minutes for the water to heat up enough, especially with electric models.
Use fewer grounds rather than reducing brew time too much. If you cut brewing time too short, you’ll get weak, sour coffee instead. You can also dilute strong percolated coffee with hot water after brewing – think of it like making an Americano.
Wash all parts with hot soapy water after every use. Use a pipe cleaner or long thin brush for inside the stem – coffee oils build up in there and will make your next pot taste rancid. Once a month, run a cycle with white vinegar and water for a deep clean.
Let the water heat until it just starts to perk, then immediately drop the heat to low. You want hot enough to percolate but not a rolling boil. The percolation should be gentle and steady, not violent bubbling.
Use more coffee grounds rather than longer brew time. A darker roast also gives more intense flavor without extra bitterness. Some people swear by adding a tiny pinch of salt to cut bitter notes, though that’s definitely a personal preference thing.
Interestingly, many people with coffee-related heartburn actually find percolated coffee easier on their stomachs than drip. The longer brewing process and higher heat can break down some of the acids that cause problems. Dark roasted beans help even more with this.
Drop them in the comments below. With over 500 comments from fellow percolator users, our community has probably faced your exact issue before – and there’s always someone willing to share their hard-earned wisdom.
Discussion 582
Stove top percolators work below boiling. If the water is at a rolling boil it will just boil away without perking. Hence after the water gets hot and you get that first perk you lower it just a tad. Much easier to do with gas than an electric stove top.
When using a percolator on a stove, don’t perk for more than 7 min and it’s best to use coarsely ground fresh beans. After 7 min turn the heat off and allow the pot to rest for about 30 seconds so any grounds that escaped the basket can settle. With coarsely ground fresh beans you could perk it to 10 min if you like it really strong but you run the risk of it jumping the shark to bitter.
You can add ground cinnamon to the grounds in the basket before perking if you like a little flavor with your coffee.
Mary’s got the touch. You certainly can over perk coffee. (Using Revere 8 cup) When the “rolling boil” starts you’ll see rapid bursts of water against the sight glass. This can flood the spreader and basket, displace the grains and pull out too much bitter oil.
If you lower the heat setting gradually the bursts will turn into a gentle bubbly pumping that seems to have no gaps. This evenly rinses the flavor and aroma off the surface of the coffee grains without excessive heat, agitation or flooding. Lots of science in there but most people get nervous watching steam explosions and seem to prefer a relaxing gentle bubbly flow for about 5 minutes.
A big name manufacturer tightly calibrates their commercial machines to get to that boil/pump point. Once you get the hang of balancing the temperature you can adjust brew time, grind and water ratio. to satisfy your personal taste, 40 years of experimenting at 3000 ft elevation, I found 2 ounces of coarse ground medium roast bean to 50 ounces of cold spring or filtered water with a filter in the basket slow perked at 7 minutes works. Enjoy making it as much as drinking it kind of like a little gift you give yourself and your guests….
I think it’s a common misconception that percolators boil the water, which isn’t to say that they won’t if you’re not careful with the heat. Instead, it’s the roiling near-boiling water that gets forced up the stem, just like in a drip coffee maker. Except in a percolator, you are using coffee to brew stronger coffee. Mmmmm. Anyways, had my GSI 6-cup for five years now and it’s always a treat when I have time to use this over my French press.
Hi! I grew up on perked coffee from the clear pyrex coffee pots…lol yes that old. My Keurig broke and I am back to perking my coffee. Yes coffee just is not the same. I remember my mom opening up a can of coffee and the aroma made you swoon. Not so anymore. But sorry went off on a tangent. Beside the fact that the new Faberware pots stink try using a filter. I will not make a pot of coffee without a filter.
hi angela…have you tried shopping ebay for a pyrex pot? i got one years ago at a thrift store or garage sale, but ebay is what we have for right now.. or maybe craigslist…
good luck!
Perc coffee till the aroma hits your nostrils, perc 2 or 3 min to taste, take off stove, let sit 30 min
enjoy. Happy Easter
Everything I have read says perk 7-8 min and take off heat. Let stand for 5 min. so water in basket will drip down. If you perk it too long like 10 min you will end up with bitter coffee. The amount of coffee (2 tbsp for 1C water) mentioned in the article was surprising. Strength of coffee is subjective so if you like dark strong coffee either use more coffee or buy dark roast like French. I am using Columbian and was told 1 tbsp/1C water and it is not very strong as far as I’m concerned. Revere Ware makes great pots/pans/percolators and are sorely lacking in their instructions.
I have a stovetop perculator and it doesn’t make sense to start heating On low and then turn the Heat down after it starts to perk. Also does it stop perking all by it’s self. That doesn’t make sense. Am I just reading it wrong?
I was taught to let it percolate for 10 minutes. Whoever wrote the article missed that part. The stovetop percolator does not stop on it’s own.
Can anyone help me figure out why my percolator (farberware 10 cup electric) wont make coffee on the first round of perks? It comes out like water! It takes two full perks (which can take up to 1/2 hour) before I get a dark cup. I love perked coffee because of the flavor. Everything is super clean and the perking is strong. Ive norrowed it down to the ground coffee itself. I think that its too fine and gets clogged in the little vents at the bottom of the filter where the water takes forever to drip out. Does anyone else have this problem? Happens to all my perculators. Is there a special ground that I’m supposed to use? ty and help! I love my perked coffee!
Use coarse ground coffee Maryanne.
Fill the bottom chamber of the percolator with hot water. If you have not already, remove the top chamber and filter basket. Heat some water, then pour it into the bottom chamber of the percolator. Keep filling until the water level is just below the steam valve.
Water boils at 201 degrees at the altitude of my current town (5300 feet). Percolators run about 10 degrees cooler here and I think it makes the coffee come out even better than when they operate at sea level.
Let me guess, you are explaining the difference between the altitude in the mountains of Colorado and the low levels of No. Little Rock, Arkansas??? I too am often faced with similar situations while cooking recipes given to me by Old Timers from Colorado! I haven’t come up with a easy way to break the math down yet? If you have, please help!!!!!!
It’s really a great coffee maker!!
Can one over fill the coffee basket. Thought you had to leave a space from lid to coffee to circulate better. Not to compact to tight
I am curious about all the mentions – in this article, the comments, other articles, and other articles’ comments – about keeping the coffee pot parts absolutely clean. I have always found that when using aluminum or stainless steel, the metal imparts a metallic flavor into the coffee. If you only rinsed the parts, and not scrubbed, scoured, brushed, or used soaps and chemicals, then, a film of coffee is left.
This is akin to rinsing a cast iron skillet after use, rather than cleaning it – albeit for different purposes. I suppose the outcomes are the same: a film of coffee fills the microscopic pores of the metal and thus reduces the surface area of metal to coffee, thereby imparting less metallic taste. Then again, my wife and I drink different favors of coffee.
I like mine plain and regular, she likes french vanilla. FV gives me headaches, so either we have to wash the pots thoroughly after she’s done with her coffee, or we use separate pots. We’ve taken to use separate pots, and only rinse them after each use.
Both our pots – and everyone we’ve ever used over the years – are dark brown with coffee residue. It is instantly noticeable when a well-intentioned guest scours our pots. Has anyone noticed the same?
Gene – how did you go through thirty of the coffee percolators? I’m on my second. The clear plastic bit broke off the lid on my first one!
Corning Wear white ceramic coffee percolators are (in my opinion) the very best way to make coffee. There has been a lot of discussion about the hazard or danger due to the metal top band (which the handle attaches to) coming loose and causing an hot coffee burning accident. Seems the metal band is bonded to the ceramic body of the pot with an epoxy compound that can possibly come loose over time.
Well, maybe, but I have over 30 of these pots, both stovetop and electric and I have not a single one that even appears to want to come loose. Now I’m not stupid, I handle these pots carefully, and gently, and they make the greatest coffee imaginable, but there is skill in using a percolator, regardless of brand. Here are my tips: Start with a squeaky clean percolator.
The fantastic feature of the Corning Wear pots is that EVERYTHING except the cord on the electric models can be put through the dishwasher, yes, even the electric heating unit that sits inside is water tight and can be dishwasher cleaned. If you get an old nasty pot, you can clean it up fairly easily. I use liquid Cascade dishwasher soap, squirt it in pot, and swish it around with a foam brush on a handle and let it sit, and it will dissolve eventually all the discoloration.
I do the same with the metal percolator parts and heater. Then I run them through a dishwasher cycle to further clean them. Anyway, a clean pot, of any style is very important.
Now for stovetop percolator, you want to start with fresh cool water, freshly ground coffee, and you don’t need to use a paper filter whatsoever. After you put in the water, and the coffee grounds in the basket. Set the percolator on the stove and turn on medium-high heat, and wait, generally about 10 minutes for the percolation to start, and you have to watch this carefully because the INSTANT it starts perking you need to reduce the heat to the minimum your stove will adjust to.
You want it to just simmer and perk slowly. I generally perk for about 6-7 minutes then remove from stove, it will continue perking for a bout a minute as it cools down. I use my iPhone to time the preperk, and the perk times, as I have worked out how long it takes for my situation for the water to reach perking temperature.
OK, you have perked and removed the pot from the stove and it has stopped perking. WAIT, this is not yet the time to start pouring. There is still water in the basket, and you want to let this drain back down into the pot.
I generally remove the lid and the basket lid so I can observe the water level in the basket, and I wait until the water has completely drained down so I can see the grounds, I then use a paper towel to grab the whole basket and stem assembly and remove it from the pot and sit it in the sink, I then stir the coffee with a wooden spoon, and pour. After I fill my giant mug, I decant the remaining coffee in a glass lined thermos bottle, and immediately rinse out the pot, to keep it snowy white on the inside. If you let the water fully drain out of the basket after perking you will get very few grounds in your coffee, very few.
It is attempting to pour a cup of coffee from the percolator while the basket is still full of water that causes grounds to come out of the basket into your cup when you pour. Let the basket drain and remove it before you pour and you just won’t get many grounds in your coffee. Thats all for now.
Drip-cappuccino machines-French press–Percolated coffee absolutely the best. I recently found flea market corning ware coffee maker—great coffee
when making a new pot with the 60 cup electric percolators, first cool the pot with ice water to reset the peculation process. also dont mix up perk stems from different models
p.s. to kendell clark—the g.e. percolator my parents had did NOT have a spring.
to kendell cklark–that smaller plastic basket that came w/ your immersible g.e. percolator is to be inserted into the meral one when you make smaller amounts of coffee. maybe 3-4 cups and less. my parents had one years ago. can’t find the pot, but still have the orange plastic basket, lol.
The person that wrote this article must be around 18 years old or very uneducated. As a 70 year old man who has used a Kuerig, Mr. Coffee coffee maker, a Sunbeam party pot, and a Sunbeam model AP percolator, as well as a Sunbeam stove top percolator I can tell you a percolator makes the best coffee if it has a brew strength adjustment. Also, you can make around 90 cups of coffee for around $4. With a Kuerig it will cost around $54 dollars. Elitists think if you pay more for something, it’s better. With the Kuerig or a coffee maker, water passes over the grounds just once and with a percolator it is done many times and you can control the strength of the brew.
hi all. Just bought a GE immersible 9 cup percolator on ebay. i’ve read through the comments so know how to use it. i just have two questions. The percolator did not come with a spring, but it did come with a filter basket and the basket cover.
It also came with a smaller basket that looks identical to the metal one, but made of plastic. Does anyone know what this is for? I’m also not sure if these GE immersible percs require a spring or not the last two I’vew bought didn’t come with them.
THe model number is a7p15 if this is any help. i’ve tried calling GE’s customer service, it’s a joke. Leads me to walmart and those people don’t seem to know much about the products they currently stock, let alont stuff that was made 30+ years ago, lol. Thanks for any help.
Hi
I am searching for a replacement glass top for my General Electric Automatic Perculator Cat No 16PG42F
I am from South Africa and cannot find one here anywhere.
Can you please be of assistance to where I will be able to get one?
Anywhere in the world
Thank you very much
Nola
I just found a great find, a late 1970’s possibly early 1980’s GE emerceable perc at good will for $2. It works fine, but upon opening the lid, I saw that the perc tube is lacking a spring and the filter basket does not have a basket cover. I tried to add the spring from my modern GE 12 cup perc, but while the spring fits, the lid, which is a plastic dome, won’t fit over the perc with it on. i’ve mad three pots of coffee and they’ve all come out extremely week, barely flavored water.
Have used community collumbian classic, folgers chocolate, and eight o’clock original. Is this perc supposed to have a spring and filter basket cover and if so where can i find replacements? I love this perc, it’s extremely quiet.
I also added my basket lid from my GE 12 cup, which should work, but because of the lack of a spring the basket falls far downt he tube until a nub stops it. Will the lack of a spring impact water flow? I think water not be showering evenly over the grounds.
Thanks for any help
w50…the key to stove-top percing is same as w/hard boiled eggs…timing begans Only when boiling/percing starts; and using simple kitchen timer I would start at 10 min percing and subsequently adjust accordingly…Quality/fine coffee, yes? It’s all about the simple things, that make us truely happy.
i found that on a stove-top glass percolator, brewing time on the percolator varies quite a lot, so i just base my decision on the color of the water to determine when to stop.
Well, it’s been a year since I’ve switched to a parcolator completely and the coffee has been excellent! I recently got a one cup drip machine for christmas and time after time the coffee comes out horrible no matter what coffee I use, lol. This site has been helpful and i love my GE percolator.
The best coffee I’ve had in years. My electric drip maker brode(another one). Got my old perculator out. I forgot how GOOD a cup it makes. For now I have no plans to replace the broken drip coffee maker.
Hello, I recently broke my brand-new laptop and I absolutely need it fixed asap. I’m a new comer to the Phoenix area and discovered this business nearby. I wanted to figure out if someone had observed them, the following is their info Computer Guru Consulting, 2942 N 24th St #114, Phoenix, AZ 85016, (602) 903-5666. Any help would be greatly appreciated, thanks!