Quick instructions (the short version)
- Coffee: 1 heaping tablespoon of coarse-ground coffee per cup of water (about 240 ml / 8 oz). Up to 2 tablespoons per cup if you like it strong.
- Grind: coarse, like sea salt or coarse breadcrumbs. Anything finer turns muddy and bitter.
- Brew time: 4 to 8 minutes once it starts perking. Start checking at 4. Stop sooner if it looks dark enough through the glass bubble.
- Heat: drop it to low the moment percolation begins. A rolling boil is not what you want.
- Most important step: remove the entire filter stem (not just the basket) the second brewing is done. This is where most percolator coffee goes wrong.
Electric or stovetop, the ratios and grind are the same. The full method is below.
Let’s start with something that might make coffee snobs cringe. Nearly any coffee expert will tell you that a percolator is about the worst possible way to make coffee. Because the water is heated to a boil in order to perk, it’s really too hot for the coffee. It gets over extracted, and you end up with the bitterness and acidity that made coffee a “grownups only” drink back in the day.
But here’s the thing the experts don’t want to admit – sometimes they’re wrong.
I used to be one of those people who turned their nose up at percolated coffee. Pour-over this, French press that, anything but that ancient contraption bubbling away on the stove. Then I spent a weekend at a friend’s cabin where the only coffee maker was his grandmother’s old stovetop percolator. I was prepared for the worst. Instead, I had some of the most satisfying coffee I’d had in months. Rich, full-bodied, and it just worked. Made me realize the problem isn’t the percolator – it’s how people use it.
That said, there are still people who prefer perked coffee to any other kind. Taste is, after all, a matter of taste. And let’s be honest – those enormous coffee urns are still the best way to make lots and lots of coffee for a crowd. Try making coffee for 40 people with your precious pour-over setup and see how that goes.
Why Percolators Get a Bad Rap (And Why It’s Not Always Fair)
The reputation problem comes from decades of people doing it wrong. Too fine a grind, too much heat, too long on the burner – and yeah, you’re going to get bitter, over-extracted swill. But that’s not the percolator’s fault any more than a burnt steak is the grill’s fault.
The science behind it is actually pretty straightforward. In a percolator, boiling water gets forced up through a hollow stem, sprays over the coffee grounds, then filters back down through the grounds and into the pot below. The cycle repeats until you turn off the heat. Done right, this creates a strong, full-bodied coffee. Done wrong, and you’re basically boiling your coffee grounds into submission.
Most people’s percolator horror stories come from leaving the thing on the stove too long, using coffee ground fine enough for espresso, or both. It’s like judging all grilled food based on hockey pucks someone left on the barbecue and forgot about.
The Parts You Need to Know
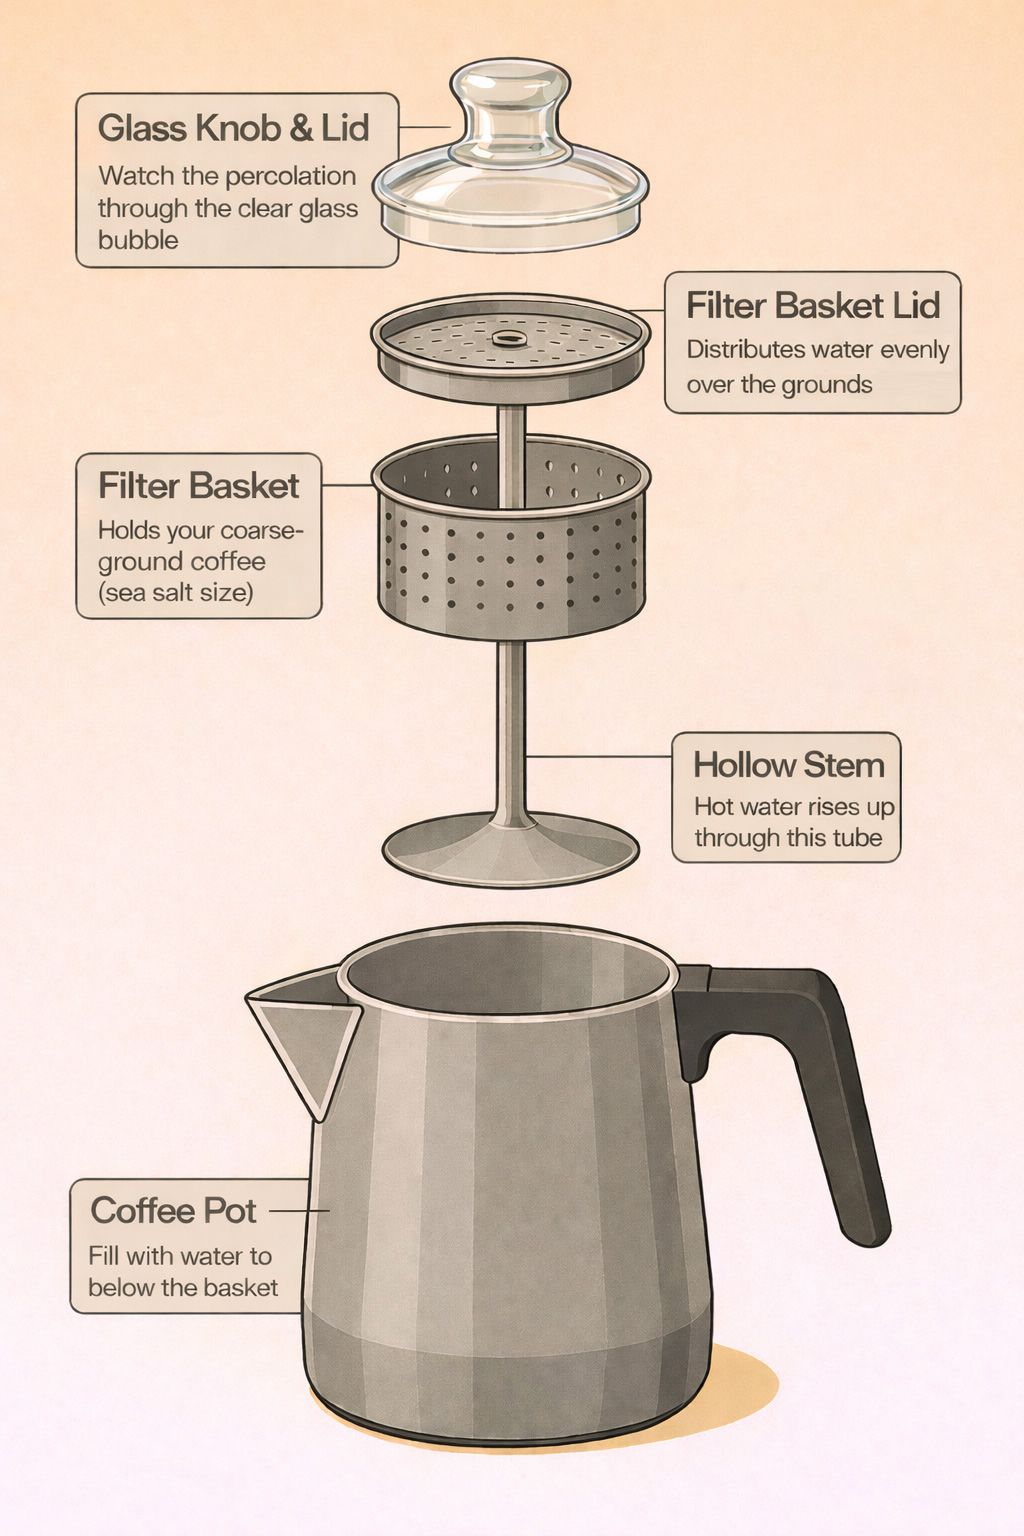
A coffee percolator has five main parts, and understanding each one helps you avoid the mistakes that give percolators their bad name.
There’s the percolator coffee pot itself, into which you put your water. There’s the stem, a hollow metal tube that fits into the bottom of the pot – in non-electric models, it has a flat round bottom that sits on the base. There’s the filter basket, which slides onto the tube and holds the ground coffee. There’s the filter basket cover, a round perforated lid that fits on top and makes sure the water showers the entire basket evenly. And finally, there’s the coffee pot lid, which often has a glass bubble in it.
That glass bubble just might be the most fun part of the entire contraption. It lets you watch the coffee splurting up from the tube and splashing inside before it spills back down onto the lid. Weirdly mesmerizing, like a little coffee fountain show happening right there on your stovetop.
Electric vs. Stovetop: Which Should You Choose?
Coffee percolators come in two distinct types – electric and stovetop. Each has its place, and honestly, both can make decent coffee despite their horrible reputation if you follow a few guidelines.
Electric percolators, including those coffee urns that can make up to forty cups at a time, are the set-it-and-forget-it option. They’re consistent, they shut off automatically, and they’re perfect for offices, church basements, and anywhere else you need to caffeinate a crowd without babysitting the process. The downside? You give up control over timing and temperature.
Stovetop percolators give you complete control, which is both a blessing and a curse. You can adjust the heat exactly how you want it, but you also have to pay attention or risk over-extraction. They’re great for camping since they don’t need electricity, and there’s something genuinely satisfying about the hands-on process. One of our readers pointed out they work differently at altitude too – at 5,300 feet, water boils at about 201 degrees, and percolators run roughly 10 degrees cooler than that, which actually makes the coffee come out better than at sea level. I thought that was fascinating.
What actually changes between the two (steps below stay the same otherwise)
- Heat: electric uses its own thermostat. Stovetop, you start at medium and drop to low the moment it perks.
- When it’s done: electric chimes or shifts indicator color. Stovetop, you watch the glass bubble and the clock.
- Pulling the basket: both still need the entire filter stem removed the second brewing finishes. Most electric models do not do this for you automatically.
- Capacity: stovetop models usually 4 to 12 cups. Electric urns scale up to 40 or 100 cups for events and offices.
For a deeper comparison and buying advice, see Electric vs Stovetop Percolators: Which Should You Buy?
How to Make Perfect Percolator Coffee
Here’s how to make percolator coffee that won’t make you question your life choices:
- Keep all parts of the percolator clean. This isn’t optional. Wash the entire thing with dishwashing liquid and hot water every single time you use it. Coffee oils go rancid faster than you’d think, and old residue will ruin even good coffee. Use a pipe cleaner for the inside of the stem. I learned this the hard way after wondering why my coffee tasted like the bottom of a week-old pot.
- Use freshly ground coffee – and make sure it’s coarse. This is where most people mess up. That pre-ground coffee from the grocery store? It’s ground for drip coffee makers and it’s too fine for percolators. You want a coarse grind, more like sea salt or coarse breadcrumbs. If you don’t have a grinder, look for coffee labeled as coarse grind, or ask your local coffee shop to grind it coarse for you. On a camping trip with no electricity? Carry your ground coffee in a vacuum container with a lid to keep the air out.
- Get your water level right. Disassemble the percolator and put the stem in place. Fill with water to below the line where the filter basket sits. Too much water and you’ll get weak coffee. Too little and it won’t perk properly.
- Don’t be stingy with the coffee. Put the filter basket on and add one heaping tablespoon of coffee for each cup of water. Some people go up to two tablespoons if they like it strong, but start with one and adjust from there. Put the basket lid in place.
- Start the heat. If you’re using an electric percolator, plug it in and turn it on – it’s on its own now. If you’re using a stovetop, put it over medium heat. Not high, not low – right in the middle.
- Watch for the magic moment. As soon as the first splurt of coffee hits that glass bubble, turn the heat down to low. This is crucial. You want just enough heat to keep percolation going, but not so much that you’re boiling your coffee. You’ll hear it change from rapid bubbling to a gentler, slower rhythm.
- Time it right. For most people, 4-8 minutes of perking is the sweet spot. Start checking at 4 minutes – the coffee coming up through the bubble should look like actual coffee, not weak tea. Don’t overthink it.
- Stop the process immediately. As soon as the pot stops perking or you decide it’s strong enough, pull it off the heat.
- Remove the filter stem – this is the step everyone skips. Carefully take off the lid and pull out the entire filter stem assembly, not just the basket. If you leave it in, steam from the coffee keeps condensing, dripping through the spent grounds, and making your coffee progressively more bitter. This is how perfectly good percolated coffee turns into undrinkable swill in about ten minutes.
- Let it rest, then enjoy. Give it about 30 seconds so any grounds that escaped can settle, then pour yourself a cup. You might be surprised by how good it actually is.
When Percolators Actually Shine
Despite what the coffee cognoscenti will tell you, there are situations where percolators are not just acceptable but actually the best choice.
Camping and outdoor adventures. Try bringing your French press on a camping trip and see how long it lasts. Percolators are practically indestructible, work on any heat source, and make coffee strong enough to get you moving after sleeping on the ground.
Large groups and events. Need coffee for 20, 30, or 50 people? A large electric percolator urn beats making pot after pot with any other method. They keep coffee warm for hours without that burnt taste you get from drip makers with hot plates.
The ritual of it. Sometimes the process matters as much as the product. There’s something deeply satisfying about the sound of a percolator bubbling away, the anticipation as you watch that glass bubble, the ritual of removing the basket at just the right moment. It connects you to decades of coffee drinkers who found comfort in exactly the same process.
Troubleshooting Common Percolator Problems
My coffee tastes bitter and terrible. Nine times out of ten, you’re using too fine a grind, perking too long, or both. Try a coarser grind and shorter brewing time. And make sure you’re removing that filter basket immediately when done.
My coffee is weak and watery. Not enough grounds, or the grind is too coarse and water’s flowing through too quickly. Try adding more coffee first, then adjust grind size if needed.
My percolator won’t start perking. Check that the stem is seated properly and the water level is right. It can take 5-10 minutes to get going, especially with electric models. Be patient.
The coffee is muddy and full of grounds. Your grind is definitely too fine. You want pieces about the size of coarse sea salt, not coffee dust.
Best Coffee Beans and Grinds for Percolators
Not all coffee works equally well in a percolator. Medium to dark roasts are your best bet because they’re less acidic and more forgiving of the longer extraction time. Brazilian, Sumatran, and other low-altitude coffees tend to be naturally lower in acid, which plays nicely with percolation.
French roast and Italian roast are particularly good choices. The roasting process has already broken down some of the compounds that turn bitter with extended brewing, and the bold flavors hold up well against the strong extraction.
For grind size – think coarse, then go a little coarser. If you’re grinding your own, aim for something that looks like coarse breadcrumbs or sea salt. Too fine and you get muddy, over-extracted coffee. Too coarse and the water flows through without pulling enough flavor.
The Bottom Line
I’m not going to pretend that percolated coffee is better than a well-executed pour-over or a properly pulled espresso shot. But it’s also not the coffee catastrophe that the experts make it out to be. Made properly – right grind, proper timing, remove the basket – percolator coffee is rich, full-bodied, and satisfying in ways my pour-over never quite manages.
The real problem isn’t the percolator. It’s people who don’t know how to use one. Master the technique, use good coffee ground to the right size, pay attention to timing, and you might find yourself reaching for the percolator more often than you’d ever admit in polite coffee company.
After all, our grandparents drank percolated coffee for decades. They weren’t wrong about everything.
Frequently Asked Questions About Percolator Coffee
Not if you do it right. The bad reputation comes from over-extraction – too fine a grind, perking too long, or forgetting to remove the filter basket after brewing. Follow proper technique and you might be genuinely surprised by how good it can be.
4-8 minutes depending on how strong you like it. Start checking at 4 minutes and taste-test. The coffee coming up through the glass bubble should look like actual coffee, not weak tea. Stop before it gets too dark or you’ll end up with bitter brew.
Coarse grind, like sea salt or coarse breadcrumbs. Fine grinds will give you muddy, bitter coffee that’s impossible to enjoy. If you’re buying pre-ground, look specifically for “coarse grind” or ask your coffee shop to grind it coarse for percolators.
Usually over-extraction from perking too long, grind that’s too fine, or water that’s too hot. Try shorter brew time, coarser grind, and lower heat once percolation starts. And make sure you’re removing the entire filter stem immediately when brewing is done – not just the basket.
Most store-bought ground coffee is too fine for percolators. It’s ground for drip coffee makers and will give you muddy, over-extracted results. Look for coffee specifically labeled as coarse grind, or better yet, grind your own beans.
Start with 1 heaping tablespoon per cup of water. If you like it stronger, go up to 2 tablespoons per cup – but don’t just brew longer to get more strength. That’s how you get bitterness. More grounds, not more time.
Yes, immediately. This is the step most people skip, and it makes all the difference. Remove the entire filter stem assembly, not just the basket. If you leave it in, steam keeps condensing and dripping through the spent grounds, turning your coffee bitter within minutes.
Electric is more convenient and consistent, plus it shuts off automatically. Stovetop gives you more control over heat and timing, and works great for camping. Both can make good coffee with proper technique. It really comes down to how hands-on you want to be.
Check that the stem is properly seated in the bottom of the pot and the water level is correct – it should be below where the filter basket sits. Be patient too. It can take 5-10 minutes for the water to heat up enough, especially with electric models.
Use fewer grounds rather than reducing brew time too much. If you cut brewing time too short, you’ll get weak, sour coffee instead. You can also dilute strong percolated coffee with hot water after brewing – think of it like making an Americano.
Wash all parts with hot soapy water after every use. Use a pipe cleaner or long thin brush for inside the stem – coffee oils build up in there and will make your next pot taste rancid. Once a month, run a cycle with white vinegar and water for a deep clean.
Let the water heat until it just starts to perk, then immediately drop the heat to low. You want hot enough to percolate but not a rolling boil. The percolation should be gentle and steady, not violent bubbling.
Use more coffee grounds rather than longer brew time. A darker roast also gives more intense flavor without extra bitterness. Some people swear by adding a tiny pinch of salt to cut bitter notes, though that’s definitely a personal preference thing.
Interestingly, many people with coffee-related heartburn actually find percolated coffee easier on their stomachs than drip. The longer brewing process and higher heat can break down some of the acids that cause problems. Dark roasted beans help even more with this.
Drop them in the comments below. With over 500 comments from fellow percolator users, our community has probably faced your exact issue before – and there’s always someone willing to share their hard-earned wisdom.
Discussion 582
Hello Patty. I personally don’t worry about the aluminum cookware. I have an aluminum drip pot that I use in the fall and spring.
There’s actually aluminum in antiperspirant and no one seems too concerned about that. Non stick coatings on pots and pans actually concern me more and have switched to mostly stainless cookware. If it’s anything, my grandmother used mostly aluminum cookware and her and my grandfather lived to be 100 and the other 87.
If you’re really worried, put a magnet onto the pot and if it sticks it should be stainless since steel is a ferrous metal, I believe. If it’s aluminum just enjoy the coffee and lessen your exposure to other things, i.e., food additives, bpa’s, pesticides ( switching to organic coffee). Life’s short, so I’m going to make some coffee right now.
Hoping someone can help me. I purchased a Farberware 134B 2-4 cup percolator at a flea market. I LOVED THE COFFEE!!!! So smooth! But then I was told it was aluminum. For health reasons – please tell me it is stainless. The coffee is delicious…
I picked up an old 12c Proctor Silex electric percolator today at a thrift store, and I’m sooo glad I found this page. I brewed a pot already, and I don’t think I let it go long enough.
Looks like I have some experimentation to do, and some comments to read.
The number of comments here is insane…but awesome. I look forward to reading all 447 of them.
Thanks for the very clear directions. I just inherited a percolator and had only a vague notion of how it worked. This article makes it perfectly understandable.
Hey, Jim, what you call Cowboy Coffee we call “Bush Coffee”. I’m on the Canadian prairies.
When I was a kid at home in the 1950s & ’60s we never even had a stovetop perc. You just threw your coffee in, added water, put it on the woodburning (or electric) stove and let ‘er rip. Voila, bush coffee! Named after roustabouts cutting wood in the bush, who made coffee this way over a fire.
But wait: nowadays we would have been seized by Child Protective Services, but us children were allowed to drink coffee!!!!! I loved my parents! Of course, maybe that is why we are all so short in my family. :)
Help trying to use a corningware 10 cup perculator all it get is caramel colored hot water, what am i doing wrong? has a lock down lid with some kind of long metal thing in the middle put the coffee holder on that lock it in put the glass lid and turn on the heat wont do any coffee at all.
Sometimes in the evening, I want a cup of coffee. I use a stovetop percolator for evening use and save my electric percolator for morning use. This way, I wouldn’t have to rush and wash the same percolator for morning use.
To keep the coffee warm in the stovetop percolator, I could use a thermo but it’s too much trouble for me to make the coffee transfer. I found a better solution, I made a coffee pot cozy :o). I want to show off my creation but not sure is I could post a photo here or not. This is my attempt…
http://img.photobucket.com/albums/v146/NTT_HOU/Misc/RevereWare6-cupCoffeePotCozy-Sm.jpg
Yeah, the Starbucks thing just blows my mind. But to each their own. The boyfriend likes the fancy drinks, double-cappuccino-Irish cream. While the local coffee shop had that the great and glorious Starbucks said, “What’s Irish cream flavor?” If I get coffee out it’s McD’s or Dunkin’ Donuts.
Worst coffee, only if you are not willing to learn a simple skill and willing to watch over it. Worst coffee? You mean Starbucks with their over baked beans, oily and bottom of pot burned taste.
First time I got a cup thought I got the leftovers from a pot sitting on the burner for two hours, when I found out that is the way it tasted I was shocked, over hyped follow the lead monkey product. I guess a French Press and an Italian Mokka coffee pot sucks, too. Very fond of a Mokka pot made of aluminum, not steel, that looks dirty, stained from use.
These pots are very much like seasoned cast iron pots. Nothing like keeping up urban legends so drip machines sell well. I believe the French did the same thing about wines produced outside their country, absinthe was killed off the same way.
Yes, paper filters have been mentioned many times but I can certainly understand about not reading all the posts. That’d may take a year or two ;o).
Some of the new percolators comes with a small package of those folding paper filters.
I noticed they cost more than just the regular round paper filters. I just punch a hole in the center of the regular 8-12 cup round unbleached paper filters to use on my percolators. This size seems to work on all of the percolators I’ve tested on.
You’re right Jack, it does make it much easier to clean and not having to worry about the thickness of the grounds.
I haven’t read through all the comments, but I haven’t seen anyone make mention of whether to use a paper filter when you perc. I found some in Krogers that, when opened up, looks basically like a handkerchief. A center hole to push down over the stem so you can then push it down and in to be able to put the grounds in.
Then there are 4 holes, one on each corner that gets folded over and pushed down over the stem, one at a time. Many find them a hassle, and some just don’t seem to mind sediment or a few specks of grounds in the bottom of their cups. I don’t mind it too much, but I’m only using them since I found them and bought them.
It’s easy clean up too. The pouch goes in the trash and there’s no rinsing grounds down the drain.
I know the instructions to perch are the first thing posted, but found a fun video (on how the Quaker Kitchen makes their coffee) some may enjoy:
http://www.youtube.com/watch?v=vkKHMiiErrk
I’ll try this out in the morning and report back
Thanks guys for all the great information provided .
LOL, that’s a good story Jim, I would settle for cowboy coffee too in a case like that.
Joanie, I found another website that sell Farberware heating element: http://www.marbeck.com/categories/COFFEE-and-TEA-PARTS/Percolator-Parts/
It looks like, there’s a bolt & nut at the center of the heating unit that you’d need to remove. Then, just pull the 2 ends of the heating element to remove it. Plug in the 2 ends of the new heating element and screw back the bolt/nut at the center. Hopefully, it is as easy as it looks.
I recently went to Honduras on a mission trip and our electricity was out so we had to abandon the large perk pot and found a pot we could use on the stove but had no guts (stem basket) so we made cowboy coffee, at least that’s what we called it. It was grounds in water simmered. We dripped some cold water over the top to settled, at least some of the grounds. Great coffee grown right on the farm we were at. downside not everyone liked the idea of needing a toothpick after every cup.
I have an all-glass Flameware percolator. The night before, I grind my beans and fill the basket. Then I fill my coffee pot with water and put it all together. It’s on my stove and ready to go when I get up.
If you don’t want to have your coffee grounds sitting out all night, then I suppose you could put the whole basket in the refrigerator. I would be leery of doing that because mine is glass, but I don’t think the temperature fluctuations of going from fridge to being put in the pot and heated would affect a metal stem and basket as much.
I wonder if you could set the coffee and beans out in the pot the night before and just turn on the stove in the morning to brew it? But if you’re like me every second counts getting ready for work-let alone minutes.
I’ll let everyone know about my repair efforts but probably won’t get around to it till fall.
Sandra, thanks for the info on Mr. Appliance. I’m going to keep as my own reference too. Good luck on your repair as well!
Joanie, I’m one of those that don’t have the time and energy to make coffee each morning. I normally make a pot, using a glass jar, I keep the leftover for the following morning. I just reheat it in the microwave. I find that coffee from a percolator still taste good the next day if you store it well in the fridge. You may want to give that a try if you find your morning time is limited.
If you still prefer fresh brew, another suggestion is to boil water the night before and keep in a water thermo. Some thermos will keep water hot all day long. Next morning, use the hot water to make your coffee. With hot water, the temperature to reach for perking would be faster. Keep in mind that this method only works with stovetop percolators. On electric ones, only cool water should be used.
Good luck to you too Joanie. Hope you’d be able to fix the Farberware.
Thank you for all those great links, Natalie. I did open up the bottom of the Farberware and not sure if I have the gumption to attempt a repair myself. Not a handyperson, but I will keep the pot and maybe I will try. In the meantime, yes, I have been looking at ebay for more vintage electric percs.
Thanks to Sandra too! And good luck in your repair attempts – let us know how it goes.
On another note – I received my stovetop pot yesterday and I just love it!! Drank a whole potful yesterday when I got it – couldn’t waste that deliciousness – and then was up all night ;-) I love that there are no plastic parts at all on this thing – and wow, the aroma! Only drawback is I’m not sure I’ll have the time in the morning to prepare a pot this way when I go back to work in a week (I work for a school so had the summer off.) The quality of the brew might force me to adjust my morning schedule, though!
Thanks Natalie for all the great threads for repair instructions. I bought an old Fargerware on Ebay to open up and experiment on.
Joanie-if you think you can’t do it yourself, look up Mr. Appliance in the yellow pages. It’s a franchise and they also repair small appliances as well as sell parts for just about anything from electric shavers to dryers. I live in Toledo and we’re not exactly a huge town anymore but we still have broke down appliances that need repairing. Good luck.
Natalie-wish me luck in repairing my alternate pots!
Joanie, looks like you got a model that was Made in China. That means, it was not made as well as the older models, Made in USA, and tend to break easily.
A few things you can do:
1) If you’re a handy person, you can try and replace the heating element yourself. You can find or call for parts at one of these locations:
http://www.repairshack.com/small-applicances-appliance-parts-farberware-percolator-repair-c-83_100_166.html
http://www.thepartsbiz.com/Farberware-Coffee-Percolator-Urn-Replacement-Flexible-Heating-Element-P04-050_p_1171.html
http://www.goodmans.net/d/421/farberware-percolator-parts.htm
Here’s a view of an open Farberware percolator, similar to yours, that may aid you in repairing the unit:
http://www.amazon.com/gp/customer-media/product-gallery/B00008ELEA/ref=cm_ciu_pdp_images_1?ie=UTF8&index=1
There’re a couple of articles from passed editions of Popular Mechanics and Popular Science magazines that show how an electric percolator works and how to repair one. Here are the links to read these articles:
http://www.popsci.com/archive-viewer?id=QioDAAAAMBAJ&pg=94&query=how+auto+coffee+makers+work (scroll down to see electric percolator)
http://books.google.com/books?id=aOIDAAAAMBAJ&printsec=frontcover&source=gbs_ge_summary_r&cad=0#v=onepage&q&f=false (pg. 102)
2) You can find a local small appliance repair and see if they can repair it for you.
3) If all fails and you’d still rather have an electric percolator vs. the purchased stovetop one, you can find older models on eBay still in working condition and sometimes even new, still in the box! eBay prices are even more reasonable than new percolators. I had purchased 6 for friends and family via eBay and they’re quite happy with them.
Good luck!
I’ll see what I can find and will get back with you on it.
oh..yes, it was purchased new, the Farberware FCP 280G model.
Hi Natalie,
Yes, I’d like to try and replace the heating element and have been looking online for the correct part. Have an inquiry in to repairshack.com to see if they carry it. If you or anyone here has a suggestion, I’d appreciate it!
Hi Joanie, you mentioned that you had the Farberware electric percolator for about 2 years. Was it new when your purchased it? Most of the time, the heating element can be replaced and you can still use it.
What a great thread – so glad I found this. I’m awaiting the UPS man with my new stainless steel stovetop percolator as I write. I, too, have been through dozens of drip coffeemakers over the years. Waking up to coffee all over the counter; plastic-tasting coffee; cracked carafes – no more. Switched to a Farberware electric perc about two years ago and will never go back to drip.
The heating element on the electric perc died suddenly this week – a disappointment after less than 2 years of daily use.I was loathe to buy another one, as they’re quite expensive if they only have a couple of years of use in them. So I’m retrogressing even further, to a stovetop pot. I remember my grandparents using one of these, and can’t wait to experiment. Found all the information I needed her to attempt a great-tasting pot. Thanks!
For that cowboy wedding, you should have looked up Arbuckles coffee on your computer. I can’t find it in stores. I go on Goldminers Rendezvous with prospectors, mountain men, and Iron Kettle Society.
Thank you again, Natalie. That’s a good idea. I used to wonder what I can do with the used coffee ground, now I know :)
Great Sharleen! Glad to hear that your eBay purchase wasn’t a waste.
We all know that fresh ground beans and fresh made coffee is normally the best. But, I’m the only one drinking coffee here. I normally perk 8 to 10 cups of coffee at a time. I pour the left over coffee in a glass jar, put in the refrigerator and reheat a cup the next day. Coffe made with percolators are not burned, so even with reheating the next day, the coffee still taste good and smooth.
If you find that 4 cup of coffee is too much for you Sharleen, just save the rest in the fridge for later use. When the coffee is cool, you can even use it to water your plants. Seriously, they love coffee and tea. You can even feed the plants with used ground coffee and used tea.
Thank you so much, Natalie, for your advice. This morning I tried it with 4 cups of water and it worked perfect :D
And I’d like to thank the above posters for the tip on how to reduce the bitterness of the coffee by adding a bit of salt. I don’t know why, but it works!
Hi Sandra, yes, washing soda is normally sold in the laundry isle (for others that didn’t know). I use it to make homemade laundry detergent, another saving, that’s how I knew.
If I calculate it correctly, buying 1 box of 55oz. A&H washing soda would save you at least $30 of Brew Rite. Isn’t that crazy?! Those marketing tactis are so unbelievable!
Thanks for the soaking tip. Btw, I forgot to mention but assumed that is understood, after brewing/perking and soaking, discard the mixture and rinse it well.
If you also own a dripper and would like to use washing soda to clean it, here’s how. Also use 1 tablespoon per 4 cups of water. Mix the washing soda well to desolve before pouring the mixture into the water reservoir. Do NOT put washing soda alone in the water reservoir. Then, brew as usual. Discard the mixture and pour just water into the reservoir. Brew again to rinse. Do this for a total of 3 times, each time changing with fresh water.
So, the stuff in the soap aisle that you buy to add to your usual soap is Brewrite? And here I just bought two more bottles a month ago so i wouldn’t have to go back to Walmart. Thank you loads for this info and I’m ashamed that I didn’t check the ingredients. I love how that stuff works and I usually run it through the electric perc about every two months and the coffee residue melts off. I’ll run it through a perc and then unplug and let it all soak for about an hour. I also run it through my electric drip. Thanks again Natalie-you’ve saved me a bundle!
There have been mentioning about different ways of cleaning a percolator. Today, I was at Walmart looking for a convection oven. I passed by the coffee maker isle and saw an 8oz. bottle of Brew Rite Cleaner uses in cleaning coffee makers. The price tag was $4.98. I looked at the ingredient and it said Sodium Carbonate. If that sounded familiar, it’s because sodium carbonate is the same as washing soda! This ingredient is also in Dip It cleaner.
A big box of 55oz. of Arm & Hammer Washing Soda is only $3.24, which I already have at home, it is much cheaper than a small 8oz. bottle of Brew Rite.
So basically, we can use A&H washing soda to clean our percolators using the same instruction given on the Brew Rite bottle. Here it is:
Use 1 tablespoon of Washing Soda for every 4 cups of Water. Stir it well to dissolve the washing soda. Assemble all units (stem & cup), and brew/perk as usual according to our type of percolators (stovetop, electric, etc.). Let the unit cool down and rinse each component with water thoroughly. It should clean just as well as Brew Rite and Dip It.
I haven’t had a chance to try it yet but will soon and will report back. If you try this method, please give feedbacks. Thank you!
Hi Sharleen, most percolators, whether it’s electric or stovetop, require a minimum of 4 cups of water for perking. Here’s why: When the water is heated and reached to the right temperature, the water at the bottom of the carafe traveled up the tube (stem) and poured over the coffee ground in the filter cup. After the water passed through the ground, it dripped down to the carafe and traveled back up into the stem and poured over the coffee filter cup. It does it several times until the coffee reaches to your desire taste (mild/strong). With only 2 cups of water, it is not enough for the water cycle to complete.
You can test it out your percolater again with just 4 cups of water and without coffee. Make sure the stem is sit correctly at the center. If you don’t mind, let us know if this works.
Very interesting thread. I’ve just bought this old stovetop 9-cup percolator from eBay. After a couple of attempts, I still can’t get it to perc properly.
I mean, I heard the water boiling but it perced a few times and then totally stopped, even when put on high heat (I’ve also tried using medium and low heat, as it said in the instructions). After half an hour, all I got was a very weak coffee, despite of the generous amount of ground I filled in. At the end, I had to pour hot water onto the basket and turned it into a drip machine (which worked fine, by the way).
As I always put water just enough to make two cups, I wonder if that’s the cause. Any suggestions would be appreciated. Thanks.
I bought 2 stainless steel percolators (different sizes) from Cabela’s, mainly for camping use. When my Hamilton Beach Brew Station drip machine at home started leaking all over (no surprise), I just got out the smaller perk pot. I keep it in the house in case of a power failure.
These are the best coffee pots I have ever owned – far better than the cheap aluminum camp pots from the big box stores. They have a silicone handle that allows you to pick up the pot without getting burned and a transparent acrylic dome that is unbreakable, plus the stem, basket and cover are all sturdy pieces that don’t bend easily. I like to use a filter, partly because it makes clean-up easier.
In the past, I used square paper filters that folded over after the grounds went in, with holes in the corners to go over the stem. Today I tried using an unbleached drip machine filter, since I have over a hundred left, and it worked great. A small hole in the bottom for the stem and still tall enough to fold over, under the basket cover.
The instructions with the pots say to perk for 24 minutes, but that’s much too long for 6 – 12 cups. My coffee of choice is 8 O’Clock Columbian Whole Bean, which I grind daily; it represents the best compromise of taste and cost, to me. No offense, but I find Chock Full’o’Nuts not to my liking.
The paper filter does a great job of keeping grounds from the finished coffee. I like it and my 2 sons that drink coffee (Starbucks fans) like it, too. Someday, I’ll buy another drip-maker for larger gatherings, with people who like that awful Hazelnut stuff.
But they drink decaf, too, so they’re missing something! :) just kidding
Brad,
It helps a little bit if you moisten the basket before putting the grinds in.
Personally, I don’t mind a little crunch in my coffee. When grinding I usually munch on a bean or two.
Coffee filters are a way round the problem if you have to use a grind such as ‘filter’ but better to but the coffee pre-ground for a percolator or increase the setting on your grinder if preparing your own beans (varies by machine and type). Even with the correct grind, there is always the presence of some ‘dust’ in the ground coffee.
Brad, as Vicki mentioned, you need to use a coffee paper filter if you’re not using coarser coffee ground specifically for percolator. I purchase the regular 8-12 cup size round unbleached paper filters and use a single hole puncher to punch a hole in the center (for the stem).
Using a paper filter makes it easy to clean the filter cup as well.
Brad, you could always try to use a coffee filter in your basket. Are you sure your coffee is perc ground, not drip? Ground coffee for drip makers is too fine. You need a coaser grind for percolators. I buy whole coffee beans and then grind them as I use them. Mr. Coffee has a pretty good grinder at a very reasonable price at Walmart. You can set the amount you need and the type of grind you want.
Also, I always wait until it’s done percolating and then remove the basket before pouring my coffee into a cup.
Just started brewing with a percolator and have problems with the grinds in the coffe , coffee is great but need to deal with this issue. Learned a lot from this website so far . Does anyone have tips to keep the grinds in the basket? I have a 9 cup stove top stainless steel model
Yes, I am on Facebook, username: wilsonmfw Location: Harrow
For SFC Marshall Brown
Do you have facebook?
Back in the 60’s, my dad used an old 9-cup glass Pyrex stove top perk. It made the best coffee, and he had it down to a science. The burners on the gas stove were just metal racks, so he found an old solid burner from another stove, and laid it on top. As soon as it gently perked for 1 minute, he shut off the gas, and let the solid burner keep the temperature perfect to continue perking. As soon as it stopped perking, it was ready. I just bought the same coffee pot on Ebay, and can’t wait to give it a try, remembering my dear ol’ departed Dad while enjoying every cup!
Hi Alane, problem might be the ‘element’ or that dampness got in and corroded any contact points that might be exposed. I am not familiar with this model but generally all have switches that utilise contacts. If you are able would suggest trying a ‘resistance’ test across the pins of the percolator ‘Live’ & ‘Neutral’ terminals, and see if you have a circuit!
My Farberware electric percolator has stopped making hot coffee. It used to work fine. What could be the problem? One possible clue — over the winter it is kept in a non-heated apartment until we return in the spring. Any connection? Any solution?
This is for SFC Marshall Brown.
I am very pleased to hear that you have received grinder and hope that it ‘lives’ up to it’s requirements. As said, I tried to send a commercial type one but was restricted due to weight limitations! I really hope it does the job for you as I know how important a good cup of coffee is especially when fresh ground! Have safe tour and above all, enjoy ‘your’ coffee.
I used a SONA Percolator when first married in 1976, over the years brought new coffee machines as they appeared, now, after 35 years have revived said SONA Percolator to enjoy Blue Mountain as we did when we first got married. The Percolator works fine, has a ‘brew’ control on the base to set the ‘strength’, again, all down to how strong or weak you like your coffee, and when percolated, switches off by itself through ‘stat’ control! Have great tasting coffee and we use the standard coffee measure per cup which suits us.
Our cups takes 250ml liquid and for taste we use 1 standard coffee scoop (2 x level tablespoons) per cup which is right for us, others might like it a little less strong and again that may depend on the coffee bean being used and the grind. We like to grind our own beans and use a ‘burr’ grinder from Gaggia which has proven to be a very good grinder over the years! We also tend to change coffee variety relatively frequently to experience the different flavours, much like chocolate!
Godd flavoursome coffee is a joy to taste!
This is for Mike Wilson.
Mr. Wilson,
Thank you for the coffee grinder; got it in the mail about a week ago. I don’t need to remind any of you on the site here, but I’ll say it anyways. Fresh coffee beans grounded and brewed is way better than Folgers in a bag!!
Mr. Wilson, you’ve definitely made this a better tour! Take care & God bless!
-A Very Thankful Sergeant