Quick instructions (the short version)
- Coffee: 1 heaping tablespoon of coarse-ground coffee per cup of water (about 240 ml / 8 oz). Up to 2 tablespoons per cup if you like it strong.
- Grind: coarse, like sea salt or coarse breadcrumbs. Anything finer turns muddy and bitter.
- Brew time: 4 to 8 minutes once it starts perking. Start checking at 4. Stop sooner if it looks dark enough through the glass bubble.
- Heat: drop it to low the moment percolation begins. A rolling boil is not what you want.
- Most important step: remove the entire filter stem (not just the basket) the second brewing is done. This is where most percolator coffee goes wrong.
Electric or stovetop, the ratios and grind are the same. The full method is below.
Let’s start with something that might make coffee snobs cringe. Nearly any coffee expert will tell you that a percolator is about the worst possible way to make coffee. Because the water is heated to a boil in order to perk, it’s really too hot for the coffee. It gets over extracted, and you end up with the bitterness and acidity that made coffee a “grownups only” drink back in the day.
But here’s the thing the experts don’t want to admit – sometimes they’re wrong.
I used to be one of those people who turned their nose up at percolated coffee. Pour-over this, French press that, anything but that ancient contraption bubbling away on the stove. Then I spent a weekend at a friend’s cabin where the only coffee maker was his grandmother’s old stovetop percolator. I was prepared for the worst. Instead, I had some of the most satisfying coffee I’d had in months. Rich, full-bodied, and it just worked. Made me realize the problem isn’t the percolator – it’s how people use it.
That said, there are still people who prefer perked coffee to any other kind. Taste is, after all, a matter of taste. And let’s be honest – those enormous coffee urns are still the best way to make lots and lots of coffee for a crowd. Try making coffee for 40 people with your precious pour-over setup and see how that goes.
Why Percolators Get a Bad Rap (And Why It’s Not Always Fair)
The reputation problem comes from decades of people doing it wrong. Too fine a grind, too much heat, too long on the burner – and yeah, you’re going to get bitter, over-extracted swill. But that’s not the percolator’s fault any more than a burnt steak is the grill’s fault.
The science behind it is actually pretty straightforward. In a percolator, boiling water gets forced up through a hollow stem, sprays over the coffee grounds, then filters back down through the grounds and into the pot below. The cycle repeats until you turn off the heat. Done right, this creates a strong, full-bodied coffee. Done wrong, and you’re basically boiling your coffee grounds into submission.
Most people’s percolator horror stories come from leaving the thing on the stove too long, using coffee ground fine enough for espresso, or both. It’s like judging all grilled food based on hockey pucks someone left on the barbecue and forgot about.
The Parts You Need to Know
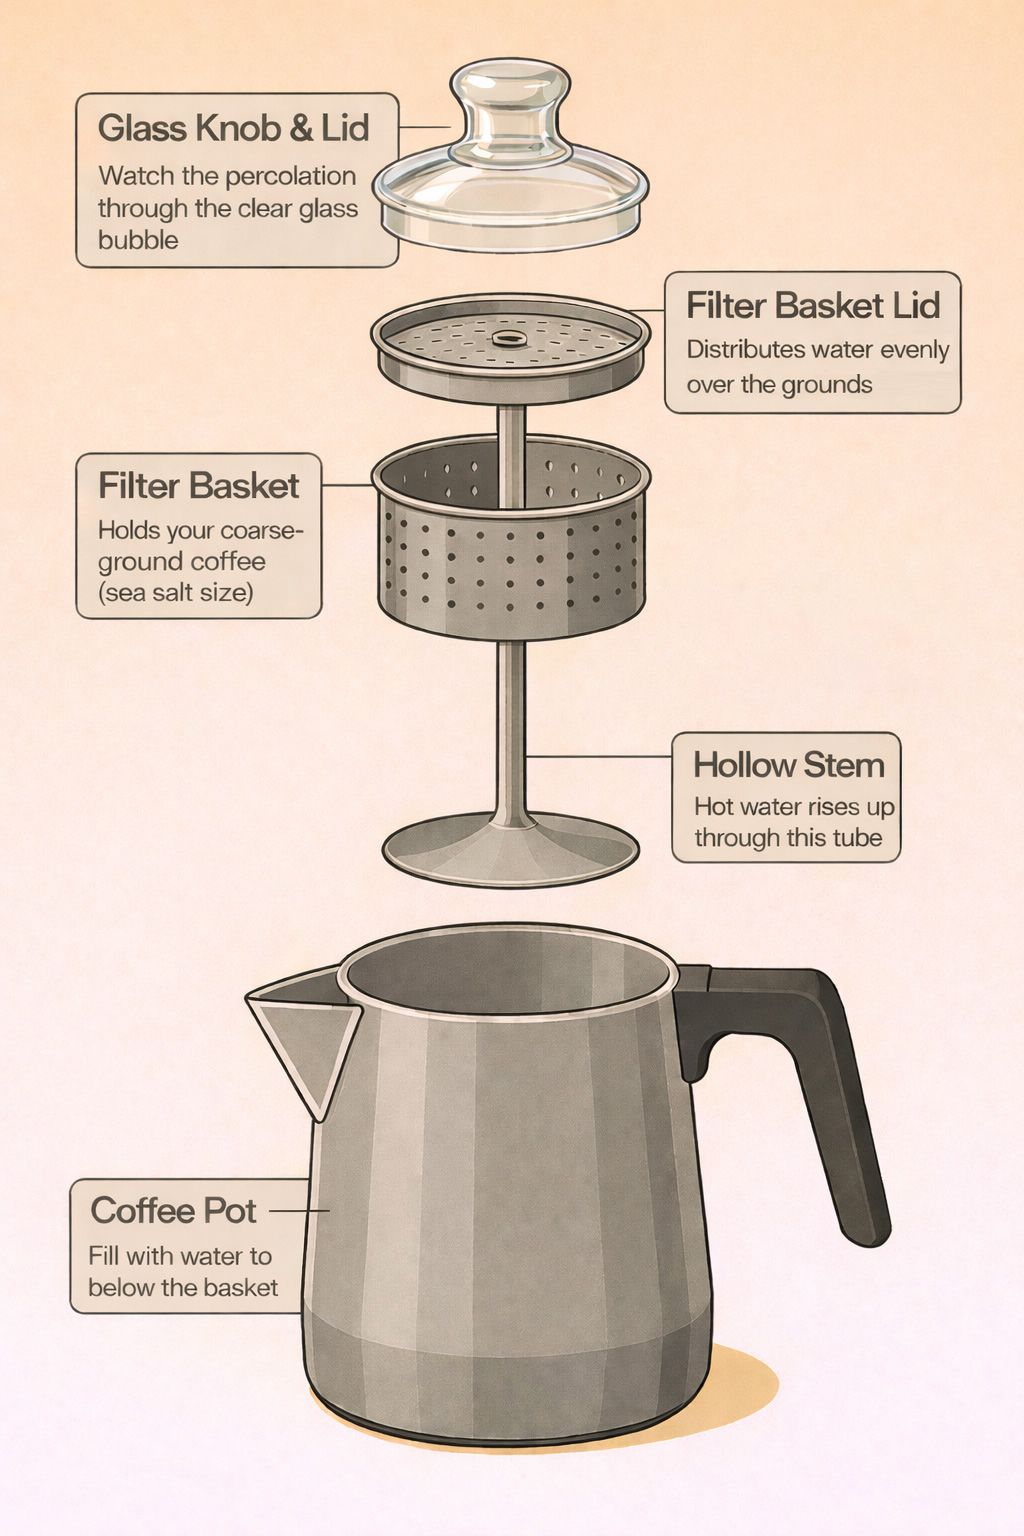
A coffee percolator has five main parts, and understanding each one helps you avoid the mistakes that give percolators their bad name.
There’s the percolator coffee pot itself, into which you put your water. There’s the stem, a hollow metal tube that fits into the bottom of the pot – in non-electric models, it has a flat round bottom that sits on the base. There’s the filter basket, which slides onto the tube and holds the ground coffee. There’s the filter basket cover, a round perforated lid that fits on top and makes sure the water showers the entire basket evenly. And finally, there’s the coffee pot lid, which often has a glass bubble in it.
That glass bubble just might be the most fun part of the entire contraption. It lets you watch the coffee splurting up from the tube and splashing inside before it spills back down onto the lid. Weirdly mesmerizing, like a little coffee fountain show happening right there on your stovetop.
Electric vs. Stovetop: Which Should You Choose?
Coffee percolators come in two distinct types – electric and stovetop. Each has its place, and honestly, both can make decent coffee despite their horrible reputation if you follow a few guidelines.
Electric percolators, including those coffee urns that can make up to forty cups at a time, are the set-it-and-forget-it option. They’re consistent, they shut off automatically, and they’re perfect for offices, church basements, and anywhere else you need to caffeinate a crowd without babysitting the process. The downside? You give up control over timing and temperature.
Stovetop percolators give you complete control, which is both a blessing and a curse. You can adjust the heat exactly how you want it, but you also have to pay attention or risk over-extraction. They’re great for camping since they don’t need electricity, and there’s something genuinely satisfying about the hands-on process. One of our readers pointed out they work differently at altitude too – at 5,300 feet, water boils at about 201 degrees, and percolators run roughly 10 degrees cooler than that, which actually makes the coffee come out better than at sea level. I thought that was fascinating.
What actually changes between the two (steps below stay the same otherwise)
- Heat: electric uses its own thermostat. Stovetop, you start at medium and drop to low the moment it perks.
- When it’s done: electric chimes or shifts indicator color. Stovetop, you watch the glass bubble and the clock.
- Pulling the basket: both still need the entire filter stem removed the second brewing finishes. Most electric models do not do this for you automatically.
- Capacity: stovetop models usually 4 to 12 cups. Electric urns scale up to 40 or 100 cups for events and offices.
For a deeper comparison and buying advice, see Electric vs Stovetop Percolators: Which Should You Buy?
How to Make Perfect Percolator Coffee
Here’s how to make percolator coffee that won’t make you question your life choices:
- Keep all parts of the percolator clean. This isn’t optional. Wash the entire thing with dishwashing liquid and hot water every single time you use it. Coffee oils go rancid faster than you’d think, and old residue will ruin even good coffee. Use a pipe cleaner for the inside of the stem. I learned this the hard way after wondering why my coffee tasted like the bottom of a week-old pot.
- Use freshly ground coffee – and make sure it’s coarse. This is where most people mess up. That pre-ground coffee from the grocery store? It’s ground for drip coffee makers and it’s too fine for percolators. You want a coarse grind, more like sea salt or coarse breadcrumbs. If you don’t have a grinder, look for coffee labeled as coarse grind, or ask your local coffee shop to grind it coarse for you. On a camping trip with no electricity? Carry your ground coffee in a vacuum container with a lid to keep the air out.
- Get your water level right. Disassemble the percolator and put the stem in place. Fill with water to below the line where the filter basket sits. Too much water and you’ll get weak coffee. Too little and it won’t perk properly.
- Don’t be stingy with the coffee. Put the filter basket on and add one heaping tablespoon of coffee for each cup of water. Some people go up to two tablespoons if they like it strong, but start with one and adjust from there. Put the basket lid in place.
- Start the heat. If you’re using an electric percolator, plug it in and turn it on – it’s on its own now. If you’re using a stovetop, put it over medium heat. Not high, not low – right in the middle.
- Watch for the magic moment. As soon as the first splurt of coffee hits that glass bubble, turn the heat down to low. This is crucial. You want just enough heat to keep percolation going, but not so much that you’re boiling your coffee. You’ll hear it change from rapid bubbling to a gentler, slower rhythm.
- Time it right. For most people, 4-8 minutes of perking is the sweet spot. Start checking at 4 minutes – the coffee coming up through the bubble should look like actual coffee, not weak tea. Don’t overthink it.
- Stop the process immediately. As soon as the pot stops perking or you decide it’s strong enough, pull it off the heat.
- Remove the filter stem – this is the step everyone skips. Carefully take off the lid and pull out the entire filter stem assembly, not just the basket. If you leave it in, steam from the coffee keeps condensing, dripping through the spent grounds, and making your coffee progressively more bitter. This is how perfectly good percolated coffee turns into undrinkable swill in about ten minutes.
- Let it rest, then enjoy. Give it about 30 seconds so any grounds that escaped can settle, then pour yourself a cup. You might be surprised by how good it actually is.
When Percolators Actually Shine
Despite what the coffee cognoscenti will tell you, there are situations where percolators are not just acceptable but actually the best choice.
Camping and outdoor adventures. Try bringing your French press on a camping trip and see how long it lasts. Percolators are practically indestructible, work on any heat source, and make coffee strong enough to get you moving after sleeping on the ground.
Large groups and events. Need coffee for 20, 30, or 50 people? A large electric percolator urn beats making pot after pot with any other method. They keep coffee warm for hours without that burnt taste you get from drip makers with hot plates.
The ritual of it. Sometimes the process matters as much as the product. There’s something deeply satisfying about the sound of a percolator bubbling away, the anticipation as you watch that glass bubble, the ritual of removing the basket at just the right moment. It connects you to decades of coffee drinkers who found comfort in exactly the same process.
Troubleshooting Common Percolator Problems
My coffee tastes bitter and terrible. Nine times out of ten, you’re using too fine a grind, perking too long, or both. Try a coarser grind and shorter brewing time. And make sure you’re removing that filter basket immediately when done.
My coffee is weak and watery. Not enough grounds, or the grind is too coarse and water’s flowing through too quickly. Try adding more coffee first, then adjust grind size if needed.
My percolator won’t start perking. Check that the stem is seated properly and the water level is right. It can take 5-10 minutes to get going, especially with electric models. Be patient.
The coffee is muddy and full of grounds. Your grind is definitely too fine. You want pieces about the size of coarse sea salt, not coffee dust.
Best Coffee Beans and Grinds for Percolators
Not all coffee works equally well in a percolator. Medium to dark roasts are your best bet because they’re less acidic and more forgiving of the longer extraction time. Brazilian, Sumatran, and other low-altitude coffees tend to be naturally lower in acid, which plays nicely with percolation.
French roast and Italian roast are particularly good choices. The roasting process has already broken down some of the compounds that turn bitter with extended brewing, and the bold flavors hold up well against the strong extraction.
For grind size – think coarse, then go a little coarser. If you’re grinding your own, aim for something that looks like coarse breadcrumbs or sea salt. Too fine and you get muddy, over-extracted coffee. Too coarse and the water flows through without pulling enough flavor.
The Bottom Line
I’m not going to pretend that percolated coffee is better than a well-executed pour-over or a properly pulled espresso shot. But it’s also not the coffee catastrophe that the experts make it out to be. Made properly – right grind, proper timing, remove the basket – percolator coffee is rich, full-bodied, and satisfying in ways my pour-over never quite manages.
The real problem isn’t the percolator. It’s people who don’t know how to use one. Master the technique, use good coffee ground to the right size, pay attention to timing, and you might find yourself reaching for the percolator more often than you’d ever admit in polite coffee company.
After all, our grandparents drank percolated coffee for decades. They weren’t wrong about everything.
Frequently Asked Questions About Percolator Coffee
Not if you do it right. The bad reputation comes from over-extraction – too fine a grind, perking too long, or forgetting to remove the filter basket after brewing. Follow proper technique and you might be genuinely surprised by how good it can be.
4-8 minutes depending on how strong you like it. Start checking at 4 minutes and taste-test. The coffee coming up through the glass bubble should look like actual coffee, not weak tea. Stop before it gets too dark or you’ll end up with bitter brew.
Coarse grind, like sea salt or coarse breadcrumbs. Fine grinds will give you muddy, bitter coffee that’s impossible to enjoy. If you’re buying pre-ground, look specifically for “coarse grind” or ask your coffee shop to grind it coarse for percolators.
Usually over-extraction from perking too long, grind that’s too fine, or water that’s too hot. Try shorter brew time, coarser grind, and lower heat once percolation starts. And make sure you’re removing the entire filter stem immediately when brewing is done – not just the basket.
Most store-bought ground coffee is too fine for percolators. It’s ground for drip coffee makers and will give you muddy, over-extracted results. Look for coffee specifically labeled as coarse grind, or better yet, grind your own beans.
Start with 1 heaping tablespoon per cup of water. If you like it stronger, go up to 2 tablespoons per cup – but don’t just brew longer to get more strength. That’s how you get bitterness. More grounds, not more time.
Yes, immediately. This is the step most people skip, and it makes all the difference. Remove the entire filter stem assembly, not just the basket. If you leave it in, steam keeps condensing and dripping through the spent grounds, turning your coffee bitter within minutes.
Electric is more convenient and consistent, plus it shuts off automatically. Stovetop gives you more control over heat and timing, and works great for camping. Both can make good coffee with proper technique. It really comes down to how hands-on you want to be.
Check that the stem is properly seated in the bottom of the pot and the water level is correct – it should be below where the filter basket sits. Be patient too. It can take 5-10 minutes for the water to heat up enough, especially with electric models.
Use fewer grounds rather than reducing brew time too much. If you cut brewing time too short, you’ll get weak, sour coffee instead. You can also dilute strong percolated coffee with hot water after brewing – think of it like making an Americano.
Wash all parts with hot soapy water after every use. Use a pipe cleaner or long thin brush for inside the stem – coffee oils build up in there and will make your next pot taste rancid. Once a month, run a cycle with white vinegar and water for a deep clean.
Let the water heat until it just starts to perk, then immediately drop the heat to low. You want hot enough to percolate but not a rolling boil. The percolation should be gentle and steady, not violent bubbling.
Use more coffee grounds rather than longer brew time. A darker roast also gives more intense flavor without extra bitterness. Some people swear by adding a tiny pinch of salt to cut bitter notes, though that’s definitely a personal preference thing.
Interestingly, many people with coffee-related heartburn actually find percolated coffee easier on their stomachs than drip. The longer brewing process and higher heat can break down some of the acids that cause problems. Dark roasted beans help even more with this.
Drop them in the comments below. With over 500 comments from fellow percolator users, our community has probably faced your exact issue before – and there’s always someone willing to share their hard-earned wisdom.
Discussion 582
Coffee making is definitely a matter of choice. I love stove-top percolators; I prefer the glass type personally. In fact just got another vintage 4 cupper at the thrift shop for $2.00 and it looks like it was never used. The anticipation of that first sip while the coffee is percolating makes it all worth while.
P.S. Thanks too to all who took the time to inform those of us who, or, well, guess I ought to just speak for myself in this regard…who might not rightly be labeled as ignorant, nor stupid, dumb maybe sometimes, but always welcoming of useful information. Mostly I just don’t know and can’t always recall everything. Heck, I can’t even remotely recall what were the comment numbers that sparked this onset of inferiority in mind. But it’s the type thing that’ll be easily cured, with a tasty cup or two of zippity coffee! ;)
Whew! This thread is looking pretty well dead now. But I’ll add my few cents anyhow, especially since it’s cold out and the night’s pretty much shot, consumed herein: Percology 101. (It’s this or Facebook.) Besides, can’t hardly resist being #548 and all, it’s like being part of something really big – like when everyone gathers on that one main street at Sturgis, and someone high upon a platform snaps a shot of the thousands of people sandwiched together below.
Anyhow, I landed here while seeking information on cleaning an old GE Pot Belly Percolator. Coffee’s ok and all, but I’m not a connoisseur. And the percolator been up in the cupboard for a few years now, ever since that near fateful elimination day. A friend’s last parent had passed a couple months before the flick of a switch rush was on to clear out some 50 or so years of accumulation, and painlessly as possible. More so like a transferrence of pain unto me. Cause I’m like those guys on the TV show “Pickers” (except I’m not a guy, and, well, have no interests in women…). It troubles me when really cool functioning stuff gets trashed. And destined for the dumpster, the coffee pot was one of many “too cool to toss” items that wound up in my cupboards (with a 1930’s toaster to match). I happened to catch the Pot Belly Pot prices on ebay: $70 upwards to $150! But with a clean pot and full flavored coffee, without the bitterness…now I’m not so anxious to sell!
The pot’s in great shape, but to look inside was to know that it’s seen a lot of coffee. Vinegar helped some, baking soda too, and I’m hoping now that Washing Soda will loosen up the last of those stubborn black stains. If not, it’s back to the only other solution I could think of: a tooth brush and cigarette ashes (unfortunately mom chain smokes). I must say, though tedius, and it takes alot of ashes, it was working well!.
To those die hards who actually wander all the way back here, just curious what, if any, are the opinions on ceramic percolators (quirks, flavor, etc.). A little one, maybe two or three cups, cloth cord and adorned with big dark pink flowers, remains boxed in the attic. It’s a pretty little thing. But I unpack it, then pack it back up, then a year or two later same thing again. However, one day upcoming this year I too must flick the switch on accumulation, and am hoping to make some progress with this item either way (use it or loose it!).
Wow, it’s getting lonely and starting to echo back here. G’nite -ite -ite….
Funny how many of the commenters share my memories of Italian aunts and grandmas with their stovetop espresso makers sitting on the back burner of the stove all day long ready to be fired up whenever an unexpected guest popped in!
I am an Italian-American coffee freak who thinks trekking around Naples in search of the best espresso in town is a perfectly rational way to spend a vacation. But I recently moved to a VERY small apartment where I have so little counter space that I went out and bought an old Corningware stovetop percolator at a thrift store. The first couple of times I used it I almost gave up in despair because it truly did produce HORRIBLE coffee. But after futzing around a bit I figured out the right way to make stovetop percolator coffee … or at least the right way for me personally.
I use coffee from Yemen/Ethiopia/Sumatra (ie low acidity beans) and I put a paper filter into the percolator basket so that I can use fine grind instead of the normal percolator grind, which results in much weaker coffee than I like. I put it on high heat until I hear the first perc and then turn it all the way down and just leave it alone until I like the color I see in the glass knob — usually about 8 minutes perc time total. Obviously this makes EXTREMELY strong coffee that is not for the faint of heart. And if I do it with Latin American beans it is in fact too bitter for my taste. But the African or Asian beans seem to be much more forgiving of overextraction.
The result is a sort of American-style version what my aunts in Italy make – and with a lot less fuss and splatter. This stuff is clearly “coffee” and not espresso. But it’s faaaah-bulous!! I think of it as what happens when diner coffee dies and goes to heaven ;-)
Tymchuk, I not aware of one and suggest that u look in Salvation Army, Goodwill, etc plus consignment shops for USA/Euro pots; Also, use emails to ask family and friends if they have old pots they might give/sell to you.
Can you please advise of a coffee percolator brand that is NOT Made in China? I want a percolator Made in USA, CANADA, or EUROPE if at all possible these days ….
I’m 58 years old and just started drinking coffee after my wife bought an 8 cup Farbarware unit at a flea market for $5.00. I love the industrial art look of the various brands from the different decades. I decided to collect them as a hobby.
I’m up to 9 percolators as I speak. One is a Sunbeam vacume pot that a man said was a wedding gift in 1951 and was only used a few times. I paid two dollars for that one.
My Jet o Matic was made by Saladmaster. It is like brand new and works great. I think the stainless steel units are the best.
All in all it is cheap fun. Thrift stores and yard sales offer the best chances of scoring a great unit cheaply. What fun and great coffee.
Elaine; Error in my last. In last sentence “usable cord” should read “unusable cord”.
Elaine; Those pots make excellent coffee. I still have eyes open for parts re my pot w/o obtained at Salvation Army mths ago. Allow me to suggest that u read my Dec.30’09 blog#241 warning re those pots.
If your pot has handle attached via screw clamp, rather than just advesive, you are ok. Also, being that elect pot(s) plugs are pretty much standard design you likely find inexpensive new cord assembly at local hardware shops, should you need others. Take pot to shop to match/mate plugs as per what available, being that diameter of pot prongs and the space for plug might vary, ie, too small for plug to fit/seat.
Also, if u have a plug that fits pot but usable cord, simply switch/rewire using cord w/plug that not fit pot. Simple stuff.
An update on my Primo Corningware pots….they are electric,cords were not with them. I finally found a cord at a local giant junk shop. Yhe owner showed me to 3 huge boxes of cords. Told me if I found them they were mine. Found one forthe larger of the two. Beats $25-$35 on e-bay. Making my first pot now. Did see the 10 cup Corningware pot for $75!! Happy coffee making!
Eric is so right in every respect. And properly made percolated coffee is not bitter at all. I get very similar results from my percolator to my steamer (less crema though). Drip machines are a poor man’s choice. Terrible coffee from these; one step up from instant. I’ve tried a dozen drips, all rubbish).
Back again for advice re the two PRIMO Corning stovetop pots I just found! Found what I needed close to the top of the blog…every pot is unique, so this groovy 6 cup does not work like my baby stainless 5c. These pots look like the “company” pots someone described earlier AND they have this great piece that looks like part of the handle, but actually clips to the basket inside and you use it to lift out the basket.
Yes I am doing the”I win I win” dance. No more burnt fingers. BTW I actually solved that problem….Take a wooden clothespin (bet there is some in that same crusty box you found your pot in in the first place ;0) and use it to graab out your stem/basket.
Works like a charm.
Maybe from the old Grant’s stores:
http://en.wikipedia.org/wiki/W._T._Grant
I have a 7 cup Grant’s stovetop that I have been using for about 6 yrs. Makes the best coffee ever. I have been trying to find some info such as when they were made and have had no luck. Anybody know any info on them? Thanks.
Sandi; As per ur comments it appears to me that u have side-stepped/defeated designs of ur pot. 1) Use regular gind coffee and very few grounds go into pot; 2) Use of a paper filter ok to use any fine grind u have,But, cut a disc only large enough to fit bottom of basket. 3) Use the basket lid w/holes which are designed to distribute the water over and thru (percolate)the fresh gind, as per design. 4) Folding the filter paper over the ginds in basket is likely preventing proper flow of sufficient water thru the gind and much water actually flowing/directed toward the basket sides, not unlike design/actions of an unbrella. Make sense? Try my 1 ~ 3 and I’ll bet that u have good hot coffee via regular perc time.
Tips: A pinch of salt in basket helps to neutralize acid of some medium/medium dark roasts; But french/dark roast can be too heavy for most: However, after one or two cups from pot pour another 8 oz water into basket to perc/claim remaining coffee from grind and/or thins out a pot after the first cups to jolt one fully awake. Good sipping stuff. Also, leave the basket assembly in the pot after percing as it is designed.
Let us know what u discover…David
we have a presto percolator,and it seems like it does not perk quite long enough..about 8 minutes..i use a rounded table spoon to measure with..we fill it to the 8 cup level and use 8 rounded tablespoons..we use a fold over melitta filter because the regular metal filter allows too many grounds thru to the coffee..we do not use the metal cover that goes over the metal basket ,because the mmelitta fold over filter seems adequate to cover the grounds..the coffee is nice and hot, but we often will need to pour off a plastic cup full and allow it to run over the grounds “one more time”..that most always makes it strong enough..we were wondering if the percolator should be perking the coffee a total of at least 10 minutes for the 8 cup level..it seems that it is always the 7-8 minute perk time no matter what we do..thanks for any advice..we also just hate the drip coffee makers because the coffee is barely warm by the time you add milk and sugar, and never tastes as good as perked coffee…
I have several dead drip makers in the garage, the latest casualty lasted less than 5 days out of thebox, so is going back to the store. After suffering through a week of coffeeless mornings, and Iwork from home so no office backup, I remembered I scored a cute babystovetop perculator at a yard sale a month ago. Googled for instructions and struck this goldmine. I am sooooo looking forward to fab coffee. The3 years of comments have been a kick to look over! Many thanks.
Many years ago(1969-70), I used to frequent a Steak House just outside of Camden, NJ. They used to have the most wonderful coffee. I am sure it was perked coffee from a large urn, but they added just a hint of cinnamon. Has anybody tried to “dress-up” coffee made in a large 60+ cup urn? Any suggestions?
Mary, if coffee is too strong, either use less coffee ground or perk less time.
For more info, follow Brat’s link which will take you to the top of this page :)
Here’s a great place to start…..
https://www.talkaboutcoffee.com/how-to-make-coffee-in-a-percolator.html
My Keurig broke down this morning so I drug out a Pyrex stovetop percolator to use. Of course the thing is at least 40 years old and I had no idea how to use it. Coffee turned out too strong. Anyone have any idea how to use these?
I’m wondering if you took time to read the rest of the comments because most, if not all, of your comments have already been addressed.
I also had addressed about avoid altering the taste of coffee by using non-bleached filters (comment #398).
I highly recommend readers to read all the comments for information and tips. If you find that there’s too much to read, just copy ‘n paste all the comments to any document tools that has a search engine such as MSWord. Use keywords in the search engine to find your answers.
Wow! The original article really misses the point on percolators. And the comment/apology in comment 34 still seems to get it wrong. First of all the common sense about percolators is just wrong. Yes they heat the water very hot, but only for a brief few seconds, and only a small portion of the water gets heated during the brew. That’s why their coffee tastes so much better. The “suggestions” in the article are really just common sense instructions and the one about needing to remove the basket immediately is just wrong. My suggestions would be as follows:
1) Clean it with soap fairly often – you’ll taste the difference – and you need soap to break down the coffee oils, but…
2) It’s OK to use a full-height coffee filter inside the basket. Yes ..paper can leave an ever-so-slight bleachy taste if your palate is that discerning, and for some, that’s one of the reasons we quit using drip makers. That being said, the slight bleachy taste is less in a percolater, for the same reason it’s less burnt: all the water doesn’t go through the basket like it does in a drip maker. More importantly a full height paper filter catches the oils which makes it easier to clean. Yes, you can go ‘au natural’ with no filter when you’re using a percolator and if you do you get to keep the taste of the fresh oils (if you washed out the old ones first with soap and water) but adding a paper liner is kind of like plastic diapers: It’s addictive because it’s easier.
3) Grind the coffee as coarse as you can. Even if you’ve added a paper filter to your routine, the coarser grounds that are possible with a percolater protect some of the flaver from the air until the last minute. Compare drip-ground beans from the store with coarse ground beans you just made. You’ll taste the difference. You probably switched from drip to a percolator because of the added flavor. You get that because only a percolater has the advantage of the short intense burst of heat to draw the flavor deep out of the grounds even when they’re thick and coarse. Take advantage of that and grind your beans very coarse at home.
4) If you’re going to be drinking throughout the day, unplug the percolator as soon as its done and microwave each new cup to reheat as you use it later. It’s less damaging to the flavor. For some reason, I find percolators often have the advange of less damage over time than drip machines anyway, but the coffee still degrades with heat so unplugging and reheating later is the lesser of two evils and seems to work best for me anyway.
I’m no expert but perhaps these comments will help some of us understand why we’re getting better flavor that we did from the drip makers and how we can take advantage of the those things which are special to percolators.
Diane, cleaning pot is a plus and I even perc a mix of 2 c vinegar w/2 c water being that vin is a mild acid, then rinse w/mild bicarb solution. Natalie recommends using washing soda solution perced occasionally to clean it. Look, u not have to clean pot after each use.
Just rinse out. My coffee gets better w/each pot and I clean only when I feel it getting too strong due to buildup of coffee tars in pot. Your choice.
Next time u perc, for coffee or to clean I suggest that u pay attention to the time that it percs; does it ever stop? and what is water temp when finished or after 8~10 min which comes first. Look, I think what you did was (1) you cleaned out coffee tars in the pot which insulates/interfer with percing; (2) your allowing pot to cool allowed the bottom inside elect contacts to cool and contract back together. Frankly, if my pot I would not have used w/o first examining bottom elect contacts, which likely need cleaning yrs of spilled coffee, etc.
The way they work is; the heating coil is controlled by several small strips of special metal which when pot cool are together/touching to complete a elect circuit which when plugged in the strips allow heating coil to be energized, heat and perc water then when temp is reached the strips open and the current flow stops. They spread alternately open and close to keep the pot/coffee but not resume percing unless pot and strips are completely cooled. Depending on ur next experiences u might use screw drive and small pliers to open bottom and enlighten self as to its condition and how it works.
Simple stuff, really. Oh, and yes, unplug pot first. Yuk! yuk!
Let us know.
Well David. Today i cleaned the pot with dishwasher cleaner…it had a considerable amount of calcium/lime build up. During the cleaning..it warmed up very well. Then, I rinsed it out, put cold water in it, and this time it didn’t seem to warm as much. So..after it was cleaned thoroughly, I put cold water in it and it sat for about 45 min to an hour (while I waited for my company to arrive), and had a chance to cool completely. This time when I perced…set a timer for 10 min..it was hot, not overly so..but very good. So, it seems it percs best when it is allowed to cool completely. Thoughts?
Diane; When I read ur blog my first reaction was “how it perc if water not heated”? being percing requires heat of about 200 degrees F. If ur pot was heated via stove burner the timing would be approx. 8~10 min, after it begans percing. Even ur ’40s elect pot has/should have same basic temp controls as newer non-electronic controls pot. I suggest that a knowledgeable person open the bottom and check the simple make-break contacts. May simply require cleaning them. Plus, repairing is not difficult and I suggest reading previous blogs re the subject. Could be worth the effort.
OK…So I own a very old percolator..1940’s-ish…and I’ve brewed coffee in it, once. I brewed it for about 9-13 min…it perked…it never stopped on it’s own (I don’t think these pots had a temperature sensor.) Problem is, when I poured, the “flavored water” was not hot. So, my question is..how many minutes do you think I should perk for? (since it won’t stop perking on it’s own?)
Kendell, when I was my percolator at night with the dinner dishes , I usually don’t bother to dry it since it’s going to get used less that 12 hours later. As for immersing the thing I hold the pot and wash it out with a soapy dish rag and then rinse with cold water. I rinse while holding it under the faucet and turning the pot around in a circle and dumping the water a few times. Sorry about you being site impaired. Don’t know what the severity is but would a small led flashlight help to look inside the pot to check for suds? Not trying to be a smart ass, but I keep one by the sink and it helps me when checking down the disposal as well as filling the pot in the morning when I don’t have my glasses on. Also, I usually use a small plastic pitcher to fill the pot while looking down into it, for what it’s worth.
Hope everyone enjoys their coffee in good health.
Natalie, can’t thank you enough for the washing soda information! I’ve passed it along to a friend and she’s seen a lot of improvement in her coffee maker. I already used it for laundry so had a lot on hand.
Kendall, Permit me to advise you re basic electricial science no longer taught in most schools where students are now simply prepared w/intent to attend college but most not even know basics of how their automobile and other possessions function. If your new perc is a modern design, especially via China, the heating elements in base are of complicated electronic components rather than simple heat-expand elect contacts of older made in USA percs, as is my 35 yrs age GE. Even new made percs are/should be designed to be washed but none should be immersed/submerged in water to extent that water might seep into the base compartment.
Any concerns re that can/should be corrected by simply finish cleaning pot and then turn pot to all angles and shake it to allow any water to drain from base. A simple test re concerns (as I do) is to place several cups water in pot and energize the pot to see if it percs (it not blow-up)and should the electronics, ie, resistors, capacitors, diodes; blow/pop, or it not perc, due to simple washing, I would return pot to store due to faulty design and seek another/older model, via Salvation Army/Good Will stores and/or Ebay. My older GE w/simple elect heat conrols might short-out if wetted but likely only cause circuit breakers to pop afterwhich once drained/dried it likely still work correctly.
You have any concerns re such simply obtain advise of knowledgeable people, ie, local small hardware shop, other; Simple stuff. Look, the basics are; If elect devices components are wetted while energized they might short-out (especially electronics components) but, based on my knowledge/experiences re devices wetted “while not being energized”, removed from power sources, properly drained and allowed to air dry via air movement via fan/hair drier, to remove moisture, they will likely work as before. Thoroughly water soaked electronic components might still blow/not function.
The key is, remaining water/moisture can/will short-out devices. I have taken devices, ie, all types elect motors, controls, even key pads wetted w/coffee/soda, etc; wetted in fresh and sea water, then, after submerging in/flushing with clean fresh water, drained and thoroughly dried; function as before. Simple stuff.
I have purchased 3 made in USA percs from the Salvation Army at $5 each, as well as other well made USA appliances at prices too good to pass up, using the best and the others possibly for gifts or I cannibalize for parts if needed.
kendell
Get a gold label Farberware off Ebay; 4,8, or 12 cup. I have all 3 :) use *2* Tablespoons of coffe per 5-6 oz cups water.
bob
thanks for all the advice. I stayed up until three in the morning yesterday reading all the posts, lol. I could’ve used some coffee then but my mr coffee was so horrible i couldn’t do it.
NOw the happy owner of a percolator and i just love the smell and the wonderful rolling boil sound. The only other question I have is related to electric percolators specifically, since taht is what I purchased. The instructions say not to emerse teh machine in water common sense, but There’s a plastic cover over the electronics and I think the actual heating element is inside the machine.
My question is, will putting it in the sink and pouring water into it damage the heating element or short it out, since the bottom is going to inevitably get wet with the sink being wet and me pouring water? This may seem a bit dumb but This is my first percolator and I don’t think the heating element is removable it looks sealed in place. The cord area is in teh back, so I’m not too worried about it bgetting wet, but me tilting and pouring dish soap/water might get some in there.
Should I be worried about one day plugging it in only to short out my perc? I usually dry it off via a towel so to get any water that si on the bottom. Sorry for the many questions but I don’t think this one is in the comments and I want my perc to last a long time.
Just brewed my first pot of french vanilla, tasted aweful in the drip machine, tasted wonderful in the perc, yum! I’m also visually impaired, so taht may be why i’m so picky about my perc being dried before I use it, and didn’t know how I was going to get all the grounds out of it if it wasn’t save to put it in the sink. Thanks for all the help, I can’t believe I spent all my money on those drip machines when my perc was just 40 bucks away!
By the way, here’s a tip if you find too much information to read and so little time.
Copy ‘n Paste all these posts to MS Word or any document tools that has a search engine. Then, search/find key words that you need.
Ditto to what David said. Take time and read the posts, all of your questions have already been answered. I understand it’s alot to read but you will get more information by reading than just by asking.
This is repeated information but it’s the one that confuse most people. When it comes to coffee, 1 cup of coffee measures approximate 6 oz. and not the usual 8 oz./cup as in cooking. However, the 1 Tablespoon measuring spoon is the same as 1 Tbn. for cooking.
There are many opinions out there simply because we all have different taste buds. What matters most is what is your taste bud. You wouldn’t know until you experience a bit to find out what suits you.
Have fun perking with your new coffee percolator.
Kendel,
Welcome to the world of good coffee. Allow me to suggest that u spend some time reading past blogs fm folks experiences w/good advice. See my #497 and previous but I not the only “expert” via trial and error. Your Seattle coffee might be fine quality but as u will discover via the blogs the “key” is the degree of roasting. Mild is too weak and dark/French is often too heavy w/oil and acid. I’ve settled on medium roast and adjust according to taste of first pot. As for amount of water I suggest filling pot to full marks and then empty that into cup size u use and adjust grounds/water accordingly. Mine are 8 oz mugs. Most pot marks are for 6oz cup amounts.
Adjust grounds and water accordingly. First, make a half pot, so as not to waste should it not be correct to your taste. My measurements are via an old Mr Coffee scoop holding 2 level tbsp/per mug. My first mug is usually strong, as I like for first mug, to get the heart pumping in morning, I then, or after the second, pour another cup of water into the basket to thin out the remainer in pot (it might perc some more)and subsequent mugs are strength for sipping. Plus, extends the amount of coffee. No matter what coffee used I strongly suggest adding a pinch of salt to the basket to neutralize any acid. Again, take time to read the blogs. Enjoy!
Hi all. I’m about to buy my first percolator after going through I couldn’t tell you how many drip machines, cuisinart, mr coffee, black and decker, Some of teh generic no name brands, I’ve had them all and they usually eitehr make bad coffee or the pots eitehr break, or in the case of thermal pots get taht rubbery taste and smell taht n one but me seems to smell. My question is this.
I have some seattle’s best coffee that I bought from walmart in an air tight canister, and it’s a little finer then your standard drip coffee maker grind, I think it’s medium fine as opposed to just medium grind. I thought about trying this in my perc when I get it later today or should I buy a bag of beans and grind? The grinds look so fine that they might just fall through the holes in the metal filter in the GE perc’s filter and into the pot.
My other question is measurement. I know you’re supposed to use 1 tbsp of coffee per cup, but I use nonstandard sized cups and most coffee scoops that come with coffee makers aren’t a tbsp, more like two or three, so I end up putting twelve of those scoops in, thinking i’m putting the right amount of coffee, and getting black as tar and just about as strong as battery acid, grins. The ge has markings for both coffeee and water.
Should I follow those directions on the side of the pot? The mr coffee piece of junk i’m returning today says to put nine tbsp in, so I do and get a week, watery, mostly water coffee. Am I doing something wrong or have I just gotten used to acid coffee?
I’ve pissed off my parents returning coffee maker after coffee maker, grins so i’m hoping to buy a percolator and taht be teh last one I buy unless I have to buy another perc. Anyone have any advice? there are so many opinions on what makes a good cup of coffee I get confused trying to figure out the measurements and end up with a coffee that i like but that someone else says is horrible and I should spend 300 bucks on a coffee maker, sure, and break it inside of a month, lol.
Brad; It is strange that no makers mark exists. If any it will be on very bottoms, maybe very lite impressions. I’d bet it by Mirro or Ekco. which made many simple cooking utinsils
Thanks so much everyone. I’ve scoured Ebay looking for something that matches this, to no avail. I was hoping someone would be able to identify the make and model of the pot, but it is not to be. Ah well. Thanks again for your quick responses.
Best,
Brad
Brad, did you try and look it up on eBay? Just do a search on “coffee percolator”. You may be able to find some information on it. Good luck!
Brad; Your description and the photo indicates to me that it is a simple drip pot for coffee and possibly tea, to which hot water via a kettle is poured to the marks slowly soaking the grind/tea leaves before draining into lower section. The basket screwing into the lower half is to possibly allow pouring w/o having to remove it.
@Natalie
Thanks for the image. Unfortunately, it looks almost nothing like that. There is no tube, the top and the bottom are equal both in height and dimension (no bulge), the metal is much shinier, there are two separate handles one on the and one on the bottom,and the pour spout is on the bottom. It looks a bit like this: http://vintagecoffeemakers.net/vintage-coffee-pots/vintage-wear-ever-dripstyle-coffee-pot-3044-4-cup/ except the handles are hard brackets rather than angles and the basket is all wrong. Closest I can find though.
In order for it to be a percolator, it needs to have a tube with a plate at one end; depending on what type of percolator it is. This tube is usually located at the center of the unit.
Does it looks like this one? http://charlasyardsale.com/VeryVintCoffeePot2.JPG
I was cleaning out my mother’s house, and I found my grandmother’s old coffeepot.
I know she used to call it her percolator, but it isn’t a percolator at all. It seems to be a manual stovetop drip coffeepot. It’s been used so much that all possible identifying marks are gone – even lines to tell you how much it holds, much less who made it. The piece is most definitely aluminum. There are three sections to the pot, a top, a bottom, and a metal basket that screws in between them. Both the top and bottom sections have black, hard bracket shaped handles. The floor of the top section has 4 small holes drilled into it, one near each corner. The metal basket is full of small holes, not just in the depression where the coffee goes (I think) but on the lip of the basket as well. The bottom has a pour spout.
Having looked around the internet, the closest thing I can find are the Wear-Ever 60’s era manual drip pots, but they had art deco handles while this does not. I remember that you had to hold the top of the pot on as you turned it over to use the pour spout.
Any ideas? Thanks so much.
Bob,
Thanks for the “tip” and input, I ground some some dark roast to medium (instead of extra fine)and found a big improvement in flavor.
Fred.
Natalie, You are partly correct being that to ignore is to avoid, be stupid on purpose. Ignorance/lacking knowledge is not shameful unless deliberately rejecting, refusing to even consider info its worth. Others reading our exchanges are likely about to tell us to knock it off so if you desire contact me via dgreer(at)charter.net..
we are on same wavelength, etc.. To continue; after yrs observing people I determined that the basics are; (1) Intelligence/IQ; Inherited,(not taught/learned) via parents plus God’s good grace. The ability and willingness to seek and absorb info and understand.(2) Smart; Inherited and learned ability/aptitude and willingness to utilize number 1: (3) Stupid; Inability or disinterest/lazy (also learned/taught) to utilize 1 & 2: (4) Dumb; Not having a clue re the other 3. We make exceptions for them.
In this politically correct, feel good, everyone is a winner world of today I will be tagged as judgmental by some, which I are. Been to traffic court lately? I subscribe to my mentor’s thinking,”stupid is as stupid does”–Forest Gump. Most of my thinking re such is via honest observations of myself as a knuckheaded H.S. student who not aware of true IQ, abilities and potential until in USN via proper testing and serious work/responsibilities (grown-up stuff) and numerous achievements since, which not include spelling skills. ;)
LOL David, reading your comments is like reading my thoughts. We must be on the same wavelength ;).
I have the same policy about feeling free of sharing what I know but let that person make his/her own decision. He/she would have to live the consequences, not me. Like you, in doing so would leave me with a free conscious that I have said it.
It’s interesting that your definition of “ignorant” is lack of knowledge. I’ve always seen it as “having the knowledge but chose not to accept it”; thus, ignoring it.
I’ve learned about label reading when I was in school in a home economic class. That was many many moons ago. This should be a knowledge that every shopper should have. Otherwise, he/she would just be buying things blindly. Oooh, yuk…. I’m shriveling at the thought of it.
Natalie; I’ve never used vin for burns but yrs ago learned that rapid soak of burn area in cold water/liquid (the colder the better) and hold until pain subsides prevents/minimizes damage due to removal of heat in flesh stops the cooking affect. My reasoning taken from when one roasts meat and removal from heat source the internal heat continues the internal cooking. The key is to remove the heat from a burn. Simple science which is (strangely) not instructed by even medical professionals, etc, and I had to learn on my own. Old remedy re butter on burns actually only lubricates the skin.
I learned yrs ago that vin splashed and wiped on sunburns, chigger, mosquito and other bites relieves plus we used on jellyfish stings. Must be the mild 5% acid. Yes, the key word is “ignorant” (lack of knowledge) which most people now days incorrectly interpret as being “stupid” which I use to suggest not using knowledge or common sense, too lazy to try, relying on others to provide. As a child I heard adults comment (even now) “I could have told them to not/to do that” upon seeing others harmed, etc, and even then I wondered “why you not advise them”? That, is what I call being stupid. Therefore, I’ve since not hesitated advising/suggesting, sometimes not welcomed, to prevent damage/help while others “I could have told you so” types stand around watching even own children make serious errors. That, I call being stupid.
One major problem is that people do not read/reason or pay close enough attention to label ingredients (especially foods)and/or not aware that first listed items are the greatest percentage in container, e.g. salt listed in first half listed ingredients I not purchase. I have salt and add amount I want, not what/as much as producer includes. That, is being smart, the opposite of being stupid.
Thanks. I am using vinegar for all that plus more. One more tip for you on Vinegar, it’s good medicine for 1st degree burn too. I had hot oil splashed severely over my hand. Right away, I rinse my hand with water and soaked it in white distilled vinegar for 15 minutes. No redness, no swelling, no blister and no pain. It was like nothing had happened. This was from my own experience and one of the reason why I always have a gallon of vinegar in the kitchen.
I even mix my own laundry detergent. It’s cleaner, less chemicals and much cheaper. I always have washing soda for this purpose. That’s how I knew that washing soda is the same stuff as Brew Rite but ohhhh so much cheaper!
I can’t get over of how much one industry can charge for the same thing another industry provides but for 10x more expensive. You’re right, it’s all marketing and so many people fall for it. It’s scary to think about it sometimes how ignorant people can be, isn’t it.
Natalie; I’ll try the washing soda being I use it to increase effects of etergent and seems to help w/hard water. More re that below but first let me offer ideas re vinegar (white) which I discovered a few yrs ago as being an amazing liquid. Look at the Heinz website and download their uses re vinegar.
Being a former flight instructor I am inclined to bore some people w/info. Example: I use vin to sanitize my cutting board; a cup in dishwasher cleans glassware; cup in washing machine final rinse acts to sweeten and is natural softener, cheap and w/o perfume; A splash in cup of water is fine hair softener but caution due to mild acid might cause one to cough and eyes to smart but no damage. Learn to use. Emergency under-arm deodorant via wet hand w/vin and wipe, the vin smell quickly disappears sweat odor gone and one feels refreshed. More info? look up The Vinegar Book which I obtained yrs ago and is amazing re uses. Such should be taught in schools.
While still have ur attention; look up uses of salt and the Salt Institute; might change ur life, especially if one eats their own cooking. Amazing uses w/o serious increase of intake we all must watch but must keep in mind that minimum salt is necessary to keep our body functioning. One last thing re washing soda, etc; most people over-use detergents which dims clothing, etc; experts will confirm that the most effective means is, fill washer w/water and add/mix half amount of detergent suggested by suppliers (they want to sell more) Before adding clothing! Common sense thinking is the detergent solution will penetrate clothing better rather than adding detergent after clothing soaked w/water alone/little penetration. Fact: detergents/soaps do not clean/remove soil, etc..they simply make water wetter. Water does the real work. Have I bored everone enough? Have head full of stuff I enjoy passing along.
@natalie:
Soda Ash from the swimming pool supply dept or store is the same thing!
bob