Quick instructions (the short version)
- Coffee: 1 heaping tablespoon of coarse-ground coffee per cup of water (about 240 ml / 8 oz). Up to 2 tablespoons per cup if you like it strong.
- Grind: coarse, like sea salt or coarse breadcrumbs. Anything finer turns muddy and bitter.
- Brew time: 4 to 8 minutes once it starts perking. Start checking at 4. Stop sooner if it looks dark enough through the glass bubble.
- Heat: drop it to low the moment percolation begins. A rolling boil is not what you want.
- Most important step: remove the entire filter stem (not just the basket) the second brewing is done. This is where most percolator coffee goes wrong.
Electric or stovetop, the ratios and grind are the same. The full method is below.
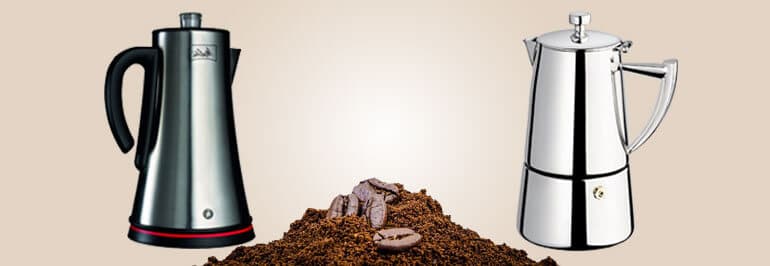
Let’s start with something that might make coffee snobs cringe. Nearly any coffee expert will tell you that a percolator is about the worst possible way to make coffee. Because the water is heated to a boil in order to perk, it’s really too hot for the coffee. It gets over extracted, and you end up with the bitterness and acidity that made coffee a “grownups only” drink back in the day.
But here’s the thing the experts don’t want to admit – sometimes they’re wrong.
I used to be one of those people who turned their nose up at percolated coffee. Pour-over this, French press that, anything but that ancient contraption bubbling away on the stove. Then I spent a weekend at a friend’s cabin where the only coffee maker was his grandmother’s old stovetop percolator. I was prepared for the worst. Instead, I had some of the most satisfying coffee I’d had in months. Rich, full-bodied, and it just worked. Made me realize the problem isn’t the percolator – it’s how people use it.
That said, there are still people who prefer perked coffee to any other kind. Taste is, after all, a matter of taste. And let’s be honest – those enormous coffee urns are still the best way to make lots and lots of coffee for a crowd. Try making coffee for 40 people with your precious pour-over setup and see how that goes.
Why Percolators Get a Bad Rap (And Why It’s Not Always Fair)
The reputation problem comes from decades of people doing it wrong. Too fine a grind, too much heat, too long on the burner – and yeah, you’re going to get bitter, over-extracted swill. But that’s not the percolator’s fault any more than a burnt steak is the grill’s fault.
The science behind it is actually pretty straightforward. In a percolator, boiling water gets forced up through a hollow stem, sprays over the coffee grounds, then filters back down through the grounds and into the pot below. The cycle repeats until you turn off the heat. Done right, this creates a strong, full-bodied coffee. Done wrong, and you’re basically boiling your coffee grounds into submission.
Most people’s percolator horror stories come from leaving the thing on the stove too long, using coffee ground fine enough for espresso, or both. It’s like judging all grilled food based on hockey pucks someone left on the barbecue and forgot about.
The Parts You Need to Know
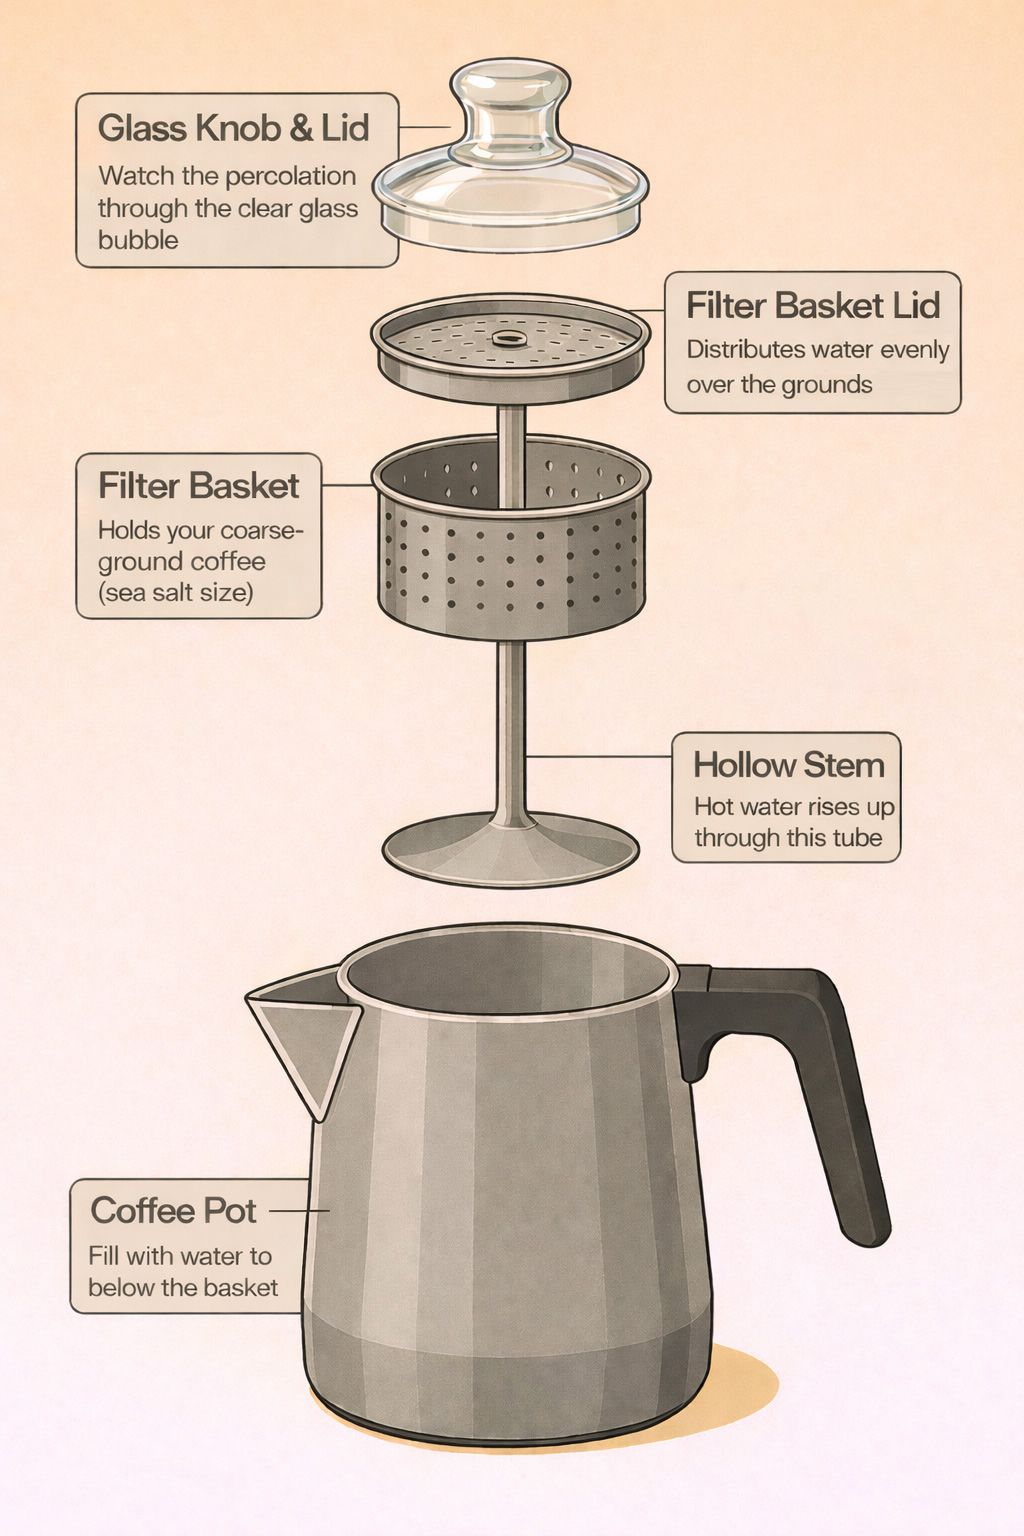
A coffee percolator has five main parts, and understanding each one helps you avoid the mistakes that give percolators their bad name.
There’s the percolator coffee pot itself, into which you put your water. There’s the stem, a hollow metal tube that fits into the bottom of the pot – in non-electric models, it has a flat round bottom that sits on the base. There’s the filter basket, which slides onto the tube and holds the ground coffee. There’s the filter basket cover, a round perforated lid that fits on top and makes sure the water showers the entire basket evenly. And finally, there’s the coffee pot lid, which often has a glass bubble in it.
That glass bubble just might be the most fun part of the entire contraption. It lets you watch the coffee splurting up from the tube and splashing inside before it spills back down onto the lid. Weirdly mesmerizing, like a little coffee fountain show happening right there on your stovetop.
Electric vs. Stovetop: Which Should You Choose?
Coffee percolators come in two distinct types – electric and stovetop. Each has its place, and honestly, both can make decent coffee despite their horrible reputation if you follow a few guidelines.
Electric percolators, including those coffee urns that can make up to forty cups at a time, are the set-it-and-forget-it option. They’re consistent, they shut off automatically, and they’re perfect for offices, church basements, and anywhere else you need to caffeinate a crowd without babysitting the process. The downside? You give up control over timing and temperature.
Stovetop percolators give you complete control, which is both a blessing and a curse. You can adjust the heat exactly how you want it, but you also have to pay attention or risk over-extraction. They’re great for camping since they don’t need electricity, and there’s something genuinely satisfying about the hands-on process. One of our readers pointed out they work differently at altitude too – at 5,300 feet, water boils at about 201 degrees, and percolators run roughly 10 degrees cooler than that, which actually makes the coffee come out better than at sea level. I thought that was fascinating.
What actually changes between the two (steps below stay the same otherwise)
- Heat: electric uses its own thermostat. Stovetop, you start at medium and drop to low the moment it perks.
- When it’s done: electric chimes or shifts indicator color. Stovetop, you watch the glass bubble and the clock.
- Pulling the basket: both still need the entire filter stem removed the second brewing finishes. Most electric models do not do this for you automatically.
- Capacity: stovetop models usually 4 to 12 cups. Electric urns scale up to 40 or 100 cups for events and offices.
For a deeper comparison and buying advice, see Electric vs Stovetop Percolators: Which Should You Buy?
How to Make Perfect Percolator Coffee
Here’s how to make percolator coffee that won’t make you question your life choices:
- Keep all parts of the percolator clean. This isn’t optional. Wash the entire thing with dishwashing liquid and hot water every single time you use it. Coffee oils go rancid faster than you’d think, and old residue will ruin even good coffee. Use a pipe cleaner for the inside of the stem. I learned this the hard way after wondering why my coffee tasted like the bottom of a week-old pot.
- Use freshly ground coffee – and make sure it’s coarse. This is where most people mess up. That pre-ground coffee from the grocery store? It’s ground for drip coffee makers and it’s too fine for percolators. You want a coarse grind, more like sea salt or coarse breadcrumbs. If you don’t have a grinder, look for coffee labeled as coarse grind, or ask your local coffee shop to grind it coarse for you. On a camping trip with no electricity? Carry your ground coffee in a vacuum container with a lid to keep the air out.
- Get your water level right. Disassemble the percolator and put the stem in place. Fill with water to below the line where the filter basket sits. Too much water and you’ll get weak coffee. Too little and it won’t perk properly.
- Don’t be stingy with the coffee. Put the filter basket on and add one heaping tablespoon of coffee for each cup of water. Some people go up to two tablespoons if they like it strong, but start with one and adjust from there. Put the basket lid in place.
- Start the heat. If you’re using an electric percolator, plug it in and turn it on – it’s on its own now. If you’re using a stovetop, put it over medium heat. Not high, not low – right in the middle.
- Watch for the magic moment. As soon as the first splurt of coffee hits that glass bubble, turn the heat down to low. This is crucial. You want just enough heat to keep percolation going, but not so much that you’re boiling your coffee. You’ll hear it change from rapid bubbling to a gentler, slower rhythm.
- Time it right. For most people, 4-8 minutes of perking is the sweet spot. Start checking at 4 minutes – the coffee coming up through the bubble should look like actual coffee, not weak tea. Don’t overthink it.
- Stop the process immediately. As soon as the pot stops perking or you decide it’s strong enough, pull it off the heat.
- Remove the filter stem – this is the step everyone skips. Carefully take off the lid and pull out the entire filter stem assembly, not just the basket. If you leave it in, steam from the coffee keeps condensing, dripping through the spent grounds, and making your coffee progressively more bitter. This is how perfectly good percolated coffee turns into undrinkable swill in about ten minutes.
- Let it rest, then enjoy. Give it about 30 seconds so any grounds that escaped can settle, then pour yourself a cup. You might be surprised by how good it actually is.
When Percolators Actually Shine
Despite what the coffee cognoscenti will tell you, there are situations where percolators are not just acceptable but actually the best choice.
Camping and outdoor adventures. Try bringing your French press on a camping trip and see how long it lasts. Percolators are practically indestructible, work on any heat source, and make coffee strong enough to get you moving after sleeping on the ground.
Large groups and events. Need coffee for 20, 30, or 50 people? A large electric percolator urn beats making pot after pot with any other method. They keep coffee warm for hours without that burnt taste you get from drip makers with hot plates.
The ritual of it. Sometimes the process matters as much as the product. There’s something deeply satisfying about the sound of a percolator bubbling away, the anticipation as you watch that glass bubble, the ritual of removing the basket at just the right moment. It connects you to decades of coffee drinkers who found comfort in exactly the same process.
Troubleshooting Common Percolator Problems
My coffee tastes bitter and terrible. Nine times out of ten, you’re using too fine a grind, perking too long, or both. Try a coarser grind and shorter brewing time. And make sure you’re removing that filter basket immediately when done.
My coffee is weak and watery. Not enough grounds, or the grind is too coarse and water’s flowing through too quickly. Try adding more coffee first, then adjust grind size if needed.
My percolator won’t start perking. Check that the stem is seated properly and the water level is right. It can take 5-10 minutes to get going, especially with electric models. Be patient.
The coffee is muddy and full of grounds. Your grind is definitely too fine. You want pieces about the size of coarse sea salt, not coffee dust.
Best Coffee Beans and Grinds for Percolators
Not all coffee works equally well in a percolator. Medium to dark roasts are your best bet because they’re less acidic and more forgiving of the longer extraction time. Brazilian, Sumatran, and other low-altitude coffees tend to be naturally lower in acid, which plays nicely with percolation.
French roast and Italian roast are particularly good choices. The roasting process has already broken down some of the compounds that turn bitter with extended brewing, and the bold flavors hold up well against the strong extraction.
For grind size – think coarse, then go a little coarser. If you’re grinding your own, aim for something that looks like coarse breadcrumbs or sea salt. Too fine and you get muddy, over-extracted coffee. Too coarse and the water flows through without pulling enough flavor.
The Bottom Line
I’m not going to pretend that percolated coffee is better than a well-executed pour-over or a properly pulled espresso shot. But it’s also not the coffee catastrophe that the experts make it out to be. Made properly – right grind, proper timing, remove the basket – percolator coffee is rich, full-bodied, and satisfying in ways my pour-over never quite manages.
The real problem isn’t the percolator. It’s people who don’t know how to use one. Master the technique, use good coffee ground to the right size, pay attention to timing, and you might find yourself reaching for the percolator more often than you’d ever admit in polite coffee company.
After all, our grandparents drank percolated coffee for decades. They weren’t wrong about everything.
Frequently Asked Questions About Percolator Coffee
Not if you do it right. The bad reputation comes from over-extraction – too fine a grind, perking too long, or forgetting to remove the filter basket after brewing. Follow proper technique and you might be genuinely surprised by how good it can be.
4-8 minutes depending on how strong you like it. Start checking at 4 minutes and taste-test. The coffee coming up through the glass bubble should look like actual coffee, not weak tea. Stop before it gets too dark or you’ll end up with bitter brew.
Coarse grind, like sea salt or coarse breadcrumbs. Fine grinds will give you muddy, bitter coffee that’s impossible to enjoy. If you’re buying pre-ground, look specifically for “coarse grind” or ask your coffee shop to grind it coarse for percolators.
Usually over-extraction from perking too long, grind that’s too fine, or water that’s too hot. Try shorter brew time, coarser grind, and lower heat once percolation starts. And make sure you’re removing the entire filter stem immediately when brewing is done – not just the basket.
Most store-bought ground coffee is too fine for percolators. It’s ground for drip coffee makers and will give you muddy, over-extracted results. Look for coffee specifically labeled as coarse grind, or better yet, grind your own beans.
Start with 1 heaping tablespoon per cup of water. If you like it stronger, go up to 2 tablespoons per cup – but don’t just brew longer to get more strength. That’s how you get bitterness. More grounds, not more time.
Yes, immediately. This is the step most people skip, and it makes all the difference. Remove the entire filter stem assembly, not just the basket. If you leave it in, steam keeps condensing and dripping through the spent grounds, turning your coffee bitter within minutes.
Electric is more convenient and consistent, plus it shuts off automatically. Stovetop gives you more control over heat and timing, and works great for camping. Both can make good coffee with proper technique. It really comes down to how hands-on you want to be.
Check that the stem is properly seated in the bottom of the pot and the water level is correct – it should be below where the filter basket sits. Be patient too. It can take 5-10 minutes for the water to heat up enough, especially with electric models.
Use fewer grounds rather than reducing brew time too much. If you cut brewing time too short, you’ll get weak, sour coffee instead. You can also dilute strong percolated coffee with hot water after brewing – think of it like making an Americano.
Wash all parts with hot soapy water after every use. Use a pipe cleaner or long thin brush for inside the stem – coffee oils build up in there and will make your next pot taste rancid. Once a month, run a cycle with white vinegar and water for a deep clean.
Let the water heat until it just starts to perk, then immediately drop the heat to low. You want hot enough to percolate but not a rolling boil. The percolation should be gentle and steady, not violent bubbling.
Use more coffee grounds rather than longer brew time. A darker roast also gives more intense flavor without extra bitterness. Some people swear by adding a tiny pinch of salt to cut bitter notes, though that’s definitely a personal preference thing.
Interestingly, many people with coffee-related heartburn actually find percolated coffee easier on their stomachs than drip. The longer brewing process and higher heat can break down some of the acids that cause problems. Dark roasted beans help even more with this.
Drop them in the comments below. With over 500 comments from fellow percolator users, our community has probably faced your exact issue before – and there’s always someone willing to share their hard-earned wisdom.
Discussion 582
When the brewing process is finished with an electric perc. do you unplug it/shut it off? Or are you supposed to keep it on to stay hot? Thanks.
Okay…I ran an experiment using calcium carbonate in my perc basket to reduce the acid. I picked up a bottle of calcium supplements at the local drugstore, knowing that it would be food grade calcium. The main ingredient is calcium carbonate, in ingredient in eggshells that reduces the acid. The other ingredients were minimal. I ground one tablet, 600mg, and stirred the powder in the grounds before percing. The result, smoother coffee, no indigestion, and no residue. Yes, I have a lot of time on my hands. But at least it was fun!
I spent some time looking up the “egg” info, so here’s what I found. The egg shell is made of calcium carbonate which neutralizes the acid of the coffee making it smoother. Adding the egg itself is only done when there is no filter or filter basket.
If you have a coffee pot of water on the stove, not a percolator with a stem and basket, you mix a raw egg in with the grounds and cook the concoction over the flame. The egg congeals around the coffee grounds as it cooks, trapping the grounds and therefore “clarifying” the coffee. Egg can’t be added to any maker with a filter.
Eggshells can. Once they are cleaned and dried, you ground them up and add them to the coffee grounds before brewing. They neutralize the acid and the filter removes their sediment.
Wow…seems like a lot of effort for a cup of coffee! I also heard that the cheaper coffees are a higher grade. For the large coffee companies to get bulk they buy “B” grade coffee and process it for bulk consistency.
The better “A” grade is past on, at lower costs, to the smaller coffee producers. It may not be as consistent, but it is generally better. Any comments?
Question: When you add the egg to the grounds in a percolator, do you add the egg first (it would drip through), grounds with egg in the middle, or egg on top? Do you scramble the egg first? I’ve always heard about the benefits, but it just seems messy.
I prefer to perk. The only coffeemaker I liked better was a vacuum pot from 1946. It did boil the water, though, and the coffee was strong, an economical alternative since I used less. I find, too, that to really perk well you have to grind the coffee rather coarsely. If it is milled as fine as the ground coffees you buy in the store you get too much sediment and the coffee is bitter.
I have tried drip and french press coffee, but the electric perc we use up at the cabin is the best, no contest. When we camp and make cowboy coffee we throw the grounds, water and crack an egg into the perc and cook over the open campfire. The grounds are collected by the egg (which cooks) and the coffee is less bitter as well.
Great thread! Came here because I couldn’t remember how to set up and operate a plain old s.s. “campfire” percolator. Now I have more help than I need… ;-)
Re: the egg shell- my dad was on a Navy survey ship in Greenland during the Korean War. They kept a big old pot simmering on the stove in the galley at all times. From time to time, dump in some more grounds and more water.
When it came time to return to their base and the admirals who would be bound to inspect the ship they scrubbed everything mast-to-keel and stem to stern. One of the casualties of the scrubdown was the coffee pot. Dad swears to this day that when they dumped it, a number of Roi-Tan cigar butts emerged along with the grounds and the occasional egg shell.
He claims that on their next cruise the coffee just wasn’t very good.
W
Use baking soda twice a week to clean your stove top percolator. First, wash the pot and filter basket as you would normally with hot soapy water. Then pour about 3-4 teaspoons of baking soda in filter basket. Fill your pot with water and put basket in. Then “perk” for about 10 minutes. Remove from heat and rinse everything thoroughly in cold water. Everything will be squeaky clean!
OK – have just started brewing in a percolator, and it works fine with, say, twelve cups of water. But if I only want to make four cups, it just doesn’t perk no matter how long it’s on the stove! What am I doing wrong here? Can percolators usually make smaller amounts?
I found the advice of DeeAnna in message #8 quite helpful for a nice brew.
A $2 brush that fits tight enough to perfectly clean the pump of a vintage pyrex percolator 4 cup or 6 cup model: Espresso Supply 1/4-Inch Port-a-Filter Brush sold by ES at their Amazon store. The complete overall length of the brush is 6-3/4 inches, and if that is long enough then it would also fit the 9 cup model.
I had a perc’d cup of coffee over Christmas and it was GREAT! It is the coffee I have been searching for instead of the coffee flavored water from the drip pot. I can’t decide if I want a stove top model or electric. I have an electric stove. Any advice would be great. I can’t wait to have real coffee again :)
Just as I was getting repulsed by the coffee at the local convenience store, I found an old aluminum five-cup percolator at a thrift shop. What a trip. My parents used to coffee in a larger version the ’50s and “60’s. I could not stop chuckling and as I looked forward to trying a pot. When I got home, I pulled out my Dunkin’ Donuts coffee and perked a pot.
During the first couple of attempts, I left the basket in when I poured the first cup, and then burned my fingers on the hot glass bubble. The coffee tasted like the strong brew I remember when I first started drinking coffee at home. Also, the unique aroma that filled the kitchen smelled better than it tasted! Of course, using the aluminum pot may not compare to using a glass pot and a coarser grind reduces the quantity of the crunchy treats.
I just started using a 12 cup all stainless percolator after a lifetime of drip coffee. I LOVE IT! No more brewing plastic for me!
Yes Jerry, I have heard of that before. It’s been so long ago, I had forgotten about it. Thank you for the reminder.
You can also add broken egg shells to your plant’s soil, which is supposed to be good for some plants. ;)
My grandma put anegg shell in the coffee grounds, she sead to nutralize the acid or bitterness. It must have worked because she made great coffee. Has anyone else heard of this?
I am a percolator devotee and have found that different pots make coffee that varies in flavor quite a bit. I tried a modern Farberware and the coffee was not very good to my taste. I have a Universal from the ’50 and a Sunbeam from the early ’60s that make the best flavor in my opinion. I have a beautiful Hamiton Beach 40 cup urn that always leaves the coffee tasting slightly burned… so if you try one percolator and are not impressed, try another.
Glad to see how many people were following this thread. I wish to apologize for the “stupid” remark in my original post. Meant only to say that it is a huge error to repeat information without first verifying the accuracy of the info. That being said, coffee is a matter of personal taste. The only two rules of coffee brewing (the actual cycle) are time and temperature. Fresh coffee and clean water (and equipment) go without saying. Most electric percolators brew at 200 degrees, and at about 8 minutes for a 10-12 cup pot. This is the recommended ideal brew temp and time. The water repeatedly cycling over the grounds does nothing chemically different to the coffee than letting it steep in a presspot before plunging.
I think where most people have had bad experiences with percs is in cleanliness. It’s easy to assume that stainless steel is somehow “self cleaning”, and low maintenance. The filter basket, and pump tube need to be washed with hot soapy water after each use. I’ve seen buildup inside of pump tubes that is worse than any of my tobacco pipes. This will produce bad coffee.
Anyone looking for a good deal on a perc (or replacement carafe for their drip machine) should look in thrift stores. These are great places to find bargains on coffee percolators that still have many years of life left. I’ve even found brand new ones, probably donated to charity by someone who received it as a gift and didn’t want it.
One interesting note in all this. The first auto drip machines were actually percolators that ran the water over the coffee once, before it dripped into the pot. If you take the top off of an early Mr. Coffee machine, you will find a short pump tube attached to the spray nozzle. The pump tube sets inside a small steel heating well, just like the well in a coffee percolator. The water is heated a little bit at a time, and percolates up through the tube, and over the coffee grounds.
Newer models eventually incorporated a design in which the water is gravity fed from the resevoir, through an aluminum tube that is directly heated by a heating element, and up through a tube to the spray head.
So, everyone enjoy their coffee; perked, boiled, dripped, or freeze dried. It’s however you like it that’s important.
cowbay coffee is just coffee beans grinded and thrown in the pot with water==boiled over the open fire and drank—some would pour the coffee through a cloth, into a cup, some would drink it down-grinds and all. that was cowboy coffee
I am having a country western wedding, it will be quite authentic does anyone know how to make Cowboy Coffee? I have an old coffee pot from my greatgrandmother which holds about 12 cups.And the tripod to use to make the coffee over a fire.Any help would be appreciated. Thanks!
FOR THE HOW MUCH TO USE QUESTIONS: You should be able to do 1/2 cup of (good quality/fresh) grounds per 10 cups of water and get a decent brew – adjust up or down per taste. For instance, I have a 55 cup perc., so I use 2-3/4 c. grounds (1/2 c x 5 = 2-1/2 cups, and 1/4 c x 1)
A few days ago the glass pot for our B&D plug -in- the- wall socket, auto-start,built-in clock broke. Being in Florida, and semi-prepared for the possible hurricane, I had a metal stove top percolator stuffed away back in the kitchen cabinet. Pulled it out , cleaned in it and told my wife that I would make coffee using it. Had not made coffee this way ever, just seen my grandmother make it in the mornings. And of course there were no directions with it. So I put in about six cups of water, filled the basket with six table spoons of Chock=Full-O-Nuts coffee and put it on the stove. Well, of course it boiled over. but it still wasn’t too bad/ remember, I’m used to the super automatic electric coffee maker.
So we’re now three days later. Can’t find a replacement pot for the coffee maker. This morning I googled on the internet to find the proper way to make coffee using the stove top percolator. Made some minor corrections in my method: took the pot off when it started perking, poured the coffee into a carafe, and am now enjoying a good cup of coffee. think I’l quit looking for the replacement glass coffee pot. the one advantage that it had was that it started automatically, and I had a cup of fresh coffee when I got out of bed. Beyond that, the perc wins, hands down!
I just purchaded a 8-30 cup Party Perc by Cory for $5.00 at a local flea market…what a steal! I have been trying to find one for years and very recently I had to rent one. Please refresh my memory about how much coffee I need to brew the whole 30 cups.Thank you in advance.
I am a receptionist and have an electric percolator in my lobby so that I can have coffee for guests (and for myself). I find that I have to make a full 12-cup pot every day, whether guests drink it or not, because people like my coffee better than the coffee in the break room which is drip type. I use the same coffee but just perk it instead. I like more flavorful, stronger coffee. When you think about it, a drip coffee maker just puts the water through the grounds once, while the percolator puts it through repeatedly. It stands to reason that you get more flavor from perked coffee.
I just bought the coolest retro coffee percolator from a thrift store yesterday. It is roundish like a diving bell helmet, has a flip forward coffee pouring release and just made a really great cup of coffee! I used two scoops more of coffee than I normally would and it is very smooth and strong at the same time. Wasn’t sure how to tell when it was done… I just unplugged when I thought the water showing through the top piece was slightly colored. Now the test is how long will it stay warm? I’m into contemporary so this is perfect I love it!
This is in response to Emily from Nov. 10th. You only need a heat spreader for electric stoves. If you have a gas stove you can just put it right on the burner without a heat spreader. Enjoy your coffee!
You all have inspired me to get out my grandma’s old farberware!! I French Press currently, hate my Krupps drip—YUCK! I am CLRing as I write. In meantime, I bought a vintage Pyrex flameware pot–can I use that directly on my old Wedgewood stove over the flame? Does anyone know–I know from previous posts to keep the flame low and steady– but do I need the heat spreader–or was that for electric only?
Thanks! Looking forward to the morning! Woohoo!
To all that say perc coffee is the best, I have to completley agree with you, I couldn’t figure out why the coffee at work taste great but my coffee at home was horrid, same brand same amount yet work was good home was terrible and then I realized what it was work, had a different coffee machine, they don’t use a perc but the idea is the same NO PLASTIC PARTS and it KEEPS IT HOT without cooking it, I remember having perc coffee growing up so I went to my local walmart and got a percolator and now the coffee is absolutely spectacular! So to let everyone know it’s not the fact that drip pots are inferior its the fact that they are made of plastic and the plastic off gases when it gets hot and puts a wierd flavor into the coffee(which is why I think some people like it so strong your tongue tries to run away)
My Mom used a stovetop percolator and I always loved the taste of the coffee. Because I was a kid she would only let me have a cup as a special treat. Then drip makers came into style and I could not tolerate the taste.
Plus, as a cup of coffee from a drip maker cools off the taste becomes horribly bitter! When a cup of perc’d coffee gets cold the taste doesn’t change, it’s still good if you don’t mind cold coffee. I was using a Farberware aluminum pot and that coffee was good.
But now I’ve purchased a vintage Pyrex Flameware all-glass coffepot off eBay, and their motto, “taste the coffee, not the coffee pot” is true! Not only that, but I live in a part of the country that usually loses power during snowstorms. I can still get out my Farberware pot and make great coffee in the fireplace.
You can’t do that with a drip coffee maker.
I really enjoyed this website. I found an old corningware stove top at a yard sale for $5.00 and it makes the best coffee. I’m just sorry it sat under the counter for so long until my drip machine died. I will be useing my 1960’s perc. for many years to come. Best $5.00 I’ve ever spent!!
I have a vintage coffee pot with no guts…I need to find a 7-71/2″ tall stem with a 4″ diameter basket and lid…I have looked everywhere I could. Do you have any ideas? All your information has been great so far. I enjoy your articles.
Great, helpful information! I was cleaning out the kitchen and found a brand new stainless stove top perc ( Norpro )! Thanks for all the tips guys!
I’m glad I came herre.
I went to an auction last Saturay and bought a lot of stuff and in this stuff was a almost new electric perculator…..well my drip coffee maker stopped working for me. So I am in luck. I have never tried perked coffee before. I just made some for the first time and that was easy! It taste great too.
thanks for the tip – i have a wedding tomorrow and a perk pot and no idea how much to use. You saved the day…..
we have tried every way to make coffee. Wound up with a stove-top percolatero (Revere) frm a flea market. There is nothing to compare to the taste of that coffee. Nothing.
Every holiday making the coffee was a big to do. My Italian grandmother and great aunt were always making it together so it turned out just right. They used a Farberware perculator and Chock Full of Nuts coffee or Foldgers. Living in Seattle, we’ve become accustomed to avoid the basic brands but I’m not sure if it was just the coffee or drinking it out of a china cup that tasted better than any of the coffee cafes here. Boiled or improper, my vote is a perculator.
I must say that my old vintage GE automatic percolator (with cloth cord) is simply the BEST! Drip is just drippy. Maybe a really expensive machine can do it, but I love my $25 on ebay perc!
I have to admit, I don’t make coffee daily (usually when my Navy hubby is deployed, I don’t make it, when he’s here, I do) but the main reason is because I always felt like my own coffee stunk, and I couldn’t enjoy a cup unless someone else made it! Especially if it’s my dad’s coffee. I think I’m starting to realize that I like it so much because he uses the percolator, (& chockful o’nuts that everyone keeps raving about) and it really just makes a full bodied, rich tasting cup of coffee.
We like our coffee on the strong side, so we use a rounded tablespoon per 6oz serving. It can be made with less and still taste ‘ok’ but that’s our idea of a good cup of coffee. Some people seem to make a decent cup from a drip maker, but usually the ones I’ve had, always needed a higher quality of coffee to accomplish this.
My favorite cup will always be going home to visit mom and dad, and pouring it right from the percolator.
My drip coffee maker broke down this morning. I wound up taking out my old Revere Ware SS stove top percolator. I haven’t used it in so long I had forgotten what a good cup of coffee it made.
If you find your coffee tasting a little bitter, next time add a quick dash of salt to the coffee grounds, it takes the bitterness away.
I recently purchased a farberware electric percolator and tried several ways to make the coffee. It always comes out disappointing, weak with no flavor. I’m wondering that it might be that anyone that likes coffee made from this pot prefers a blander kind of coffee.
my farberware electric just went to coffee hell and I had to pull out the stove top corningware. WHAT A DIFFERENCE! Stove top perc is the best with Chockful O Nuts coffee. I felt like I was in coffee utopia. I will never use electric again.
can’t we all just get along….:)I am going to buy a coffee urn for meetings @ my home, any tips on what type of decaf to buy(evenings, people want decaf)and how much for say 30 cups…No offense Jeff, but yours didn’t sound like enough…
The key to a perculator pot is, not over cooking it. when the perc ing slows take it off the stove.
The big elctric pots, I make 42 cup with 8 +1 mountain sized tablespoons (1 per 5/6 oz cup + 1)
I know it’s way less than what they say but it does work. And the best water, we use 5 gallon bottles of spring water.
If you use 1 tablespoon (T) of coffee per serving (5-6 oz), then a 42 cup percolator will need 42 T to brew a full pot. 42 T = about 2 2/3 cups. I used the conversion of 16 T = 1 cup.
I had to make percolator coffee recently after years of using an electric drip machine, and I discovered I like percolator coffee as well or better than drip.
Some folks say a percolator makes the brew bitter, but that’s not necessarily true IF you use decent coffee AND brew at a gentle simmer for ONLY the recommended length of time.
I used fresh, good quality coffee ground for auto drip. When the pot started perking, I reduced the heat until there was a gentle “perk” every 1-2 seconds, then brewed for 5 minutes. I removed the pot from the stove immediately to stop the perking action. The results were excellent — mellow and rich.
The coffee my grandmother and mother used when I was young made a bitter cup regardless of brewing method. Since percolators were the most common brewing method back then, percolators got a bad rap, when it really was the coffee that was inferior.
A common myth is that a percolator puts boiling water over the grounds, but that won’t happen unless you bring ALL of the water in a percolator to a roaring boil. If you perk correctly, that won’t happen.
I agree the water at the bottom of the stem needs to be at a strong simmer to create a density difference and start the percolating action. As the water rises through the stem, however, it is cooled by the main body of water in the pot. By the time the water in the stem reaches the coffee in the basket, it’s at a good brewing temperature.
So … use good coffee. Adjust the temperature to a gentle perk while brewing. Time the brew cycle carefully. Remove the coffee from heat promptly.
I’m a french press fan myself but where I work I find my self having to use the mega 42 cup peculator and since I love coffee and the since of coffee I’m in charge of making it. However I’m still trying to figure out a good mixture for that amount of coffee. Any tips? How many table spoons in a 42 serving?
I agree with Eric also. After many years of luke warm coffee from the Mr. Coffees, I went out and bought a Farberware Percolator. Yum…..and it doesn’t matter what kind of coffee you use. One of the best tasting is Chock Full O’ Nuts New York Style. Gavalia Sperl is also a good choice and the best thing is it stays nice and hot…..
You two guys(Eric + Besty) are doing exactly what you are accusing the author of, trashing one method of brewing coffee over another. It’s a matter of individual taste. I have tasted v.good coffee produced using both methods. The ingredients are the most important items, fresh beans ground properly shortly before you make the coffee.
I grew up w/my Mom perking it on the stove even tho she was given an electric percolator. I’ve tried the drip ones – ugh! I want the taste of the coffee! Percolators rule!
I just have to second Eric. I couldn’t have said it better. Thank goodness the stupid drip one broke and I had to pull out the old Farberware percolater. Why did I ever stop using percolater? The usual coffee machines seem engineered to give out too. Better coffee and takes less space. Doesn’t boil it!!!
I simply wanted to know how much coffee to put into a 50 cup perculator.
Electric percolators do NOT boil the coffee; they brew at 200 degrees. Most everyone who enjoys coffee made in a percolator nowadays has switched from the lame, inferior drip machines. Yet, those who claim percolators are “the worst way to make coffee” have probably never even used one. Stop repeating erroneous second hand information that you simply heard from some other supposed coffee expert. Doing this simply makes you look stupid when people realize that you were so wrong.