Quick instructions (the short version)
- Coffee: 1 heaping tablespoon of coarse-ground coffee per cup of water (about 240 ml / 8 oz). Up to 2 tablespoons per cup if you like it strong.
- Grind: coarse, like sea salt or coarse breadcrumbs. Anything finer turns muddy and bitter.
- Brew time: 4 to 8 minutes once it starts perking. Start checking at 4. Stop sooner if it looks dark enough through the glass bubble.
- Heat: drop it to low the moment percolation begins. A rolling boil is not what you want.
- Most important step: remove the entire filter stem (not just the basket) the second brewing is done. This is where most percolator coffee goes wrong.
Electric or stovetop, the ratios and grind are the same. The full method is below.
Let’s start with something that might make coffee snobs cringe. Nearly any coffee expert will tell you that a percolator is about the worst possible way to make coffee. Because the water is heated to a boil in order to perk, it’s really too hot for the coffee. It gets over extracted, and you end up with the bitterness and acidity that made coffee a “grownups only” drink back in the day.
But here’s the thing the experts don’t want to admit – sometimes they’re wrong.
I used to be one of those people who turned their nose up at percolated coffee. Pour-over this, French press that, anything but that ancient contraption bubbling away on the stove. Then I spent a weekend at a friend’s cabin where the only coffee maker was his grandmother’s old stovetop percolator. I was prepared for the worst. Instead, I had some of the most satisfying coffee I’d had in months. Rich, full-bodied, and it just worked. Made me realize the problem isn’t the percolator – it’s how people use it.
That said, there are still people who prefer perked coffee to any other kind. Taste is, after all, a matter of taste. And let’s be honest – those enormous coffee urns are still the best way to make lots and lots of coffee for a crowd. Try making coffee for 40 people with your precious pour-over setup and see how that goes.
Why Percolators Get a Bad Rap (And Why It’s Not Always Fair)
The reputation problem comes from decades of people doing it wrong. Too fine a grind, too much heat, too long on the burner – and yeah, you’re going to get bitter, over-extracted swill. But that’s not the percolator’s fault any more than a burnt steak is the grill’s fault.
The science behind it is actually pretty straightforward. In a percolator, boiling water gets forced up through a hollow stem, sprays over the coffee grounds, then filters back down through the grounds and into the pot below. The cycle repeats until you turn off the heat. Done right, this creates a strong, full-bodied coffee. Done wrong, and you’re basically boiling your coffee grounds into submission.
Most people’s percolator horror stories come from leaving the thing on the stove too long, using coffee ground fine enough for espresso, or both. It’s like judging all grilled food based on hockey pucks someone left on the barbecue and forgot about.
The Parts You Need to Know
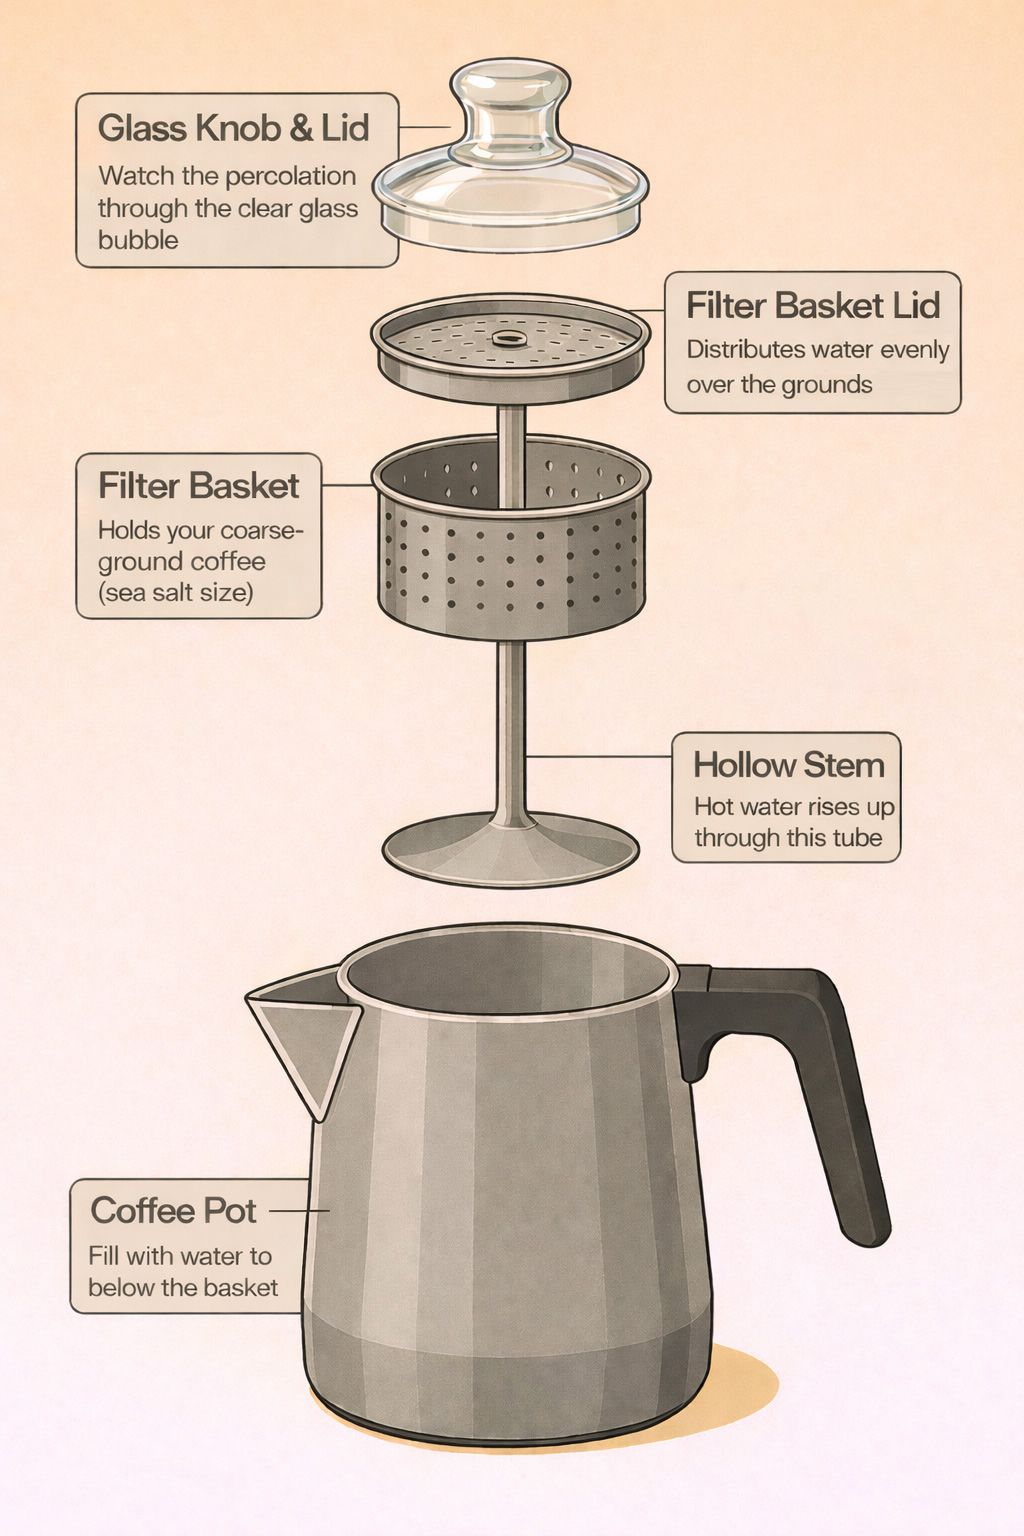
A coffee percolator has five main parts, and understanding each one helps you avoid the mistakes that give percolators their bad name.
There’s the percolator coffee pot itself, into which you put your water. There’s the stem, a hollow metal tube that fits into the bottom of the pot – in non-electric models, it has a flat round bottom that sits on the base. There’s the filter basket, which slides onto the tube and holds the ground coffee. There’s the filter basket cover, a round perforated lid that fits on top and makes sure the water showers the entire basket evenly. And finally, there’s the coffee pot lid, which often has a glass bubble in it.
That glass bubble just might be the most fun part of the entire contraption. It lets you watch the coffee splurting up from the tube and splashing inside before it spills back down onto the lid. Weirdly mesmerizing, like a little coffee fountain show happening right there on your stovetop.
Electric vs. Stovetop: Which Should You Choose?
Coffee percolators come in two distinct types – electric and stovetop. Each has its place, and honestly, both can make decent coffee despite their horrible reputation if you follow a few guidelines.
Electric percolators, including those coffee urns that can make up to forty cups at a time, are the set-it-and-forget-it option. They’re consistent, they shut off automatically, and they’re perfect for offices, church basements, and anywhere else you need to caffeinate a crowd without babysitting the process. The downside? You give up control over timing and temperature.
Stovetop percolators give you complete control, which is both a blessing and a curse. You can adjust the heat exactly how you want it, but you also have to pay attention or risk over-extraction. They’re great for camping since they don’t need electricity, and there’s something genuinely satisfying about the hands-on process. One of our readers pointed out they work differently at altitude too – at 5,300 feet, water boils at about 201 degrees, and percolators run roughly 10 degrees cooler than that, which actually makes the coffee come out better than at sea level. I thought that was fascinating.
What actually changes between the two (steps below stay the same otherwise)
- Heat: electric uses its own thermostat. Stovetop, you start at medium and drop to low the moment it perks.
- When it’s done: electric chimes or shifts indicator color. Stovetop, you watch the glass bubble and the clock.
- Pulling the basket: both still need the entire filter stem removed the second brewing finishes. Most electric models do not do this for you automatically.
- Capacity: stovetop models usually 4 to 12 cups. Electric urns scale up to 40 or 100 cups for events and offices.
For a deeper comparison and buying advice, see Electric vs Stovetop Percolators: Which Should You Buy?
How to Make Perfect Percolator Coffee
Here’s how to make percolator coffee that won’t make you question your life choices:
- Keep all parts of the percolator clean. This isn’t optional. Wash the entire thing with dishwashing liquid and hot water every single time you use it. Coffee oils go rancid faster than you’d think, and old residue will ruin even good coffee. Use a pipe cleaner for the inside of the stem. I learned this the hard way after wondering why my coffee tasted like the bottom of a week-old pot.
- Use freshly ground coffee – and make sure it’s coarse. This is where most people mess up. That pre-ground coffee from the grocery store? It’s ground for drip coffee makers and it’s too fine for percolators. You want a coarse grind, more like sea salt or coarse breadcrumbs. If you don’t have a grinder, look for coffee labeled as coarse grind, or ask your local coffee shop to grind it coarse for you. On a camping trip with no electricity? Carry your ground coffee in a vacuum container with a lid to keep the air out.
- Get your water level right. Disassemble the percolator and put the stem in place. Fill with water to below the line where the filter basket sits. Too much water and you’ll get weak coffee. Too little and it won’t perk properly.
- Don’t be stingy with the coffee. Put the filter basket on and add one heaping tablespoon of coffee for each cup of water. Some people go up to two tablespoons if they like it strong, but start with one and adjust from there. Put the basket lid in place.
- Start the heat. If you’re using an electric percolator, plug it in and turn it on – it’s on its own now. If you’re using a stovetop, put it over medium heat. Not high, not low – right in the middle.
- Watch for the magic moment. As soon as the first splurt of coffee hits that glass bubble, turn the heat down to low. This is crucial. You want just enough heat to keep percolation going, but not so much that you’re boiling your coffee. You’ll hear it change from rapid bubbling to a gentler, slower rhythm.
- Time it right. For most people, 4-8 minutes of perking is the sweet spot. Start checking at 4 minutes – the coffee coming up through the bubble should look like actual coffee, not weak tea. Don’t overthink it.
- Stop the process immediately. As soon as the pot stops perking or you decide it’s strong enough, pull it off the heat.
- Remove the filter stem – this is the step everyone skips. Carefully take off the lid and pull out the entire filter stem assembly, not just the basket. If you leave it in, steam from the coffee keeps condensing, dripping through the spent grounds, and making your coffee progressively more bitter. This is how perfectly good percolated coffee turns into undrinkable swill in about ten minutes.
- Let it rest, then enjoy. Give it about 30 seconds so any grounds that escaped can settle, then pour yourself a cup. You might be surprised by how good it actually is.
When Percolators Actually Shine
Despite what the coffee cognoscenti will tell you, there are situations where percolators are not just acceptable but actually the best choice.
Camping and outdoor adventures. Try bringing your French press on a camping trip and see how long it lasts. Percolators are practically indestructible, work on any heat source, and make coffee strong enough to get you moving after sleeping on the ground.
Large groups and events. Need coffee for 20, 30, or 50 people? A large electric percolator urn beats making pot after pot with any other method. They keep coffee warm for hours without that burnt taste you get from drip makers with hot plates.
The ritual of it. Sometimes the process matters as much as the product. There’s something deeply satisfying about the sound of a percolator bubbling away, the anticipation as you watch that glass bubble, the ritual of removing the basket at just the right moment. It connects you to decades of coffee drinkers who found comfort in exactly the same process.
Troubleshooting Common Percolator Problems
My coffee tastes bitter and terrible. Nine times out of ten, you’re using too fine a grind, perking too long, or both. Try a coarser grind and shorter brewing time. And make sure you’re removing that filter basket immediately when done.
My coffee is weak and watery. Not enough grounds, or the grind is too coarse and water’s flowing through too quickly. Try adding more coffee first, then adjust grind size if needed.
My percolator won’t start perking. Check that the stem is seated properly and the water level is right. It can take 5-10 minutes to get going, especially with electric models. Be patient.
The coffee is muddy and full of grounds. Your grind is definitely too fine. You want pieces about the size of coarse sea salt, not coffee dust.
Best Coffee Beans and Grinds for Percolators
Not all coffee works equally well in a percolator. Medium to dark roasts are your best bet because they’re less acidic and more forgiving of the longer extraction time. Brazilian, Sumatran, and other low-altitude coffees tend to be naturally lower in acid, which plays nicely with percolation.
French roast and Italian roast are particularly good choices. The roasting process has already broken down some of the compounds that turn bitter with extended brewing, and the bold flavors hold up well against the strong extraction.
For grind size – think coarse, then go a little coarser. If you’re grinding your own, aim for something that looks like coarse breadcrumbs or sea salt. Too fine and you get muddy, over-extracted coffee. Too coarse and the water flows through without pulling enough flavor.
The Bottom Line
I’m not going to pretend that percolated coffee is better than a well-executed pour-over or a properly pulled espresso shot. But it’s also not the coffee catastrophe that the experts make it out to be. Made properly – right grind, proper timing, remove the basket – percolator coffee is rich, full-bodied, and satisfying in ways my pour-over never quite manages.
The real problem isn’t the percolator. It’s people who don’t know how to use one. Master the technique, use good coffee ground to the right size, pay attention to timing, and you might find yourself reaching for the percolator more often than you’d ever admit in polite coffee company.
After all, our grandparents drank percolated coffee for decades. They weren’t wrong about everything.
Frequently Asked Questions About Percolator Coffee
Not if you do it right. The bad reputation comes from over-extraction – too fine a grind, perking too long, or forgetting to remove the filter basket after brewing. Follow proper technique and you might be genuinely surprised by how good it can be.
4-8 minutes depending on how strong you like it. Start checking at 4 minutes and taste-test. The coffee coming up through the glass bubble should look like actual coffee, not weak tea. Stop before it gets too dark or you’ll end up with bitter brew.
Coarse grind, like sea salt or coarse breadcrumbs. Fine grinds will give you muddy, bitter coffee that’s impossible to enjoy. If you’re buying pre-ground, look specifically for “coarse grind” or ask your coffee shop to grind it coarse for percolators.
Usually over-extraction from perking too long, grind that’s too fine, or water that’s too hot. Try shorter brew time, coarser grind, and lower heat once percolation starts. And make sure you’re removing the entire filter stem immediately when brewing is done – not just the basket.
Most store-bought ground coffee is too fine for percolators. It’s ground for drip coffee makers and will give you muddy, over-extracted results. Look for coffee specifically labeled as coarse grind, or better yet, grind your own beans.
Start with 1 heaping tablespoon per cup of water. If you like it stronger, go up to 2 tablespoons per cup – but don’t just brew longer to get more strength. That’s how you get bitterness. More grounds, not more time.
Yes, immediately. This is the step most people skip, and it makes all the difference. Remove the entire filter stem assembly, not just the basket. If you leave it in, steam keeps condensing and dripping through the spent grounds, turning your coffee bitter within minutes.
Electric is more convenient and consistent, plus it shuts off automatically. Stovetop gives you more control over heat and timing, and works great for camping. Both can make good coffee with proper technique. It really comes down to how hands-on you want to be.
Check that the stem is properly seated in the bottom of the pot and the water level is correct – it should be below where the filter basket sits. Be patient too. It can take 5-10 minutes for the water to heat up enough, especially with electric models.
Use fewer grounds rather than reducing brew time too much. If you cut brewing time too short, you’ll get weak, sour coffee instead. You can also dilute strong percolated coffee with hot water after brewing – think of it like making an Americano.
Wash all parts with hot soapy water after every use. Use a pipe cleaner or long thin brush for inside the stem – coffee oils build up in there and will make your next pot taste rancid. Once a month, run a cycle with white vinegar and water for a deep clean.
Let the water heat until it just starts to perk, then immediately drop the heat to low. You want hot enough to percolate but not a rolling boil. The percolation should be gentle and steady, not violent bubbling.
Use more coffee grounds rather than longer brew time. A darker roast also gives more intense flavor without extra bitterness. Some people swear by adding a tiny pinch of salt to cut bitter notes, though that’s definitely a personal preference thing.
Interestingly, many people with coffee-related heartburn actually find percolated coffee easier on their stomachs than drip. The longer brewing process and higher heat can break down some of the acids that cause problems. Dark roasted beans help even more with this.
Drop them in the comments below. With over 500 comments from fellow percolator users, our community has probably faced your exact issue before – and there’s always someone willing to share their hard-earned wisdom.
Discussion 582
I just bought a perc at a yard sale yesterday. I love how the coffee tastes made in the perc, it’s steaming hot unlike my drip coffee maker. And some might say it tastes bitter but that’s how I think coffee should be. When I make it in the perc it is strong and has that full coffee flavor. It all dependes on a person’s preference thoiugh I just like the taste of coffee from the percolator
Wow, hello to all of you from Australia. I bought a Corning Ware ceramic from a local op shop the other day and Googled how to make coffee in it, ended up here. I am VERY impressed with the amount of information, and am sitting here drinking my very first per’d cup of coffee. My Dad uses one, my Nunu used to make coffee this way when I was a little kid, and I am as happy as…well, just happy! Thank you.
Does anyone know hot a electic perc keeps coffee? My husband thinks ours is not making hot enough coffee. How hot should coffee be served? Thanks!
Yes, Russ, that is the way it was all together, so I suspect you are correct. I expected to be attending an event this weekend where I could try it out, but our motorhome developed a loose belt, and rather than break down in the middle of nowhere, we turned back. I’ve always used the smaller Revere Ware percolators, which are the simple single stem and basket. I have a few other ones as well, being a life-long camper and Scouter.
I’ll give it a try. Thanks!
Sammy,
Most if not all percolators leave a residue of “coffee dust”. This is the fine powder left by the grinding/milling process. Melita makes disc filters that fit the bottoms of most perc baskets. These cut down that residue a lot, but not totally. And, yes, the coarser the grind, the less residue. In fact, percolators require the least grinding (is “coarsest” a word?).
Deb,
Our church used to have a Revere percolator and if I remember the smaller “basket” is the cover, the holes distribute the water evenly. The stout stem with the larger base is the bottom stem. If I remember, the two stems go together” It’s been a long time…I’m an advocate of experimenting to find out what works, just use plain water, though, no coffee until your machine starts to make sense. Good Luck and Happy Easter!
Does anyone here use a Bialetti? I have a 3-cup Bialetti stovetop percolator (since last week) and it makes good coffee but I find there is some very small coffee residue in my coffee every time. I used medium coarse grind coffee and a very low heat to brew the coffee. Does anyone know why or what I can do to fix this? Coarser grind perhaps?
Does anyone know how to use the larger Revere Ware percolators that have more than one section or basket? I have one large pot that is all one piece, but seems to almost have two baskets; one fits inside of the other. Maybe the smaller, top basket functions as the cover? It has two stems, as well. Likewise, one fits inside the other. The shorter, stouter stem has a circular base near in size to the diameter of the pot. The other stem is taller, narrow, and has a smaller diameter base.
Somewhere I have another Revere Ware percolator that comes apart in two sections. I don’t remember what the inside of that one looks like. I’ll have to hunt it up over the weekend. I’ll be away and may not be able to check email for a couple of days, but thanks for any info, and Happy Easter!
Russ, thank you …. I never thought of a local antique shop. We have a great antique mall that I visit occasionally.
Patty, you might want to try a local antique shop if you’re looking for a percolator. In the several shops in our city there is quite a selection, percolators ranging from the 1920s through today. If you ask the shop owner politely they may let you test the pot there by running it through its cycle with plain cold water.
LindaK, sounds like a fun plan. I’m watching for a used percolator at Goodwill. The one I got from E-Bay only makes two (2) cups and even though it is electric, it has some age on it. My husband thinks I’m goofy but I’m finding it fun.
I figured you meant “use”; as a touch typist I have done my share of letter reversal, so I may not use “spelcheker”, but I try to proofread before hitting send. You have some good ideas.. I’ll try the paper filter packet ploy first. In the immortal words of John Paul Jones, “I have just begun to fight!” Or a stitch in time saves nine….or pride goeth before a fall….something like that….
One more comment to LindaK, “use” a paper filter (I misspelled). Also, don’t give up. I remember asking my mom why she left a little bit of coffee in her coffee cup and she said it was a habit of the days of on-stove percolated coffee – there were always grounds on the bottom of the cup.
Don’t give up. You have the basket, just sure a paper coffee filter (put coffee grounds in and fold paper filter over. It works great, I know, I just did it recently with an vintage 4-cup percolator I purchased from E-Bay. You may be able to find a basket cover on Corning Ware website; also check E-Bay and your local Goodwill store.
Well, last Monday I tried making a pot in the CorningWare stovetop without the perforated basket. Lots of grounds wound up in the pot, which I strained out with each cup. I think next I’ll try it using a cutout of a paper filter over the basket and see what happens. But one thing I can say, and that is that you sure can’t mistake the resultant coffee for Mr. Coffee produce! My dad liked strong coffee, and this must be why my mom used this one. There’s probably nowhere to get a perforated basket top. Rats!
After reviewing this site I found that 5 or 6 minutes is the best brewing time for a stove top
percolator. Reduce the heat after first perk and dump the basket after brewing. My antique shop find, Revereware stainless steel 8 cup, makes the best coffee I have ever tasted. I purchased the pot for power outages, but after tasting a cup, I tossed the drip maker.
Linda, I accidentally left that perforated “distributor” off the basket one day and only had hot water in the pot after brewing. On a spring loaded stem and basket, that perforated piece makes the seal at the top that forces the hot water down into the grounds. Without it, at least on my percolator, the water just ran down the sides of the pot. When you put the pot together, does the basket seal tightly to the lid? If so, I’d try to make a pot. Even if it doesn’t, a little test perc can’t hurt.
Today I found my mom’s old CorningWare glass stovetop percolator, and I scrubbed it out to use tomorrow. I didn’t know how long to let it perc, or what heat to do it on, so I Googled and found this site. Fantastic! Great info! I read that there was supposed to be a perforated top over the basket, which this percolator lacks. If I tried it without that top, would I wind up with a cupful of coffee grounds? I had so been looking forward to the sights and sounds and yummy smell.
I just purchased a vintage 4-cup electric percolator (can find no name and/or brand on it – there is no light, etc. How long should I perk? I’m not sure it is designed to shut off. Coffee is good but it was a guess on how long to perk,
Rosemary, I heat my stovetop perculator on high till it starts percing then reduce the temperature enough to just keep it percing since it’s already boiling hot as to not ‘burn’ the coffee. I pull it off at about 6 minutes or so of percing. Probably a matter of taste and coffee brands. You’ll have to play with it. Lots of tasting!!!
Rosemary, I was at an antique store this weekend with my teenage daughters and the proprietor had a glass percolator brewing on a hot plate behind the counter. My sixteen year old noticed the aroma and sought it out. The gentleman had it down to a science and proudly showed us all the start of a new pot, after graciously sharing some with us. The process is gentle, no need to hard boil. It only took four or five minutes of percolating before he turned off the heat. It was exceptionally good coffee, although I had to limit because of the new decaf discipline. I hope this helps.
I have a stainless steel stove top percolator. The little clear, plastic knob on the top of the lid turned cloudy and cracked. Ace Hardware has a universal replacement glass knob for about $3 to $4. My pot is like new.
I’m back! First attempt involved cleaning up a groundsy brown mess on my stovetop after the (carefully watched except for about 10 seconds when I left the room) … pot boiled over. But still, even with coffee at a rolling boil when I entered the room, what great tasting coffee!! I’m thrilled to have found this site. So enjoyable to read all your posts.
Anyway, this morning I stayed put for the whole procedure. I was surprised at how quickly the water colored after the first perk, almost immediately… and the aroma was heavenly. Here’s where I need some more info because I can’t find anything stating just how long to leave the pot on the heat. I turned it right low, played around with it so it was perking but short of a boil. After a couple of minutes of gentle perking, the fragrant coffee aroma turned to a slightly burnt one. The directions at the start of this discussion say ‘as soon as the pot stops perking remove it from the heat’ however, I believe the pot will perk ad infinitum (or until it boils dry :) would it not? So my question is … how long is tooooo loooong? BTW the coffee still tastes great, not burnt or bitter.
Thanks all!! Isn’t this fun?? What a trip down memory lane … even the action of cleaning out the basket and strangely seeing, in place of my now wrinkled hands, those of a young girl, carefully guiding the corner of the dishcloth under the rim so as to get off all the residue, a strict rule in my mother’s kitchen. Cheers!
Russ!! Sonovagun! You are absolutely right.
I went and looked closely and the spring on the stem with the ceramic sleeve is NOT attached very well, in fact, not at all. (I found I can slide the spring up and then also the sleeve to remove it entirely–but aha the basket slides down to the bottom!). The spring without the sleeve is firmly attached to the stem. And the sleeve is just exactly the same length as the distance between the bottom of the spring and the collar at the bottom on the other one.
Mystery solved. I would say that maybe the stem with the sleeve is the older stem — or my dad who was a “problem?-fix-it!” kinda guy just found something to correct the sliding spring. Anyway, I have enjoyed this chat and thanks so much for the background story!
Best regards!
Margy, your ceramic stem sleeve wouldn’t leave me alone! So, after much web searching, I called my local appliance shop, who re-directed me to the oldest shop in town. They knew the purpose of the ceramic sleeve. Apparently the spring wasn’t crimped tightly around the stem and the ceramic sleeve was simply a spacer! That’s it! It kept the spring from sliding down the stem. They told me that the stems are fully interchangeable within the same manufacuter’s brand. So, for authenticity, keep the stem. For practicality, give away the regular one. Whew! Now I’m at peace, too.
It is kind of “attached” to the stem, being in between the bottom of the spring and the collar that slips down inside the hole in the bottom of the pot. I thought maybe it had something to do with heat retention perhaps when the water was going up the tube? A stretch, but it looks more like an insulator than not. I have been using this one, but in the morning I will try the one without the sleeve and see if there is any difference. Thanks so much for the quick response!
Margy, I’ve seen ceramic sleeves before but neverknew what they were for! I used to have a Proctor-Silex that had a dial on the stem for adjusting the strength of the brew, maybe it is something like that. Anyway, I’d try brewing without the sleeve. If it’s not needed to percolate the coffee, just hang onto it until you know what it is, especially if it is unsightly.
Well, what a wonderful site this is! I googled on to find out which of my two old Farberware 4 cup percolators (left by my dad after he died) is newer and found all kinds of really great information here. Thanks, guys.
I just discovered this week what everyone has been saying about how HOT this perked coffee is and want to give my son one of mine for his wife who nukes her coffee after it comes out of her Mr.C pot just to get it hot enough. So, now, question: Since I want to give him the newer one, and I can tell which pot is older, but NOT the stem tubes. One has a ceramic (I think) sleeve around it, much stained by the coffee, and the other one does not.
What is the reason for the sleeve and did it come on the newer one or the older one. Can I get a replacement if it is needed for the other one?
Angela, you’re quite welcome. I have a delimma now, though. Over the past two weeks I’ve had to switch to decaf coffee. The withdrawal headaches are beginning to subside, but I can tell you, going from a pot a day of caffeine to zero has been painful. My problem now is that I can’t seem to find a good decaf coffee. Those of us who are serious coffee drinkers know immediately when someone has served us decaf. I’m hoping that either my taste will change and I’ll grow accustomed to the new flavor, or that someone will point me in the direction of a good decaf brand. Any suggestions?
Thanks for the advice Russ. I’ve been making stupendously good coffee for a week now! :-) Long live the perc.
Angela
I want to share a solution to a common problem with percolators. You know the glass, and more often, plastic tops that let you see the coffee percolate? They often break, as many of us know.
It used to be that any hardware store carried a supply. Not any more. I met a lady recently who couldn’t find one even though her percolator was fairly new.
Her husband, being a man, went to the hardware store and improvised. He picked up a stainless steel drawer pull, a stainless screw, and a stainless washer. The top of her percolator is now invincible!
The coffee still percs, you just hear it rather than see it. The minor drawback is that the knob stays hot. But that’s how she broke the plastic one in the first place, trying to tilt the lid while it was hot.
Oh, by the way. Those drip makers that don’t get hot enough only release about 6 of those compounds. Maybe that’s why the house smells so good when perking. Hope this page isn’t heavily viewed or it’s going to be hard to find those old perculators.
I use a Faberware electric perc I found stashed under my mom’s kitchen counter. It’s over 30 years old and never used. Read somewhere that perced coffee even make Foldgers taste good. Tried it and tossed out my drip maker. I use 8’Oclock coffee. Way better than in my drip. Finally told a friend who loves coffee about how much better the coffee tastes and he started laughing because he had switched to a perc and was afraid to tell his friends. He thought they would think he was crazy. I always unplug mine after brewing and pour the left over into a caraffat, which I found stashed also. Keeps it hot all day. I also read somewhere that there are over 250 compounds in coffee and it takes about 180 to 190 degrees for 6 to 8 minutes to release most of them. Most tested drip machines never reach that temperature except for the last minute of brewing if at all. In the test I saw only one achieved that because it had a copper heating element and was quite expensive while the others had aluminum elements.
I think I saw the report in Consumer Reports a while back. Happy Percing
I Love Percolated Coffee, I Pan Roast Coffee, And I Welcome Any Challenge, Hands Down, I Will Beat Any Regular Coffee Pot With My Percolator N Pan Roasted Beans. It’s All In The Grind, And The Freshness OF The BEAN :D (|_|
Angela, the water needs to be just below the basket. This allows for the water to drip back down into the pot. The metal cooker will react like a cast iron pan, slow to heat and slow to cool. Make sure you have the percolator on the cooker before turning on the heat. Always turn it to the highest setting to start and anticipate turning it off midway through a good perc. Practice will make perfect.
Hi, great guide.
Today I bought a stove top percolator in a charity shop – it’s a metal Sona circa 1970. I have two questions, the basket is fixed to the stem – do I use the same procedure as described above – ie fill with water to just below the basket? Secondly, I have an electric cooker with solid metal hobs, these really hold the heat and I envisage a problem when trying to regulate the temperature – anybody got any tips? Thanks, Angela
Thanks for the reply, Russ. The Mardis Gras Morning March has come and gone already this morning, and the champagne and tangerines were more popular than the coffee, but I was impressed with how the coffee turned out. Glad to have the advice on iced coffee. I’ll do it!
Stephen, you are blessed with a great gift! The “church” percolator sounds like it is working perfectly and will serve you well. The only problem I ever ran into was getting 60 or 80 people to enjoy the same strength of coffee! I tend to make mine stronger, the weaker stuff turns me off. Those who like it weaker can, as my wife says, always add water. I’d brew one good test to get it down pat. The coffee you make can always be refrigerated and served iced later.
Rosemary, your glass stove top is ideal for a glass percolator. The top diflects convective heat naturally while the heat is radiated to the percolator. Just set the percolator on the heating element before turning on the stove so they both heat equally.
Great resource. Thanks, interwebs!
So, I’m planning on making a lot of coffee for a lot of people in a couple of days. I have what I call a giant “church” coffeemaker, an electric percolator with marks on the side for 40, 60, and 80 cups! It hadn’t been used in quite a while, though I don’t think it’s vintage, but I didn’t know if it worked or what kind of coffee it might brew. This forum heartens me! So, I cleaned it up (there are still stains and calcium residue that aren’t coming off easily), filled it with water to the 60 cup line and switched ‘er on. The light didn’t come on, but I reviewed the instructions printed on the machine. They said the light came on when coffee was ready. Okay, but how do I know it’s working? A couple of seconds later, I heard a “perc”, and got glad again. I set up a stopwatch to see how long things would take. Well, 55 minutes later, I’m done reading these forum entries and still no light, but the sound the machine is making has become steady, and steam is coming out the edges of the lid. I decide to keep waiting, and after a few more minutes, I hear a click. The light came on! Then the percolating stopped. Does this sound trustworthy? An hour sounds like a long time for coffee to brew, but I know it’s a lot of water. Does the fact that the percolating stopped indicate that I don’t really need to worry about pulling the basket out immediately? (Well, the directions do say to pull the basket out, so I will.) I’m going to get some coffee ground today, and some good filtered water. Is it important I get all that calcium off before the big brew? There is a bit in the heating well and clinging to the base of the filter stem. Any recommendations? Thanks so much!
While going through some boxes in our storage locker today, I came across an old (1950’s or 60’s I think) decorative glass percolator of my mother’s and brought it home, anxious to try it out, particularly so after reading all your thoughts and experiences here. I too have a question … we have a glass top stove. Do I need to put a heat diffuser under the pot or can it go directly onto the cook top surface? Thanks in advance and happy sipping everyone!
Mike, by Corning you mean glass, and it does take longer to heat than aluminum. I wouldn’t bother with adding the stem and coffee after its hot, seems dangerous and I’m sure you have a life that’s not centered on brewing coffee. The first time you brew you need to watch the pot. Make your heating adjustments and time the cycle. From then on you’ll just have to duplicate the process and return to find the coffee ready. I used to do this with sausage and eggs in the morning, letting everything cook as I prepared for my day.
Please take a seat – i like to write
I just bought a ‘very new’ second hand Corning Ware 9 cup stove top percolator. It’s really a classy table top coffee pot that my Mom would have put out for my rich visiting Uncle and Aunt in the 60’s.
I figured i should give it a try, as some people swear by percolator coffee ( as above). I also once dated a German nanny in the 80’s who worked for this wealthy family who used an aluminum camp style stove top percolator for even their guests ( mind you it never made it to the table).
As I watched the pot work it’s magic today for the first time, i noticed it took forever to come to a boil ( something I’m sure was not the aluminum version’s problem). I then wondered “what if i keep the percolator gadgets out of the pot, bring the water to a boil fast and then place in the coffee & percolator gadget once it boils”. That just seems like too much work & time.
I thought the magic of these things in the 50’s was the fact that you put it on the stove at 7:30am and came back for coffee at 8:00am. Is that roughly the time it takes? Kinda’ long – but i’m willing to wait for the perfect coffee. Also do I have to watch it constantly to regulate the heat?
The best home made coffee i had recently was from a press…but it was not hot.
Would love to experience the magic and joy of percolator coffee.
any thoughts would be welcome
cheers
Sadie, avoid the glass stove top percolators. Unless you are extemely careful, you will break it. If you can find stainless steel, make that investment. I’d also avoid enameled steel, it tends to crack and chip.
I want to purchase stove top percolator, what I read the glass top breaks after a few uses.
Sindy, I just brought my percolator to Ace and they fixed me up with a cord!
Finally, I am glad to see that there are still people who know what to expect from a cup of coffee. Drip coffee makers do not make good coffee; percolators do. My experience is that the type of percolator matters not – electric or stovetop are both excellent. The type of coffee and how much or little is used is the key. It is the coffee you taste, not the percolator. Drip coffee is this: the water drains through the coffee once and that’s it. Yuk. With percolated coffee the water keeps going through the coffee grounds long enough to get the flavor.
Sindy, most coffee makers, especially the larger ones, use a standard countertop kitchen appliance cord. These can be found at most older hardware stores. These same cords can be found on lots of older appliances, from waffle irons to griddles. Check the yellow pages for the oldest hardware store in your city. Sears used to carry them, too.
I don’t have a question about coffee or making it.
I am trying to find a replacement cord for my GE 42-cup coffee urn! Can anyone help? I’ve looked all over the internet, and had no luck. Thank you
Alison, it all depends. Most electric percolators have a warming heater after the percolating cycle is complete. But if you’re going to empty the pot quickly or if you don’t need hot coffee all day, unplug it. The percolator, being virtually sealed, will keep the coffee fresh for about a day, sometimes two. I personally like to unplug. The microwave heats the coffee later that day and I save a little energy.