Quick verdict
Steaming milk at home is much easier than the cafe ritual makes it look. The three things that actually matter:
- Start cold. Cold milk straight from the fridge holds foam better than warm or room-temperature milk.
- Texture before temperature. Stretch the milk (incorporate air) in the first 5 to 10 seconds, then submerge the wand fully to heat and roll the milk into smooth microfoam.
- Stop at 140-150°F (60-65°C). Hotter than that destroys the sweetness and scalds the proteins. If the pitcher is too hot to hold, you have gone too far.
The barista mystique around milk steaming is mostly theater. The actual technique is simpler than the cafe choreography suggests, and you can get to 90 percent of cafe quality at home with about a week of practice on whatever espresso machine or milk frother you own. The remaining 10 percent (the latte-art-on-Instagram tier) takes longer, but the foam itself does not.
This guide covers the four pieces of equipment that work for home steaming, the three steps that actually matter, the sensory cues that separate good foam from clumpy bubbles, and the most common mistakes that produce bad cappuccinos.
What you need
You can steam milk at home with four different equipment categories, in roughly increasing order of foam quality:
Handheld electric frother ($10 to $25). The little battery-powered whisks that look like miniature blenders. They cold-foam milk well, but they do not heat it. You either heat the milk separately or use them on already-warm milk. Good for adding texture to drip coffee or making bulletproof-style drinks. Not capable of cafe-grade microfoam.
Standalone electric milk steamer ($30 to $100). Countertop appliances like the Nespresso Aeroccino or various competitors. Heat and froth in a single button press. Produce decent foam consistently with zero technique required. Limited control over texture, but the result is good enough for daily cappuccinos and lattes.
Steam wand on a home espresso machine ($100 to $2,000+). The most versatile option and the one this guide focuses on. Real steam under real pressure, with full operator control over texture and temperature. This is what cafes use, and the technique transfers between every machine in the category.
Stovetop steamer with milk pitcher ($20 to $40). Manual pitchers with a steam-generating bottom chamber that you heat on a stove. Functional but slow and harder to control than electric options. Reasonable for occasional use.
For everything below, the technique discussion assumes a steam wand on an espresso machine. The principles apply to other equipment but the timing and movement specifics will differ.
The three steps that actually matter
1. Use the right milk and the right pitcher
Whole milk steams best because the fat content gives the foam structure and creaminess. 2 percent works but produces thinner foam. Skim milk produces large stiff bubbles rather than smooth microfoam. Plant milks vary widely; oat milk (specifically the barista-blend versions) and soy milk both steam well. Almond milk is the hardest to work with and rarely produces smooth foam.
Start with cold milk straight from the refrigerator. Cold milk holds foam better because the proteins denature more gradually during heating, producing smaller, more stable bubbles.
Use a stainless steel pitcher sized appropriately to your drink. For a single cappuccino or latte (8 to 12 ounces of finished drink), a 12-ounce pitcher works. Fill to just below the bottom of the spout, never more than half full. There needs to be room for the milk to expand as foam forms.
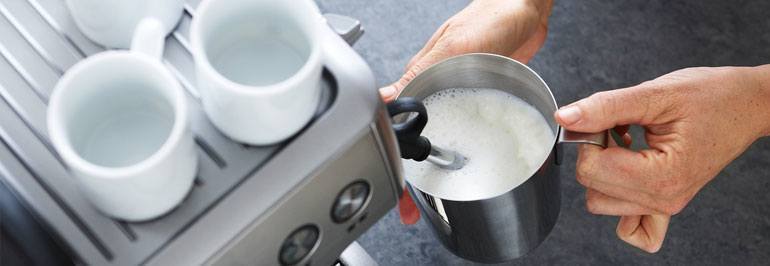
2. Stretch first, then roll
This is the core technique. Milk steaming has two phases, and getting them in the right order is the difference between cafe-quality and amateur foam.
Stretching phase (first 5 to 10 seconds): Position the steam wand tip just below the surface of the milk. You should hear a soft “ssss” or paper-tearing sound as air gets incorporated. The milk should rise visibly as foam forms. This is when air enters and the foam volume builds. If you hear loud sputtering or splashing, the wand is too high. If you hear a deep gurgling without any foam forming, the wand is too deep.
Rolling phase (remaining time): Once the milk has expanded by about 30 to 50 percent (depending on whether you want a cappuccino’s heavier foam or a latte’s thinner foam), lower the pitcher so the steam wand is fully submerged and angled to create a whirlpool. The milk should swirl visibly. This phase incorporates the foam into the milk, breaking up any large bubbles and producing smooth microfoam. It also continues heating the milk to the final temperature.
The whole process should take 20 to 30 seconds for an 8-ounce pour, longer for larger amounts.
3. Stop at the right temperature
Properly steamed milk peaks in flavor and texture at 140 to 150 degrees Fahrenheit (60 to 65 degrees Celsius). Past that point, the milk sugars start breaking down and producing the burnt, off-sweet flavor that ruins so many home cappuccinos. The proteins also start coagulating, which destroys the smooth microfoam texture.
The simplest temperature gauge is your hand on the pitcher. When the pitcher becomes uncomfortable to hold (but not yet painful), you are at roughly 140 to 150 degrees. If you can keep your hand on it indefinitely, the milk is not hot enough. If it is painfully hot, you have overshot.
A pitcher-clip thermometer takes the guesswork out of this entirely and costs about $15. Worth the investment if you are early in the learning curve.
Sensory cues to dial in your technique
The four senses tell you everything you need to know about how a steam is going.
Listen. The sound profile changes through the steam. Stretching should sound like soft tearing or hissing. Rolling should sound like a smooth whoosh. Loud sputtering means the wand is too shallow; deep gurgling means it is too deep; squealing means the milk is overheating.
Watch. Look for a swirling whirlpool during the rolling phase. If the surface is choppy or has visible large bubbles, the foam is breaking down. Smooth and glossy means you are doing it right.
Feel. Use the pitcher temperature as your stop signal. The position of the wand tip is also better calibrated by feel than by visual measurement once you have done it a few times.
Taste. The finished milk should taste noticeably sweeter than cold milk because heating converts some of the lactose into more easily perceived sweetness. If the milk tastes flat or burnt, the temperature was wrong. If it tastes thin, the stretching phase was too short.
The most common home steaming mistakes
Starting with warm milk. Pre-warming the milk seems efficient but eliminates the temperature buffer that gives you time to build foam before the milk overheats. Always start cold.
Forgetting to purge the steam wand. Most espresso steam wands accumulate condensed water in the wand between uses. Crack the steam open for one or two seconds before inserting the wand into the milk to expel the water. Otherwise, the first burst of steam will be 50 percent water and dilute the foam.
Filling the pitcher too full. The milk needs room to expand. Fill to no more than half full at the start; the foam will bring you to roughly three-quarters by the end.
Skipping the wipe-down. Wipe the steam wand with a damp cloth immediately after every use and purge the steam for one or two seconds to clear residual milk from inside the wand. Dried milk on the wand becomes a stuck-on cleaning nightmare within hours and a bacterial concern within days.
Overshooting temperature out of caution. Beginners almost always overheat milk. If you are unsure when to stop, stop slightly earlier than you think. Underheated milk can be heated more if needed. Overheated milk cannot be saved.
Frequently asked questions
Can I steam milk without an espresso machine?
Yes. Standalone electric milk steamers (Nespresso Aeroccino and similar) produce good foam without needing an espresso machine. Handheld electric frothers paired with separately heated milk also work. The foam quality from these alternatives is good enough for daily home use, though not quite at espresso-wand-on-a-real-machine level.
What temperature should milk be for a cappuccino versus a latte?
The same temperature for both: 140 to 150 degrees Fahrenheit. The difference is in foam volume and texture. A cappuccino has roughly equal parts espresso, steamed milk, and foam, with the foam being airier and standing up on top. A latte has more steamed milk with a thinner layer of foam, and the foam is smoother and more integrated into the milk.
Why does plant milk steam differently than dairy?
Different proteins and fats. Dairy milk proteins (casein and whey) and milk fat produce particularly stable foam structures when properly stretched. Most plant milks have less of either component, producing less stable foam. Barista-blend versions of oat milk and soy milk are formulated specifically to compensate, with added fats and stabilizers that produce dairy-comparable foam. Standard supermarket plant milks usually do not.
How do I clean my steam wand?
Every time you steam milk: wipe the wand with a damp cloth immediately, then purge steam for one or two seconds. Every week or two: remove the wand tip (most are unscrewable) and soak in a milk-residue cleaner like Cafiza Milk Frother Cleaner. Run hot water through the wand internals after soaking. Skipping this routine produces a steam wand that smells like sour milk within a month.
Can I make latte art at home?
Yes, with practice. Properly textured microfoam is the prerequisite (about 80 percent of latte art difficulty is foam quality, not pouring technique). Once you can consistently produce smooth, glossy milk with no large bubbles, basic pours like a heart or rosetta are achievable within a few weeks of regular practice. The detailed designs you see on professional barista Instagrams take longer and require a machine with very consistent steam pressure.
The barista skill is real but the gap is narrower than the marketing suggests. Three or four weeks of daily practice gets most people to cappuccinos that would not be out of place in a small neighborhood cafe. The remaining gap to a flagship-cafe pour is mostly about machine consistency, not about a secret you do not know.
Discussion 12
we have many coffee shops in my little burg in Iowa. The worst has to be a Starbucks because their coffee is bitter roasted and then not well made. I love those mom/pop shops that make a little cup of heaven each morning for me.
Thanks for the tips on making my own foamed milk. I can now make my oen cup of heaven at home!
I agree with BKM, last time I got to starbucks I ended up with dishsoap as well! It is unbelievable how there are so many informative coffee websites, which tells you in detail how to froth milk, and yet those people who is actually working in the industry still do not know how to make a decent coffee.
2% is best for forming foam; better than skim or whole. Nevertheless, whole milk tastes better and has more nutrition. If a person needs to lower their fat intake for health reasons, it’s good to know that good micro-foam can make even lowfat milk taste wonderfully sweet. The lactose in milk is a form of sugar and heating and foaming it really brings out the sweetness of the lactose. Soy products are usually sweetened with sucrose. Besides sweet lactose, soy also lacks significant calcium, so that’s added as calcium carbonate (Tums) along with some vitamins. The solubility and digestability of those forms are probably not as good as that of the nutrition in milk.
The problem is those kids at Starbucks don’t know how to steam milk. In fact, this very thing is one which Howard lectured every single one of them on last year in (video) person. Howard gets it. A whole lot of the baristas don’t get it. What I get, is dishsoap!
You’ll get a better foam if you use a non fat skim milk rather than your full fat whole milk. If you really can’t stand skim try 2%, but honestly the texture you get from a good steaming will cover up for the sleight difference in taste you may (but probably wont)taste, especially if you are adding something to the milk after.
Use cold, full fat, milk. Put the steamer wand only submerged in the top of the milk, to the side of the jug to create a whirl pool effect. Turn the steam onto FULL. Use your hand to feel the bottom of the jug – until it is too hot to touch. If milk smells like marzipan then you’ve burnt it! (Steamed too long). Create smooth, bubbless, “cream” topping to create real cappaccino and latte art. Let the jug stand for 30 seconds or so – this will allow the “cream” to form/bulk up more. Visit utube for lots of videos showing you how.
when i steam milk i cant get it to foam, it just bubbles and and stays watery. what am i doin wrong? what do i need to do different?
Hey Ada,
Check out Ebay. There is one member that sells them: kiwi-in-newyork. Or search “stove top cappuccino”
Hi Ada Suzer, I know just where to get what you’re looking for! In Selfridges in London, we have one and are looking to buy a new one on since the rubber ring that seals the steam in has cracked… However, this is a great milk steamer and the milk gets so fluffy it tastes like whipped cream! Good luck!
Dear writer,
You are so great in making coffee! I have some trouble in making the coffee at home. I bought the fresh milk and full cream milk to try at home to make capuccino. I try to get the milk foam same as on the internet but it doesnt because too watery.I can see their milk are high concentration, is it they mix up something inside?
Coffee too, my coffee coming out from espresso machine is watery, but why they can make it like creamer?
Thanks and pls give me some advice.
From Neo
Penang,Malaysia
I’m looking for a stove top milk steamer, not one of those plunger foamers….. but the ones where the steam shoots out like a jet engine taking off…. I used to have an old-fashioned one, but can’t find them anymore. Any info of where to get it would be appreciated. Thanks.
THANK YOU!! I got clumpy milk today!! UGH!!!!!